Guide
How to Make Rules to Your Discord Server

There are a few of reasons why adding rules to your Discord server is vital. First and foremost, it contributes to the definition of the culture of your server. Having a rule that prohibits “hate speech” gives a safe atmosphere for people to converse in, for example,
Second, it establishes boundaries for your server’s operation. By establishing limits for your server, you will be able to define principles for how users should interact with one another. If you follow the instructions in this article, you’ll be able to customise your Discord server. Furthermore, you are not need to include any bots or to install any plugins.
Read Also: How To Turn Off Discord Overlay
How to add Rules to your Discord server
To be able to add rules to your Discord server, you must first enable the community option on the server. Following the activation of the community function, you will be able to configure the server rules.
If you’ve validated your email address and your server complies with the media content filter criterion, the community function will be made available to you. The functionality enhances the administrative capabilities of your server. This contains features such as a welcome screen, server insights, membership screening, and other features as well. You’ll be able to add server rules to the membership screening tool after it’s installed. Before anybody can become a member of your server, they must first read and agree to the rules that have been established.
The following steps will show you how to add rules to your Discord server:
- Enable community
- Set up server rules
- Enable your changes
1. Enable community
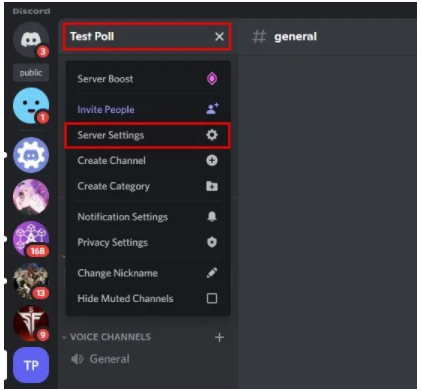
The first step is to make sure that your server has the community functionality enabled. To begin, launch Discord on your computer’s desktop and log into your existing account. Then, go to your Discord server and sign in. After that, click on the name of your Discord server. After you’ve clicked on the name of your Discord server, a navigation drawer will appear on your screen. There are a variety of settings available in the navigation drawer. Included in this category are “Server Boost,” “Invite People,” “Server Settings,” and others. To access your server settings, select “Server Settings” from the drop-down menu.
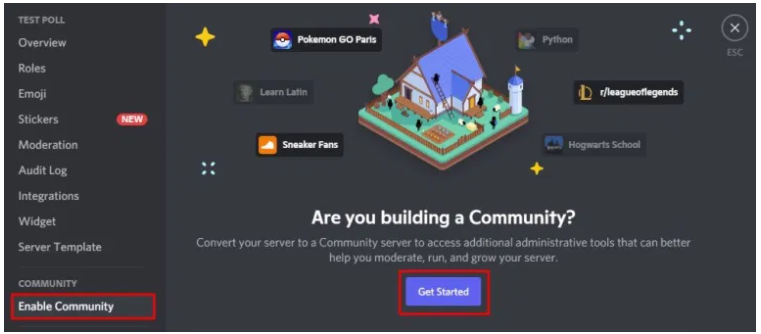
Following your selection of “Server Settings,” you will be sent to the “Server Overview” page. You’ll find a variety of alternatives in the left-hand sidebar. This covers sections such as “Overview,” “Roles,” “Emoji,” and others. Make a selection under the “Community” header and then click on “Enable Community.”
In addition, the community feature provides administrative tools to your server, such as the ability to configure server rules. Simply click on “Get Started” to begin the process of configuring the community feature on your server.
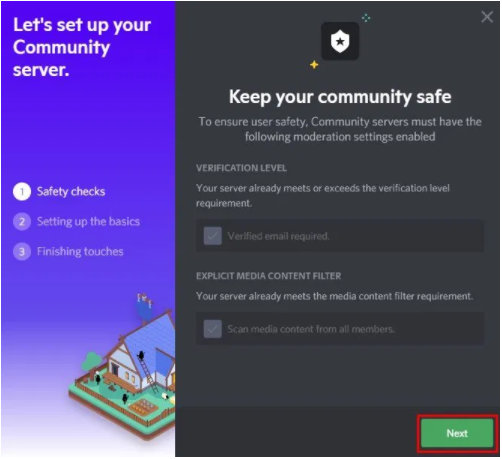
It will be necessary for you to set up your community server after you have clicked on “Get Started.” The first step in configuring your community server is to perform security tests. You must have a valid email address in order to use the community function.
In addition, your server must match the requirements for the media content filtering system. Please verify your email address if you have not already done so by going to your account settings and clicking on “Verify.” Afterwards, check your mailbox and confirm your email address by clicking on the “Verify Email” button.
To advance to the next stage, make sure that you’ve previously validated your email address and that your server satisfies the media content filter criteria by clicking on “Next.”

The second stage is to get the fundamentals in place. As a community server, you must have a channel for rules and guidelines, as well as a channel for community updates. Choose “Create a new channel for me” if you do not already have both of these channels set up. The option to “Create one for myself” should be selected by default in this case. If, on the other hand, you already have those channels, you may pick them from the dropdown box. To go to the last stage, select “Next” from the drop-down menu.
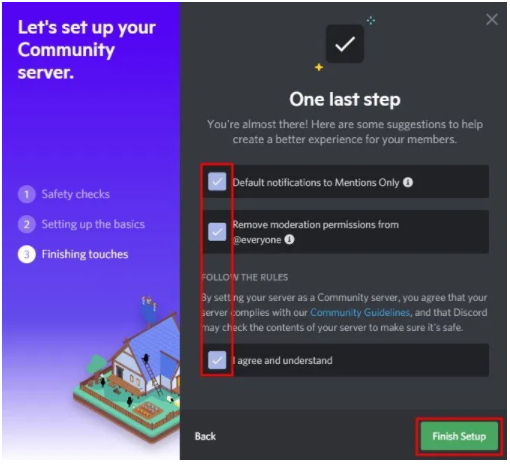
After you’ve selected “Next,” you’ll be sent to the “Finishing touches” section of the process. In order to set up your community server, you must complete the following steps:
Three checkboxes will be available to you at this phase. This contains options such as “Set notifications to be sent only to Mentions,” “Remove moderating rights from @everyone,” and “I agree and comprehend.”
To finish the setup, you need to check all of the checkboxes. This is to create a better experience for your members. Lastly, click on “Finish Setup” to finish the setup.
2. Set up server rules
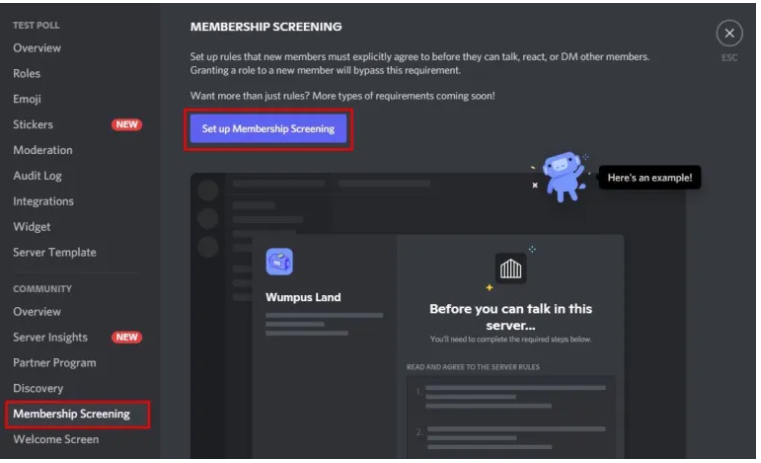
Having activated the community function, you’ll be able to customise your server by adding rules to it. To begin, select “Membership Screening” from the drop-down menu on the left sidebar. The Membership Screening tool will be launched as a result of this action.
New members must agree to your server regulations before they can join your server, and you may use the Membership Screening tool to make this happen. To set up Membership Screening, select “Set up Membership Screening” from the drop-down menu.
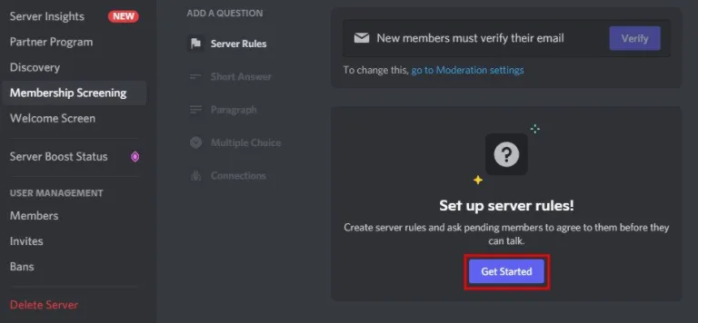
Following your selection of “Set up Membership Screening,” you will be presented with the “Server Rules” option. You may use this feature to define server rules and need pending users to agree to them before they can begin chatting. To begin adding server rules, click on the “Get Started” button.

Following your selection of “Get Started,” the “Server Rules” page will be shown. Fill in the blanks on the page with the rules that you wish to implement on your Discord server. To add another rule, select “Add a rule” from the drop-down menu. Alternatively, you may utilize the sample rules by just clicking on them. Once you’ve finished adding the rules, click on the “Save” button to keep them in place.
3. Enable your changes
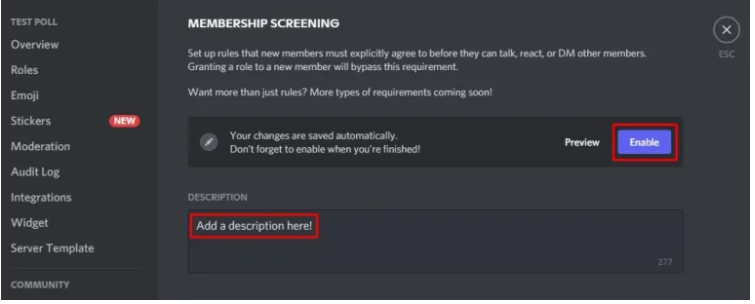
Your rules will be stored when you have clicked on the “Save” button. However, they have not yet been activated. You must first provide a description of your server in order for them to be enabled. Without providing a detailed description of your server, you will not be able to allow your modifications.
Describe what your server is all about in the “Description” section of the form. When new users join your server, they will be able to access this information. You’ll be able to enable your modifications when you’ve completed the process of adding a description to your server. To make your changes effective, click on “Enable.” You’ve completed the process of adding rules to your Discord server!
Video

Vampire Crawlers Coin Farming Guide

Forza Horizon 6 Performance: Why 60 FPS Is Still the Console Standard

Yoshi and the Mysterious Book (2026) – Full Completion Guide, Rewards & Secret Ending

How to Get Free Pets in Adopt Me: A Guide for Players

Roblox Username Generator – Create a Cool & Unique Username in Seconds
How to Get Free Pets in Adopt Me: A Guide for Players
Yoshi and the Mysterious Book (2026) – Full Completion Guide, Rewards & Secret Ending
Forza Horizon 6 Performance: Why 60 FPS Is Still the Console Standard


