Gaming
How to Allocate More RAM to Minecraft
“Minecraft” has the potential to be astounding in its scale — especially if you’ve loaded modifications and texture packs to improve the visual quality. However, the larger and more beautiful your “Minecraft” world is, the more RAM it will require to function properly on your computer. Furthermore, if the game is not given adequate RAM, it may load slowly, frames will stutter, and the game may potentially crash as a result.
Fortunately, a remedy can be found. There are numerous possible methods for increasing the amount of RAM available to “Minecraft,” each of which is quite basic and uncomplicated. In addition, if you operate your own “Minecraft” server, you may allot extra RAM to it, allowing for more players to play on the server at the same time, increasing its capacity.
Here’s an overview of every method of increasing the amount of RAM available to ‘Minecraft.’
Read Also: How to Breed Parrots in Minecraft
How to Allocate more RAM to ‘Minecraft’
To alter the amount of RAM that “Minecraft” may consume, you must first modify the settings of the Minecraft Launcher application. Minecraft’s launcher software is the programme that allows you to start the game.
Depending on the type of modifications you have loaded, you may want to use a different launcher software than the default one. We’ll go through three of the most common ones, starting with the normal “vanilla” launcher that the majority of users are familiar with and comfortable with.
Allocating RAM using the default ‘Minecraft’ launcher
If you’re acquainted with the game “Minecraft,” it’s likely that you’re also familiar with the default launcher programme for the game, which is named “Minecraft Launcher.” Learn how to reallocate RAM by using this command.
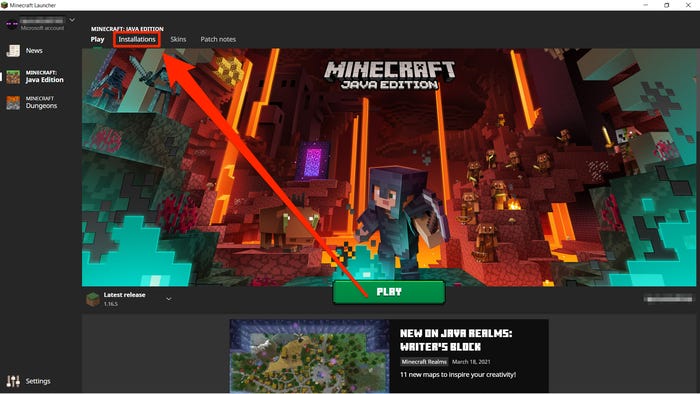
1. Launch the Minecraft Launcher and navigate to the “Installations” option at the top of the screen.
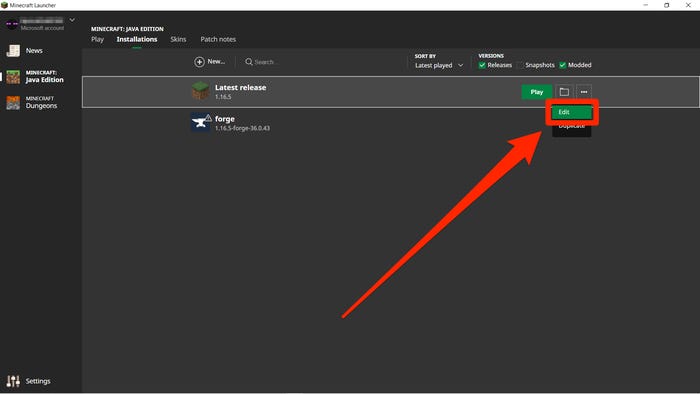
2. To assign RAM to a certain “Minecraft” version, first scroll your mouse over it with your cursor, then click three dots on the right and pick “Edit.”
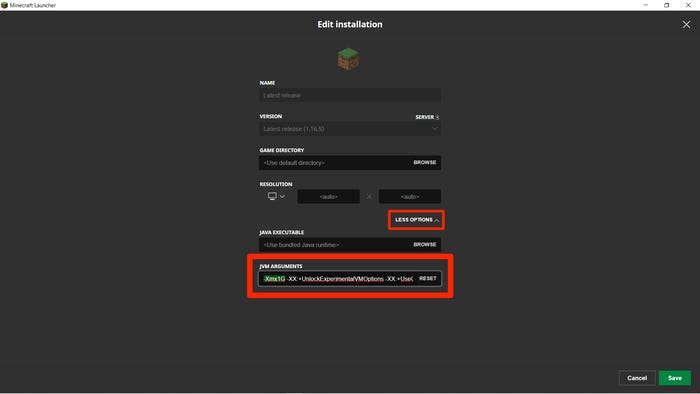
3. To see two extra options, select “More Options” from the drop-down menu in the lower right corner of the screen.
4. At the beginning of the “JVM Arguments” field, there is a piece of code that says “-Xmx2G” or something similar — the “2G” denotes how many gigabytes of RAM “Minecraft” is currently capable of utilizing (in this case, 2GB). Change the value to alter the amount of RAM that is allotted. The remainder of the content should be left alone.
5. Tap “Save” to finalize your changes.
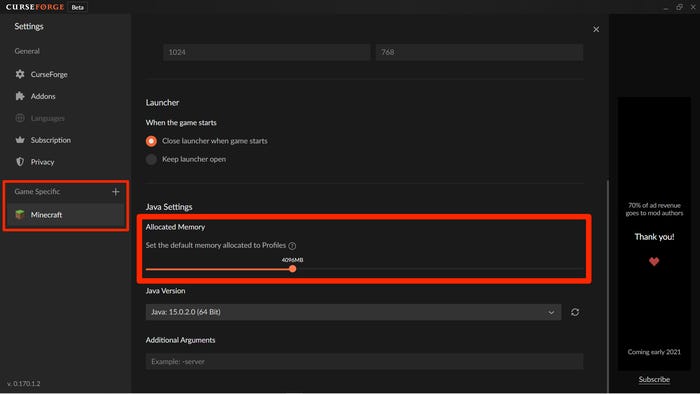
Allocating RAM using the CurseForge ‘Minecraft’ launcher
1. Open the CurseForge application. By selecting the gear symbol in the lower left corner of the screen, you may access the “Settings” menu.
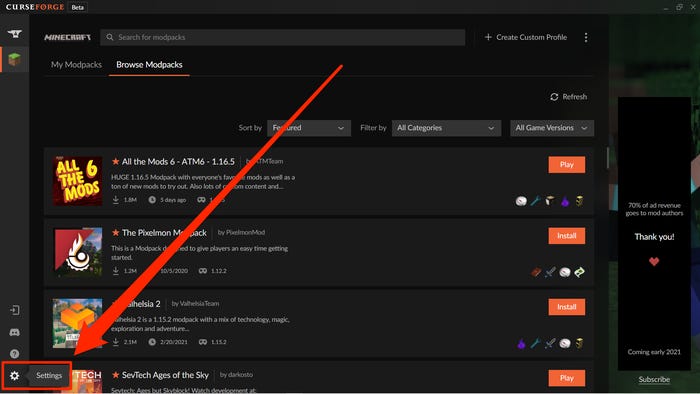
2. In the left-hand column of the settings page, there is a section labelled “Game Specific.” Choose “Minecraft” from the drop-down menu.
3. Continue to the bottom of the page to “Java Settings,” where you’ll see a slider for “Allocated Memory.” You may now select your preferred RAM allocation by dragging and dropping the orange ball on the slider to the desired position. It will be immediately saved if you make any changes.
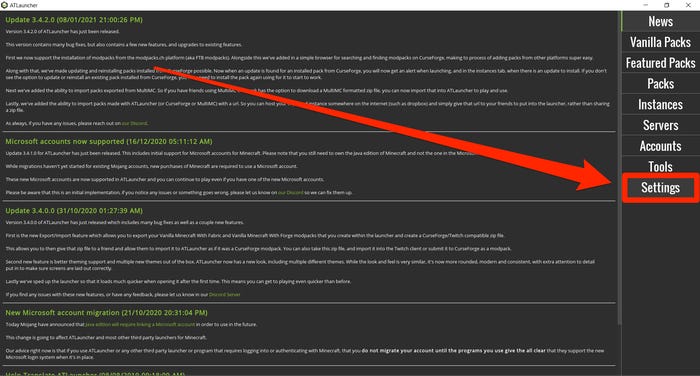
Allocating RAM using the ATLauncher ‘Minecraft’ launcher
1. Launch the ATLauncher and select “Settings” from the right-hand menu bar.
2. The top of the settings page will have a number of tabs to choose from. Select the “Java/Minecraft” tab from the drop-down menu.
3. You’ll see a list of attributes that can be changed. The second item on the list is for “Maximum Memory/RAM,” and that is the figure you’ll want to raise as much as possible. Because it’s given in megabytes, keep in mind that 1024MB equals one gigabyte.
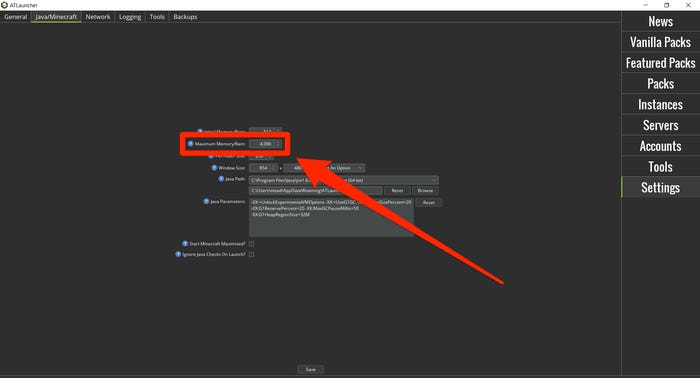
4. After you’ve adjusted the max RAM, make sure you click “Save” at the bottom to confirm your changes.
Video

Vampire Crawlers Coin Farming Guide

Forza Horizon 6 Performance: Why 60 FPS Is Still the Console Standard

Yoshi and the Mysterious Book (2026) – Full Completion Guide, Rewards & Secret Ending

How to Get Free Pets in Adopt Me: A Guide for Players

Roblox Username Generator – Create a Cool & Unique Username in Seconds
How to Get Free Pets in Adopt Me: A Guide for Players

Grow a Garden Recipes in Roblox: Guide to Cook (Donuts, Sushi, Pie, Pizza & More!)
Roblox Username Generator – Create a Cool & Unique Username in Seconds
Yoshi and the Mysterious Book (2026) – Full Completion Guide, Rewards & Secret Ending


