Apple
How to Authorize a Mac on iTunes or Apple Music

When you open the Music app on your Mac, it will automatically log you in with the same Apple account that you used to set up the app in the first place. Even while this is sufficient for you to browse and stream content from Apple Music, you won’t be able to play songs that you’ve purchased from iTunes or songs that are stored in your iCloud Music Library because you won’t have access to them. This is because you must first add your Mac to the list of authorized devices that can play content from your library. After doing so, you will be able to play whatever you want from your library. This article will walk you through the steps of authorizing an Apple Music or iTunes account on a Mac computer. So let’s get started:
Read Also: How to Clear the ‘Other’ Storage on Your Mac
How to Authorize a Mac on iTunes or Apple Music
Launch the iTunes or Apple Music application on your Mac and select Account from the app’s menu bar to complete the authorization process. The next step is to select the Sign In option and provide your Apple ID along with your password. Click Account once again, then hover your mouse over Authorizations, and then click the Authorize This Computer button.
1. Launch either the Music or iTunes application on your Apple Mac. Both of these can be found in the Applications folder on your computer, but which one is there depends on the version of macOS you are using.

2. Then, select the Account tab. After selecting the application, you will notice that this appears in the Apple Menu Bar at the very top of the screen.
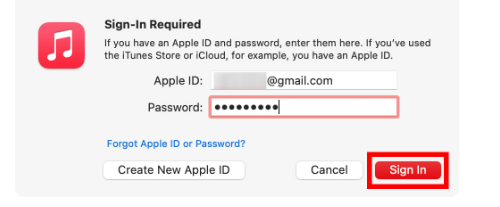
3. Next, select the option to Sign In.

4. The next step is to click the Sign In button after entering your Apple ID and password. Click the “Forgot Apple ID or Password” link that will appear in the pop-up window if you have forgotten either your Apple ID or your password.
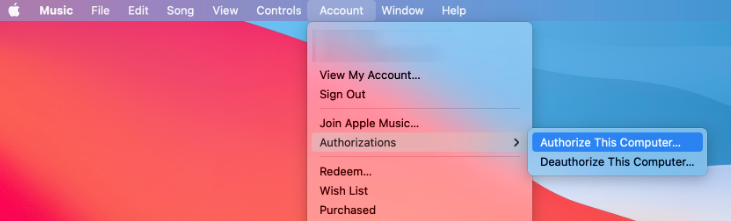
5. After that, select Account once more.
6. After that, move the cursor to Authorizations, and then click the Authorize This Computer button.
FAQs
Why is Apple Music saying my computer is not authorized?
You could also try using a different Apple ID to authorise your transactions.
It’s possible that you purchased the products you need to play with a different Apple ID than the one you normally use. To verify this, right-click the item, and then select Remove Download from the menu that appears. If you see the Remove Download option, this indicates that you are signed in with the Apple ID that was used to make the original purchase.
Why can’t i authorize my Mac?
The fact that you have an excessive number of computers that are already allowed is the root cause of the majority of authorization issues that arise. Because of restrictions imposed by licencing agreements, you are only permitted to have a maximum of five computers approved under your iTunes account at any given time.
How do I Authorize Apple Music content?
Select Account > Authorizations > Authorize This Computer from the drop-down menu within the Music app on your Mac. If it’s asked of you, enter the password for your Apple ID to confirm.
Why does my Mac keep asking me to authorize?
Is this a bug in Apple’s operating system or something else entirely? Repeated attempts to authorize a computer that has previously been authorized for recent store downloads is often an indication that the copies you downloaded are defective or incomplete. Remove from your library any songs that are unable to be played, but do not hide this action from your purchase history.

Vampire Crawlers Coin Farming Guide

Forza Horizon 6 Performance: Why 60 FPS Is Still the Console Standard

Yoshi and the Mysterious Book (2026) – Full Completion Guide, Rewards & Secret Ending

How to Get Free Pets in Adopt Me: A Guide for Players

Roblox Username Generator – Create a Cool & Unique Username in Seconds
How to Get Free Pets in Adopt Me: A Guide for Players
Yoshi and the Mysterious Book (2026) – Full Completion Guide, Rewards & Secret Ending
Forza Horizon 6 Performance: Why 60 FPS Is Still the Console Standard


