Guide
How to Change Read-only Files on Chromebook

Are you a proud owner of a Chromebook? Do you want to make changes to read-only files that are saved on your Chromebook? The next article will provide you with a solution to delete or alter the read-only marked files on your Chromebook. This article describes how to modify the read-only status of files on a Google Chromebook.
Read Also: How to Get Minecraft on Chromebook
What are read only Files?
The process of changing read-only files on a Chromebook is as simple as three simple steps. Read-only files are those that can only be read, opened, and renamed; they cannot be removed or deleted from the computer’s storage system. Chromebook organizes files into separate folders that are marked as read-only. This means that Chromebook users will not be able to simply erase any downloaded or saved data from their system.
Before you can delete read-only files from your Chromebook, you must first modify the attribute of the read-only files. In the absence of altering their attributes, you will be denied the ability to remove them from the Chromebook. So the first thing you’ll need to do is change the read-only files on your computer.
Why do Chromebook stores files as Read only Files?
Chromebooks store files in the cloud since they only have a limited amount of storage capacity. When you download anything from the internet or copy anything from an external device, the files are saved as read-only files to prevent them from being accessed by others. Thus, the system will find it easier to save the files on a cloud-based storage platform. Users will be prevented from mistakenly removing the files from their system as a result of this.
Those who have a limited amount of available space, on the other hand, may find the same feature to be rather inconvenient. They wish to delete the downloaded files from their Chromebooks on purpose, but they are unable to do so since the files are saved with a read-only attribute.
If you’re interested in learning how to modify read-only files on a Chromebook, the step-by-step instructions provided below will assist you in doing so successfully. Let’s see how it’s done, shall we?
Steps to Change Read-only Files on Chromebook
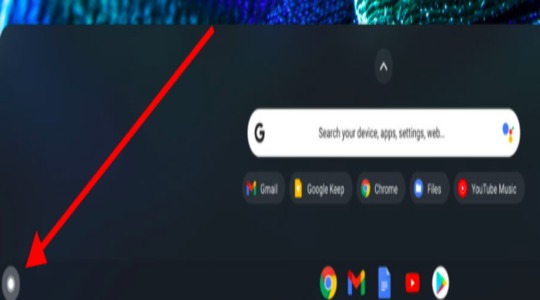
- After the Chromebook has been opened, launch the App Launcher on your computer. It is possible to locate the App Launcher icon at the bottom-left corner of the screen.
- From the list of available possibilities, select App Drawer as your preference. App Drawer is an application manager that displays a list of all the programmes that have been installed on the Chromebook. It is accessible via the Chromebook’s Start menu.
- This menu allows you to access the Files application. With the Items app, you can browse through photographs, videos, and other items stored on your Chromebook in a similar way to how you would with a traditional file manager.

- Now, select the file or folder to which you want to apply the read-only attribute and click on it to select it.
- Select the Properties option from the context menu by right-clicking on the file and selecting it from the context menu. The Settings option can be accessed by selecting the three dots in the top-right corner of the file and then selecting the Settings option from the drop-down menu.
- If you want to change the read-only attribute for a specific file, simply uncheck the read-only option in the Advanced Options menu for that file. You should close the window when you’re finished.
When it comes to updating the read-only files on your Chromebook, that’s all there is to it. It is possible to delete any type of file from the Chromebook by altering this attribute. This includes photographs, movies and other media files as well as documents and other media.
Video

Vampire Crawlers Coin Farming Guide

Forza Horizon 6 Performance: Why 60 FPS Is Still the Console Standard

Yoshi and the Mysterious Book (2026) – Full Completion Guide, Rewards & Secret Ending

How to Get Free Pets in Adopt Me: A Guide for Players

Roblox Username Generator – Create a Cool & Unique Username in Seconds
How to Get Free Pets in Adopt Me: A Guide for Players
Yoshi and the Mysterious Book (2026) – Full Completion Guide, Rewards & Secret Ending
Vampire Crawlers Coin Farming Guide


