Guide
How to Change Your Mouse Cursor in Windows

The mouse cursor is one of the most important elements of contemporary user interface design. Even if you’ve made the switch to a tablet or touchscreen device, such as Microsoft’s excellent Surface Pro series, there are times when you just need your trusty old cursor, especially on an operating system that is still heavily geared toward the traditional desktop environment (i.e., Windows).
However, this does not imply that you must continue with the default setting. Users who want to change the colour and size of their mouse cursor in Windows, whether for improved visibility or merely for aesthetic reasons, can follow our short guide on how to change your mouse cursor in Windows. Customizing individual images or installing themed packs is relatively simple when using one of the built-in Windows 10 “schemes,” which serve as collections of cursors for various tasks such as normal operation, text selection, hyperlinks, and so on. Users can also customise individual images or install themed packs.
Read Also: How to Fix Curser From Moving Around in Windows 10
How to Change Your Mouse Cursor in Windows
Changing the default cursor
The next parts will go over how to alter the default cursor on your computer.
Change mouse settings
To begin, you’ll need to make some adjustments to your mouse settings. Here’s how to do it.
Step 1: Navigate to the search box in the taskbar by clicking on it.
Step 2: Enter the word “mouse.”
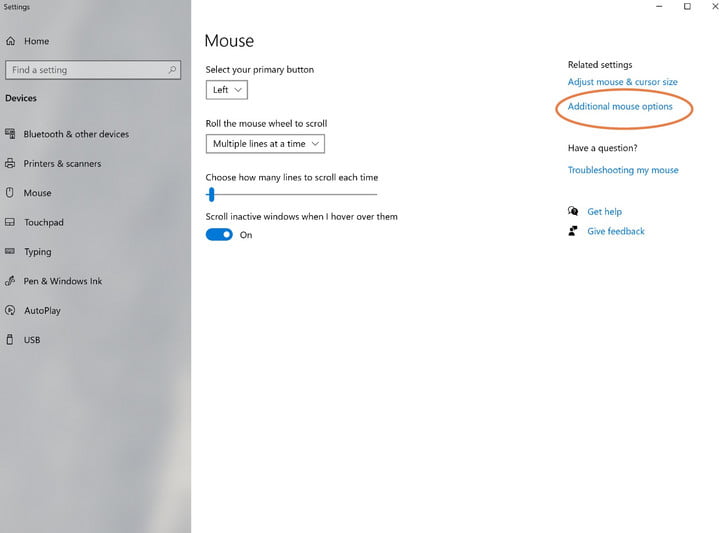
Step 3: From the list of alternatives that appears, select Change Your Mouse Settings to bring up the primary mouse settings menu for your computer.
Step 4: Select Additional Mouse Options from the drop-down menu.

Browse the available cursor schemes
Following that, you’ll be able to browse through several cursor schemes. Essentially, these are collections of static and dynamic images that are used to entirely replace the default “arrow” cursor and the tools that go with it. The majority of them are uninteresting but practical, and they have the standard Windows appearance. Several colour options are available, including white and black for the best contrast, as well as a range of sizes to accommodate varied screen resolutions and individuals with weak vision.
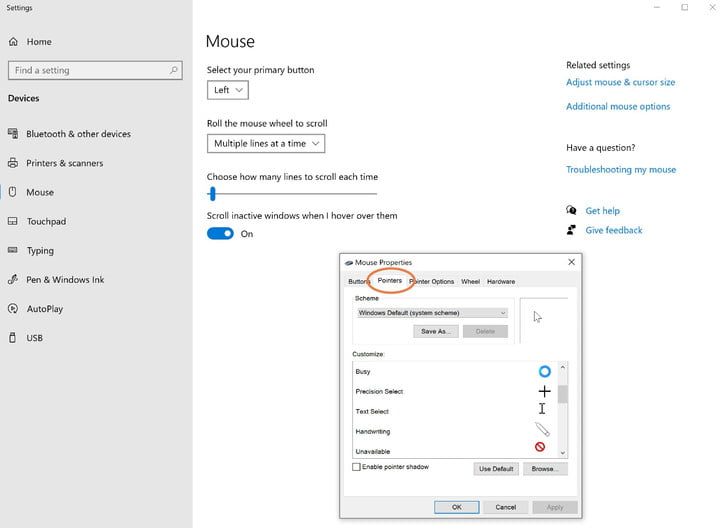
Step 1: To begin, navigate to and click on the Pointers tab in your mouse properties window, which will open. Scheme is the first of these options, and it is all that the vast majority of users will require.
Step 2: Select Scheme from the drop-down menu, and you’ll be presented with perhaps a dozen various cursor schemes.

Select and apply a scheme
After then, it’s time to make a decision. Here’s how to pick a scheme and put it into action.
Step 1: Select one of the schemes to see a preview of the cursors that will be used in that scheme. You can go back and forth between them to evaluate the colour and size.. The Inverted schemes are particularly useful for folks who have difficulty seeing the usual white pointer.
Step 2: Once you’ve found one that you like, click on it to make it permanent.
Step 3: To put the changes into effect, click OK.
Step 4: Return to the Mouse Properties menu if you need to make any other adjustments in the future.
Step 5: The Enable Pointer Shadow option allows you to add a cosmetic shadow to the cursor, which is interesting but not very useful in most situations.
Customizing cursors
If you really want to tailor your options, you can also look through a comprehensive collection of additional cursors for even more options.
Video


