Gaming
How to Create a Minecraft Texture Pack
Minecraft Texture Packs are a great way to change the look of your world, and they also allow you to put different things in the game. For example, say you wanted to make a block look like something else. You could change the wiping square into an alternate type of stone that is better for that particular block.
Consistently, Minecraft has remained consistent with its textures. New updates may give a couple of changes to textures, however generally, Minecraft maintains a classic and notable look.
How to make a custom resource pack in Minecraft?
Step 1.) Open .minecraft folder
The initial step of making a texture pack in Minecraft is to open the Create a Minecraft Texture Pack registry. On windows, open the start menu and type %appdata%. After this, hit enter and open the .minecraft envelope.
Step 2.) Extract texture pack files
The subsequent stage is to open the .minecraft catalog, prior to opening the “renditions” organizer. Inside this envelope, players should now open an organizer with the name of the Minecraft rendition they want to alter the texture pack for.
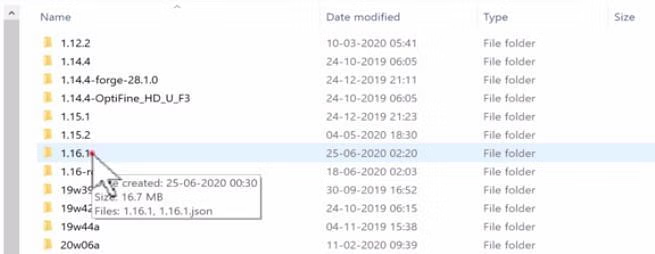
A jar document ought to be found inside this envelope, and players should right-click it and press “duplicate”.
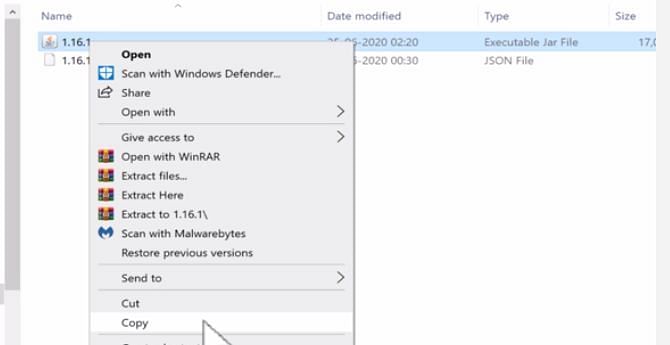
Players should now create another envelope inside the main .minecraft index. This new organizer can be named anything. Inside this organizer, the duplicated jar record should then be pasted.
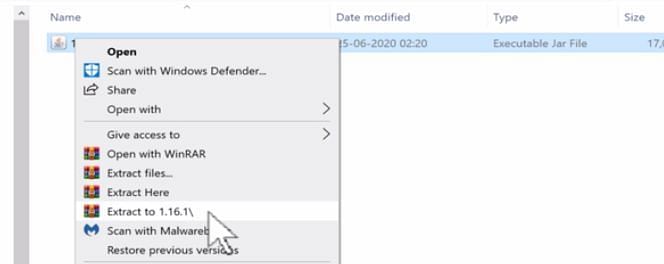
After this has been done, players need to right-tap the newly pasted jar document and press the choice named “extract to.”
Step 3.) Open textures folder
After everything has been extracted, players need to navigate to the textures organizer. This can be finished by going to assets – > minecraft – > textures
Inside this textures envelope, players can choose explicit textures they might want to alter.
Step 4.) Edit textures
Players can now alter any texture they might want just by right tapping the image record and opening the document with any image altering software. Microsoft paint will do fine and dandy much of the time, nonetheless.
After players are finished altering the texture as wanted, they should make certain to save the updated changes made.
Step 5) Create pack.mcmeta file
Navigate back inside the envelope with the base catalog of the as of late unfastened substance (the organizer with the variant number as it were). Another document should be Create a Minecraft Texture Pack inside here.
This can be finished by right-clicking inside catalog – > New – > Text Document
The accompanying should be composed inside the new text archive:
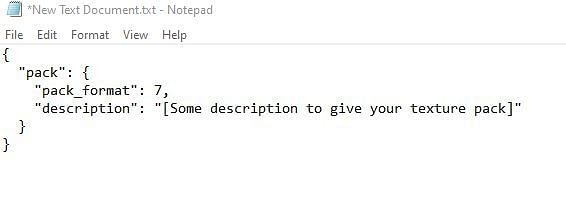
The pack_fomat number ought to be kept at 7 for variant 1.17, 6 for 1.16, 5 for 1.15 and so on.
Step 6) Save pack.mcmeta file
Presently this record should be saved with the exact name “pack.mcmeta” and with the sort “All documents” in windows, as seen underneath:

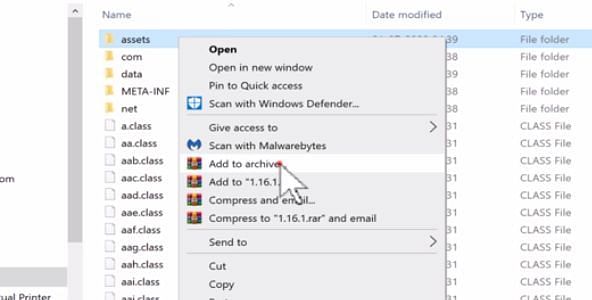
Step 7) Compile the resource pack
Once the pack.mcmeta document has been effectively saved inside, it’s an ideal opportunity to order the final item.
This can be done via holding the “ctrl” key and tapping the “assets” organizer and then. At that point (while as yet holding ctrl) tapping the mcmeta record. After this, players need to right-tap on one or the other document and press “add to archive”. Utilizing their zipping device (7 zip or winzip for example).
That’s it! If everything has been done effectively, players ought to have the option to install. The recently compressed record actually like any other texture pack out there.

Vampire Crawlers Coin Farming Guide

Forza Horizon 6 Performance: Why 60 FPS Is Still the Console Standard

Yoshi and the Mysterious Book (2026) – Full Completion Guide, Rewards & Secret Ending

How to Get Free Pets in Adopt Me: A Guide for Players

Roblox Username Generator – Create a Cool & Unique Username in Seconds
How to Get Free Pets in Adopt Me: A Guide for Players

Grow a Garden Recipes in Roblox: Guide to Cook (Donuts, Sushi, Pie, Pizza & More!)
Roblox Username Generator – Create a Cool & Unique Username in Seconds
Yoshi and the Mysterious Book (2026) – Full Completion Guide, Rewards & Secret Ending


