Guide
How to Disable VBS / HVCI in Windows 10 or 11
It’s possible that a security setting that’s enabled by default in Windows 11 and at least certain installations of Windows 10 could be responsible for up to 15 percent of the speed decrease experienced by some users. Windows is able to generate a secure memory enclave that is separated from hazardous code thanks to a technology known as virtualization-based security, or VBS. Hypervisor-Enforced Code Integrity (HVCI), which is yet another built-in capability, makes use of the capabilities of VBS to prohibit unsigned or dubious drivers and applications from entering memory. Even if malware is able to circumvent your antivirus program, the combination of VBS and HVCI provides an additional layer of defense that reduces the amount of harm it may cause. This article will walk you through the steps necessary to turn off VBS and HVCI on Windows 11 or 10. So let’s get started:
Read Also: How to Remove or Uninstall McAfee on Windows 11
How to Disable VBS / HVCI in Windows 10 or 11
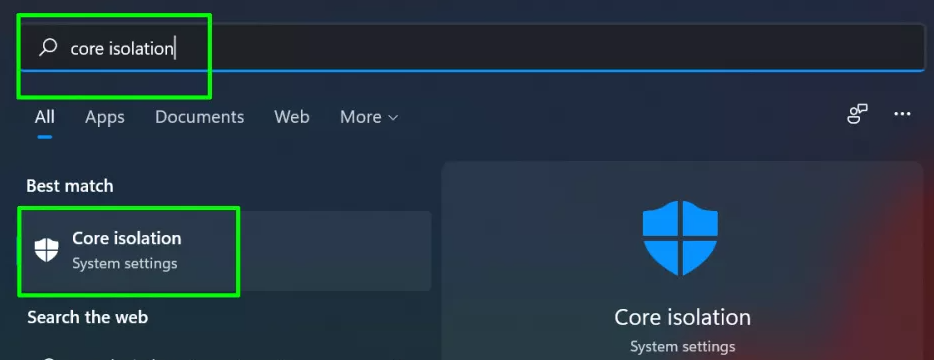
1. Use Windows search to look for “Core Isolation,” then select the first result that appears.
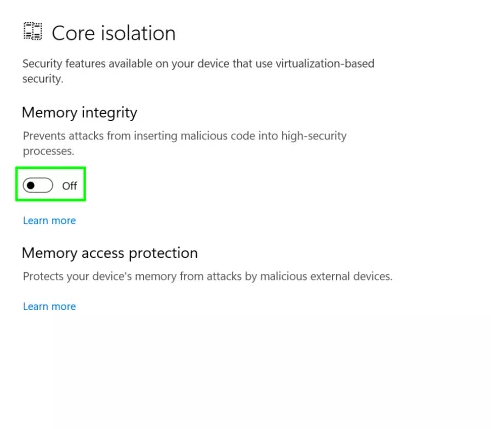
2. If Memory Integrity was active, turn it off by toggling the switch. If it is not turned on, proceed directly to step 6.
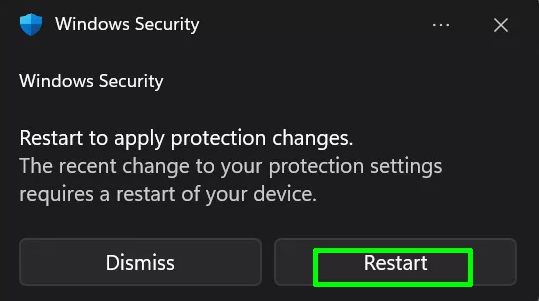
3. Restart your computer when instructed to do so.
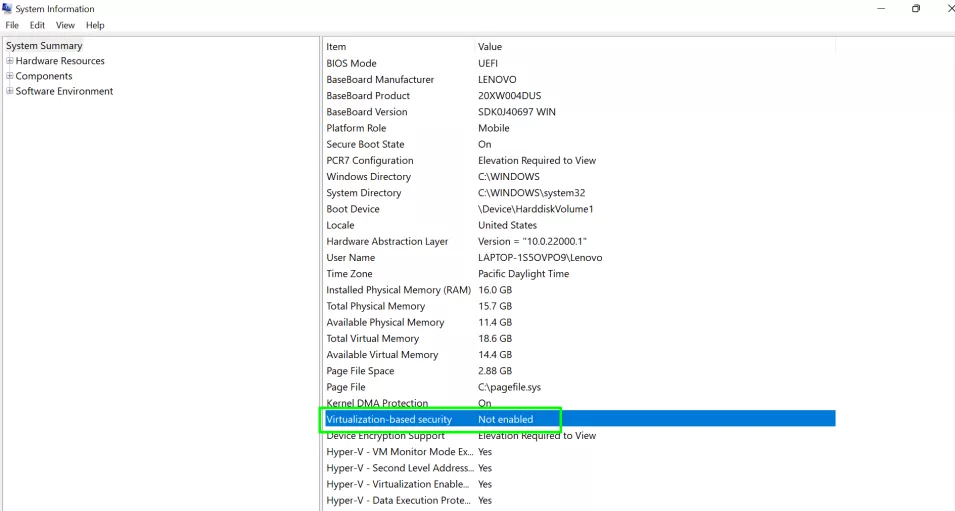
4. Perform a second check of the system details to determine whether or not virtualization-based security is marked as “not enabled.” If so, you are done. If this is the case, continue on to step 6, where you will turn off VBS in the registry.
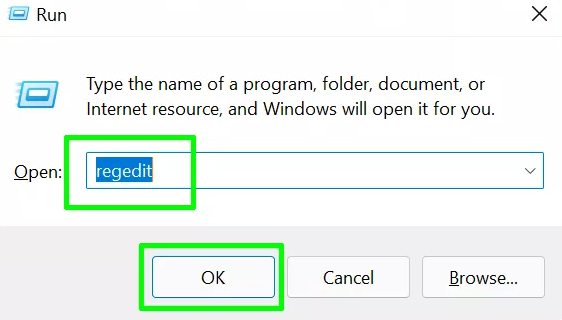
5. Open regedit. The quickest and easiest method is to press the Windows key and the letter R simultaneously, then type regedit into the box that appears, and then click OK.
6. Go to HKEY_LOCAL_MACHINE\System\CurrentControlSet\Control\DeviceGuard in your browser’s address bar.
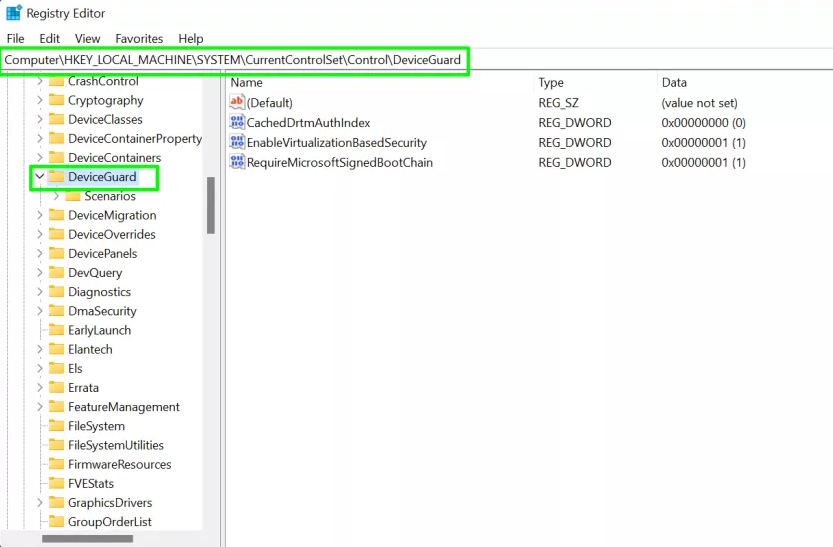
7. Navigate to the EnableVirtualizationBasedSecurity configuration file and change the value to 0.
8. Exit regedit and then restart your computer.
9. Return to the system information and examine if the Virtualization Based Security setting is still marked as “not enabled.”

FAQs
Should I disable VBS in Windows 11?
According to Microsoft, VBS lessens the damage caused by Kernel infections and other forms of malware. Disabling Virtualization-Based Security (VBS) is required in order to improve the overall efficiency of Windows 11 and to provide a fluid gaming experience.
What is Hvci Windows 11?
Memory integrity was first made available to the public as a component of Device Guard. It is also known as hypervisor-protected code integrity (HVCI) or hypervisor imposed code integrity. It is no longer necessary to use Device Guard, with the exception of locating memory integrity and VBS settings in Group Policy or the Windows registry.
Does Hvci affect performance?
Because current processors provide Mode-Based Execution Control (MBEC), the impact of VBS, and more specifically HVCI, is very minor.
What is Hvci mode Windows?
HVCI is an abbreviation that stands for “Hypervisor Code Integrity.” In Windows 10, the HVCI service examines code that is currently running in kernel mode in order to determine whether or not the code is reliable and has been developed securely. It provides defense against exploits as well as protection against vulnerabilities, including Zero-Day assaults.

Vampire Crawlers Coin Farming Guide

Forza Horizon 6 Performance: Why 60 FPS Is Still the Console Standard

Yoshi and the Mysterious Book (2026) – Full Completion Guide, Rewards & Secret Ending

How to Get Free Pets in Adopt Me: A Guide for Players

Roblox Username Generator – Create a Cool & Unique Username in Seconds

Bloxburg Neighborhood Codes 2026
How to Get Free Pets in Adopt Me: A Guide for Players

Grow a Garden Recipes in Roblox: Guide to Cook (Donuts, Sushi, Pie, Pizza & More!)

Job Opportunities in Dubai – 2026


