Guide
How to Enable the Telnet Client in Windows

In order to communicate with a device, a network protocol known as Telnet, which offers an interpreter for command lines, is utilised. It is used for remote management the vast majority of the time, but on occasion it is also used for the initial configuration of some devices, particularly network hardware such as switches and access points. Before any commands that are pertinent may be carried out in Windows 11, Windows 10, Windows 8, Windows 7, and Windows Vista, the Telnet Client must first be activated in the Windows Features section of the Control Panel. The Telnet Client on Windows can be Enabled in the Following Ways.
Read Also; How to Unzip Files on Windows 11
How to Enable the Telnet Client in Windows
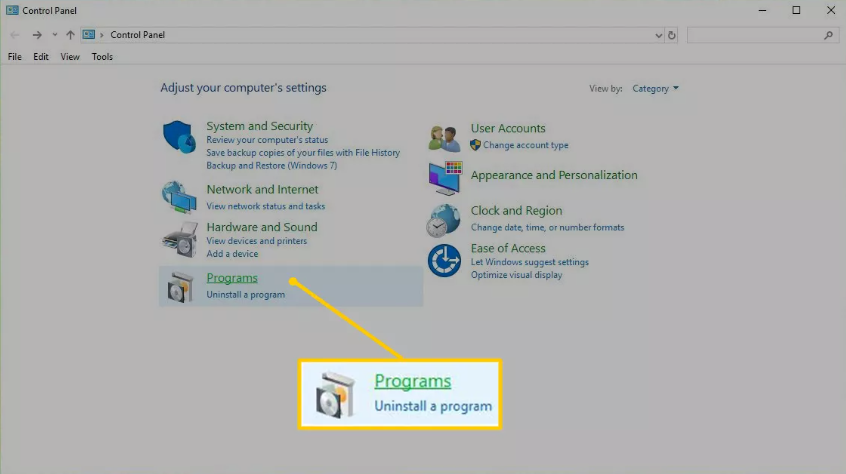
1. Start by going to the Start menu and searching for “control panel.” This will open the Control Panel. Alternately, you can press the Win key and the R key simultaneously to bring up the Run dialogue box and then type control after it.
2. Choose among the Programs. If you are having trouble seeing it because you are seeing the applet icons in the Control Panel, select Programs and Features instead, and then move on to Step 4 without further delay.
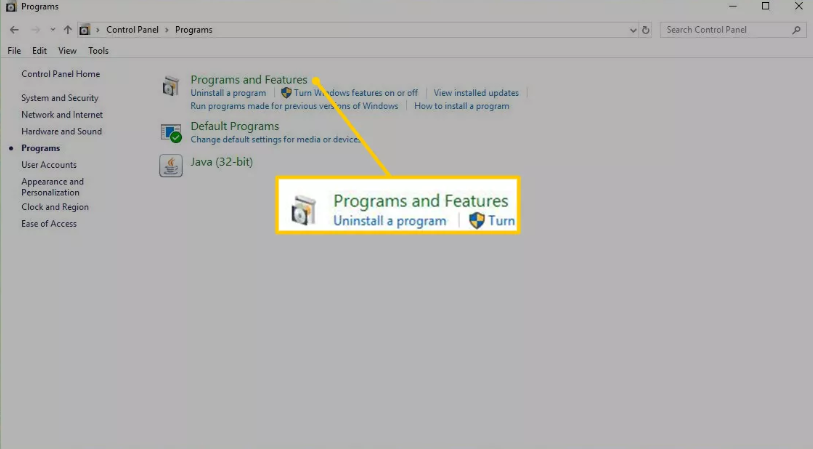
3. Make your selections under Programs and Features.
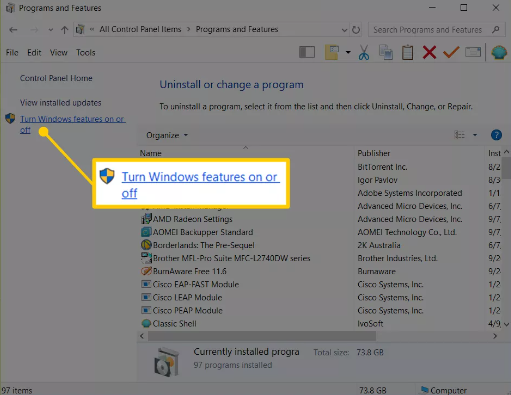
4. Choose whether you want to turn features of Windows on or off from the left pane.
5. Make sure that the box next to Telnet Client is checked.
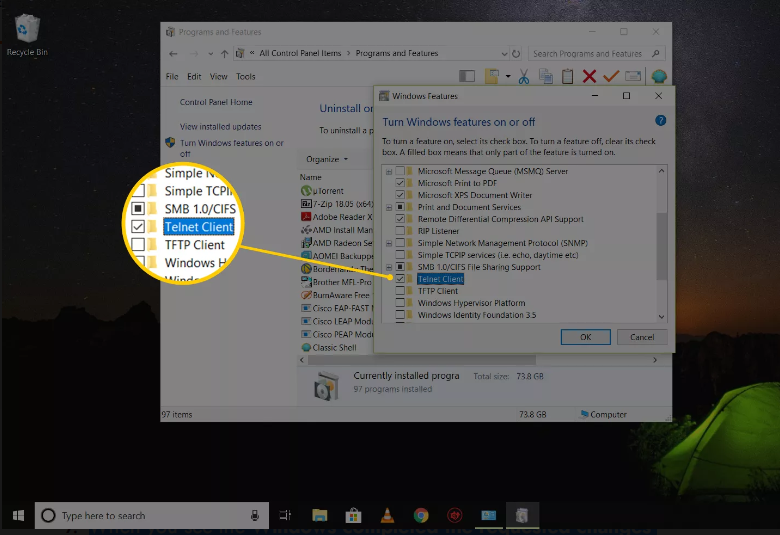
6. To activate Telnet, select the OK button.
7. When you get the notice that Windows has finished making the modifications you requested, you are free to close any active dialogue boxes.
FAQs
Is Telnet enabled by default Windows?
Moreover, despite the fact that Telnet has never been seen as an essential Windows feature, Microsoft has included a Telnet client in Windows 11 and Windows Server 2022. However, this client is disabled by default. In this post, I will demonstrate how to activate the Telnet client by utilising the graphical user interface (GUI) as well as the command line.
What is a telnet client?
To open a command line on a distant computer, often a server, you can use a client-server protocol called Telnet. Telnet is most commonly used for this purpose. Users can make use of this tool to ping a port in order to determine whether or not the port in question is open.
Why Telnet is not working in CMD?
You may turn aspects of Windows on or off by going to the Control Panel and clicking on the Programs menu item. After that, make sure “Telnet Client” is selected, and then save your modifications. In order for the adjustment to take effect, it is possible that you will be need to wait a few minutes.
Is Telnet a client-server?
The Telnet protocol is a client-server protocol that is built on a connection-oriented transport that is dependable. This protocol is typically used to establish a connection to the Transmission Control Protocol (TCP) port number 23, which is where a Telnet server application, known as telnetd, is listening for incoming connections.
Is it safe to enable Telnet?
Telnet is not a secure protocol by design. Because the credentials information (usernames and passwords) that is submitted via telnet is not secured, it leaves the user open to the risk of having their identity stolen. Users, on the other hand, have the ability to prevent this kind of infiltration by establishing a connection via Secure Shell.

Roblox Username Generator – Create a Cool & Unique Username in Seconds

Grow a Garden Recipes in Roblox: Guide to Cook (Donuts, Sushi, Pie, Pizza & More!)

Job Opportunities in Dubai – 2026

Mr Bit at the SBC Awards Europe 2025: The Bulgarian Brand Setting New Standards in the European Gaming Industry

Dennis Rodman Net Worth 2026 – Everything You Need to Know

Bloxburg Neighborhood Codes 2026
Grow a Garden Recipes in Roblox: Guide to Cook (Donuts, Sushi, Pie, Pizza & More!)
Job Opportunities in Dubai – 2026
Dennis Rodman Net Worth 2026 – Everything You Need to Know


