Guide
How to Forget a Network on Windows 10
Forgetting a network is a process that can be completed on Windows 10 computers. When you forget a network, it means that the computer will no longer remember the settings for that particular connection. This can be useful if you have a work or home network that you no longer need to connect to or if you have changed your password and want to update the settings on your computer. In this article, we will show you how to forget a network on Windows 10.
Read Also: How to Make Chrome Always on Top in Windows 10
How to Forget a Network on Windows 10
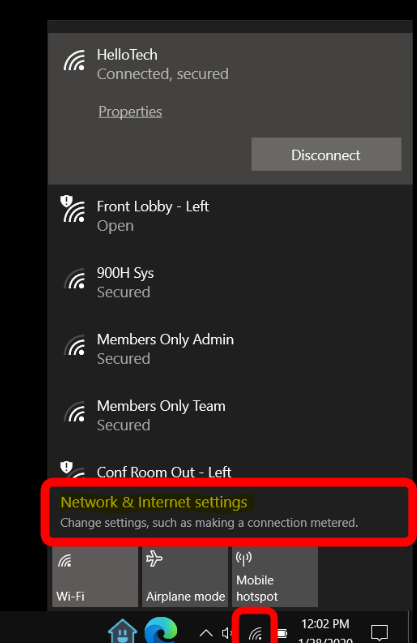
1. To connect to your WiFi network, select the WiFi symbol located in the lower-right hand corner of your screen. If you do not see this button, you may access it by clicking the icon for the notification centre that is located in the lower right corner of your screen and then clicking the Expand button that is located above the row of icons that are located at the bottom. After that, you will be able to choose Network from the list.
2. After that, select the “Network and Internet settings” option. You can also access this screen by clicking the Windows icon located in the bottom-left corner of your display and selecting Settings from the drop-down menu that appears. After that, head on over to Network and Internet.
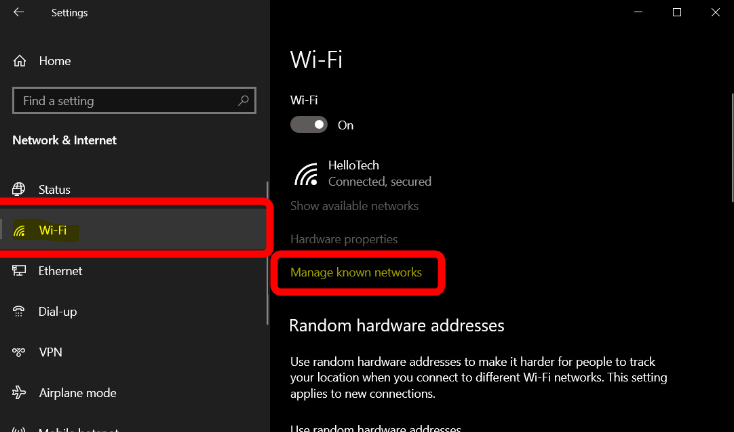
3. After that, select WiFi from the menu on the left.
4. After that, select the Manage known networks option.
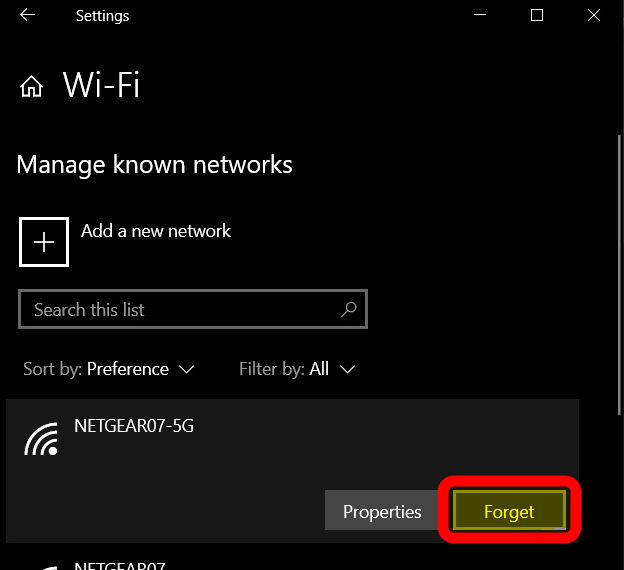
5. Choose a network that you’d like to forget about. A list of all of the wireless network profiles that have been saved on your computer will be displayed to you. Simply scroll through the available options until you find the network that you do not want Windows 10 to remember.
6. To finish, select the button labelled “Forget.”
FAQs
How do I uninstall a network driver?
Proceed to the Device Manager menu. Create new subcategories in the Network Adapters category. Select “Uninstall” from the context menu that appears when you right-click your Intel Wireless Adapter. Ensure that the radio button labelled “Delete the driver software for this device” is selected before continuing.
How do I uninstall and reinstall a network driver?
Use the right mouse button to select the Network Adapter you want to remove, and then click the Uninstall button. To confirm the removal of the device, click the OK button on the Confirm Device Removal window. In the window for the Device Manager, select the icon labelled “Scan for hardware changes.” The reinstallation of the gadget will begin shortly.
Can’t connect to Wi-Fi after network reset?
Try again after restarting both your computer and your router. After you have finished entering all of the commands, restart the computer. If the issue still continues, try going through these steps: Navigate to Settings > Network and Internet > Status, then hit the Network Reset button on the right side of the screen and follow the on-screen instructions. Please specify the version and build of Windows 10 as well as the firewall and antivirus software that is currently being used.
Is network reset safe Windows 10?
Because resetting the network eliminates all previously configured connection settings, this technique of troubleshooting should always be used as the very last resort. That will aid in avoiding the effort of setting things back up again, which is needless. Having said that, performing a network reset will in no way harm your computer. Your files will not be altered in any way, as was previously stated.
What does network Reset do in Windows 10?
When you reset your network, Windows will forget all of your Wi-Fi networks as well as the passwords for those networks, including your Ethernet network. Additionally, it will forget any additional connections that you’ve built, including VPN connections and virtual switches, for example.

Vampire Crawlers Coin Farming Guide

Forza Horizon 6 Performance: Why 60 FPS Is Still the Console Standard

Yoshi and the Mysterious Book (2026) – Full Completion Guide, Rewards & Secret Ending

How to Get Free Pets in Adopt Me: A Guide for Players

Roblox Username Generator – Create a Cool & Unique Username in Seconds
How to Get Free Pets in Adopt Me: A Guide for Players
Yoshi and the Mysterious Book (2026) – Full Completion Guide, Rewards & Secret Ending
Vampire Crawlers Coin Farming Guide


