Guide
How to Group Objects in Microsoft Word

One of the most helpful functions in Microsoft Word is called Grouping, and it’s used while working with different objects and forms. When brought together in this way, the various components form a single entity. This simplifies the process of repositioning, resizing, and formatting them. The following is an explanation of how to group items in Word.
Read Also: How to Duplicate a Page in Microsoft Word
How to Group Objects in Microsoft Word
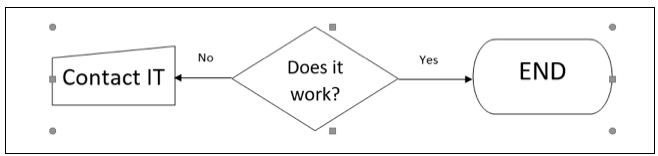
It’s possible that you’re using arrows in Word to create a flowchart or instructions for something else. You can organize them into groups and control all of those groups at the same time.
Make sure that all of the objects or shapes that you want to group together are selected. You can accomplish this by clicking on each item while holding down the Control (Windows) or Command (Mac) key on your keyboard. If you want to quickly group all of the items in your document, you may speed things up by using the shortcut Ctrl+A (on Windows) or Command+A (on Mac).
When you have the shapes or objects selected, you will notice that each has a border indicator associated with them. This is an effective method for ensuring that all of them are selected on your end.

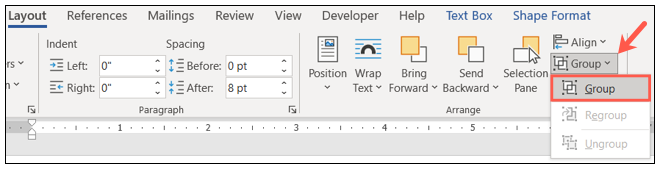
Navigate your way to the Arrange portion of the ribbon by clicking the Layout tab. You can select “Group” by clicking the “Group” button. You also have the option to right-click, then move your pointer to Grouping and select “Group” from the menu that appears.
After that, you will see all of those shapes or objects contained within a single boundary region. At this point, there is only one component.
After that, you can use the drag tool to move the group, one of the corners to resize it, you can give the pieces a colour, or you can conduct any other operation that you require.
The screenshot below shows us elevating the group to a higher position. It is possible to make out the outlines of each component that makes up the group, but they remain cohesive.

FAQs
Why can I not group objects in Word?
It is not possible to access the Group button.
Check to see that you have several different shapes or photographs selected. The Group button will not be accessible to you if the selection you have made contains a table, worksheet, or GIF picture.
Can you group text boxes in Word?
Putting text boxes into groups
To group, hold down the Control key and click on each individual text box’s borders one at a time. After letting go of the CTRL button, right-click any of the text boxes that have been chosen. Choose Grouping from the context menu that appears when you right-click.
Where is group in Microsoft Word?
While selecting numerous objects, press and hold the Shift key on your keyboard. To change the layout, select the Layout tab on the ribbon. You can also click the Format tab located on the ribbon. The Group button can be found in the Arrange group on either tab of the ribbon. To join a group, select the Group button.
What is the use of grouping in MS Word?
By “grouping” your photographs, shapes, and other objects in Microsoft Word, you will have the ability to make modifications to them as a single unit, such as resizing, rotating, and flipping them. This feature is available in the Microsoft Word word processing application. The ability to move numerous objects at once is another benefit of grouping. Using the Drawing tools, you can group different shapes and objects.

Roblox Username Generator – Create a Cool & Unique Username in Seconds

Grow a Garden Recipes in Roblox: Guide to Cook (Donuts, Sushi, Pie, Pizza & More!)

Job Opportunities in Dubai – 2026

Mr Bit at the SBC Awards Europe 2025: The Bulgarian Brand Setting New Standards in the European Gaming Industry

Dennis Rodman Net Worth 2026 – Everything You Need to Know

Bloxburg Neighborhood Codes 2026
Grow a Garden Recipes in Roblox: Guide to Cook (Donuts, Sushi, Pie, Pizza & More!)
Job Opportunities in Dubai – 2026
Dennis Rodman Net Worth 2026 – Everything You Need to Know


