Guide
How to Record a Zoom Meeting

When it comes to quick conversations with their colleagues, Zoom has never been more popular, as employees of all types resort to the simple video and audio conferencing service for help. Nevertheless, as web conference users are often reminded, no matter how good a video meeting is, it is still necessary to share it with those who were unable to attend or who need to refer to specific facts or instruction more than once.
Zoom, like any effective video chat applications, provides for recording for just this reason, and users must be aware of how it works in order to get the most of it. We’ll show you step-by-step how to complete the task. More Zoom hints and suggestions may be found on this page as well.
Read Also: How To Enable Screen Sharing On Zoom
Local recording to your computer drive
Local recording refers to the act of recording directly to your computer’s hard drive if you have the necessary disc space. This is a straightforward alternative that does not necessitate the usage of any cloud storage accounts.
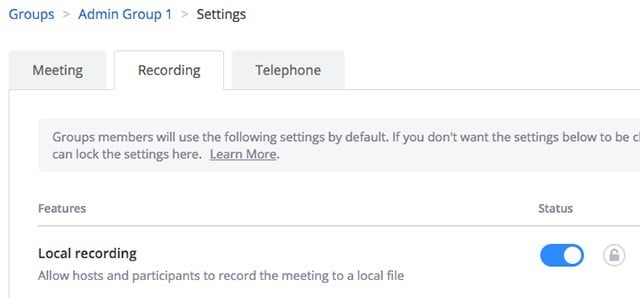
Step 1: Ensure that Zoom’s local recording is activated first by going to Tools > Options > Local Recording. Open Zoom in your browser, locate the Personal toolbar on the left, and select Settings from the drop-down menu (this option only shows up if you are the account administrator, which is necessary to enable recording). If you’re working from a corporate account, the settings area may be referred to as something different, such as Account Settings or Account Preferences.
Step 2: In the Settings window, pick the Recordings option, which is located towards the top of the window. Local recording should be one of the first choices you choose in this area. Local recording should be enabled, so make sure it is under the Status area. If it isn’t already, turn it on. You may also choose to lock this setting so that it is always active for all users.
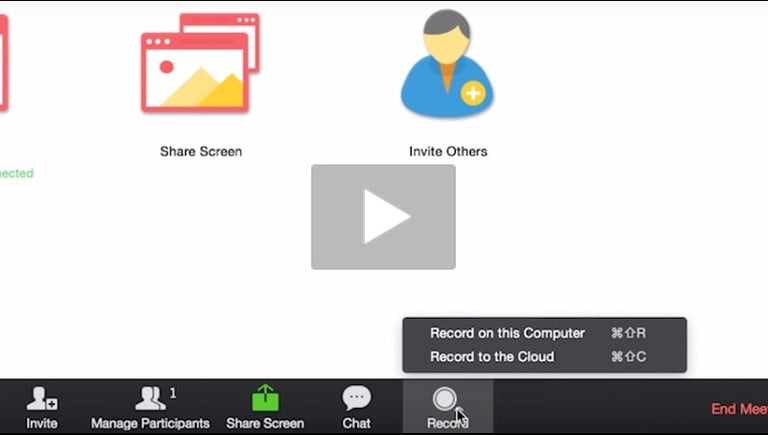
Step 3: As the meeting’s host, begin the meeting on Zoom. You will see a round icon labelled Record if you look at the bottom of the screen, where the tools are located. To begin recording, select it from the list. Some Zoom versions will provide you with an option to Record on This Computer right away, which you should pick if you want to record on your local computer. Afterwards, a recording notification will display in the upper left corner of all participant’s windows, letting them know that the recording is taking place. You can pause the recording whenever you want.
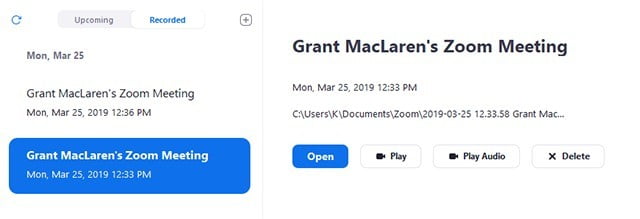
Step 4: Until the Zoom meeting has concluded, you will not be required to take any more action. Once the meeting has been terminated, a message will appear stating that the meeting recording is being converted. When this is complete — and this is critical — it will automatically store an MP4 file and an audio-only M4A file on your computer in a Zoom folder with the name “Zoom 0.mp4,” and it will continue to save further files in the same location as the previous ones. These recorded files may be accessed using the Zoom desktop client, which can be found in the Meetings area. This is the most convenient method of viewing them.
However, viewing the video files directly from a computer without the use of a client is more difficult. You must go into the appropriate folder, double-check that the files have been downloaded successfully, and then rename the files to reflect the name and date of your meeting. In the event that you do not change these files immediately away, it is quite easy to lose track of which file is whose, which may lead to a great deal of confusion later on in the process.
Note that the file will appear in this Zoom folder even if the meeting hasn’t been fully converted for viewing at the time of the upload. In the event that something interrupts the conversion process or converting immediately after the session does not work for you, you can just click on the file to begin converting it from scratch again.
Recording a video to the cloud

Another option is to record a video to the cloud, however this is only available to licensed users of the Zoom desktop client or mobile app who have sufficient cloud storage space in their subscription. For context, this is normally roughly 1GB per person, which is not a large amount of data. As a result, you will be unable to automatically record to popular cloud storage services such as Dropbox. If you intend to record on a regular basis, you will need to subscribe to a Zoom cloud storage plan, which costs money. These options start at $40 per month for an extra 100GB of data storage space.
If you don’t mind all of that, the process of activating cloud recording is actually fairly straightforward. Back on the Recording tab, where we demonstrated how to activate local recording, you should see an option to enable Cloud recording a little farther down on the page. Check to see if it is operational.
Afterwards, when you pick Record during a meeting, select Record to the Cloud from the drop-down menu that appears. When the meeting is ended, Zoom will have the video recording ready for transmission to Zoom’s cloud, and it will send you an email to notify you that the recording procedure has been completed successfully.
Recording a video on iOS or Android
In case you were wondering about Zoom’s video recording capabilities, both iOS and Android mobile operating systems are capable of recording meetings, although there are certain restrictions. For starters, you will be unable to record locally on a mobile device. As a result, the only alternative available to you is Zoom’s cloud recording service. In order for mobile recording to function properly, the host must also be a licensed user.
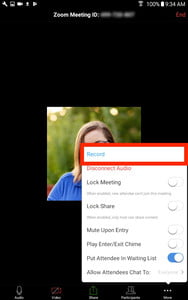
The Zoom meeting display has the same format on both mobile operating systems, regardless of which mobile operating system you are using when you are on a video chat, including a More option on the lower half of the video screen. To begin, pick More, then Record or Record to the Cloud from the drop-down menu.
Video

Vampire Crawlers Coin Farming Guide

Forza Horizon 6 Performance: Why 60 FPS Is Still the Console Standard

Yoshi and the Mysterious Book (2026) – Full Completion Guide, Rewards & Secret Ending

How to Get Free Pets in Adopt Me: A Guide for Players

Roblox Username Generator – Create a Cool & Unique Username in Seconds
How to Get Free Pets in Adopt Me: A Guide for Players
Yoshi and the Mysterious Book (2026) – Full Completion Guide, Rewards & Secret Ending
Forza Horizon 6 Performance: Why 60 FPS Is Still the Console Standard


