Guide
How To Record Screen On Mac
Have you ever wanted to know how to start and stop screen recordings on a Mac? You don’t have to worry about anything because we’ve got many techniques for recording video of what’s on your screen. There are a variety of situations in which recording your Mac screen can be beneficial. Perhaps you’d like to make a screencast tutorial for others. Suppose you’re putting together a business presentation. Alternatively, you might be interested in recording video notes for yourself.
Whatever the cause, it’s a straightforward and straightforward process. So, here’s how to start and stop screen recording on your Mac using a variety of different techniques.
How to Screen Record on a Mac Using the Screenshot Utility?
The Screenshot Utility on your Mac is the quickest and most convenient way to capture a screenshot of your screen. In addition to taking screenshots, this programme also allows you to record screen sessions.
To access the utility, hit the Cmd + Shift + 5 keys on your keyboard simultaneously. At the bottom of the window that appears, you’ll see two options: Record Entire Screen and Record Selected Portion. Choose the option that best suits your needs.
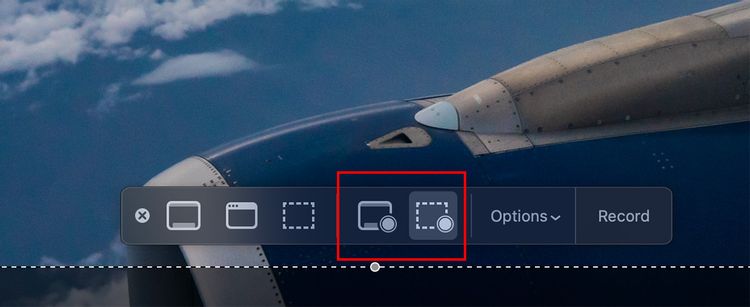
When you select Record Entire Screen, a camera symbol will show on the screen. If you utilize more than one monitor, this feature comes in handy. Simply move the camera to the area of the screen you want to record and press the record button to begin recording.
If you select Record Selected Portion, you can change the size of the frame by dragging the corners of the box you see. You may also drag and drop the box to a new location on your computer screen.
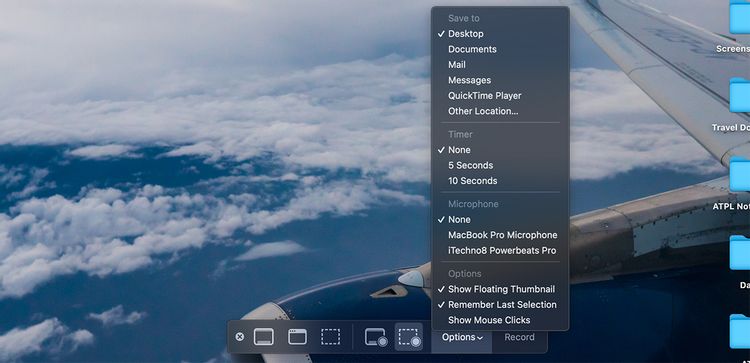
The Features button lets you to customize your Mac screen recording by selecting from a variety of options. This includes selecting your preferred microphone, determining the place in which you wish to save your recording, and other options. As soon as you’re finished, press the Record button to begin the recording.
How to Stop Screen Recording on Your Mac
The screenshot tool window will not be displayed in front of you once the recording has been done, so you may be perplexed as to how to stop it after it has been completed. As an alternative, you should see a little Stop icon in the top-right corner of the macOS menu bar instead. The screen recording on your Mac can be stopped by simply clicking on it.

To stop recording, press the keys Cmd + Control + Esc at the same time. Alternatively, press Cmd + Shift + 5 and the screenshot bar will reappear, this time with an option to pause the video recording.
The recording will be saved to your computer’s desktop automatically, and you’ll be able to see a preview of it in the bottom-right corner of your screen (similar to when you take a screenshot). Click on this preview to be able to see the complete recording and trim it as needed if necessary.
Benefits of Screen Recording With the Screenshot Utility
1. Since macOS Mojave, the screenshot utility has been included as a standard feature, meaning it is both free and does not require the installation of any additional software.
2. Additional capabilities include a built-in microphone for recording audio, a timer for creating timed recordings, and the ability to display mouse clicks for tutorials and presentations.
3. You can use Airplay or other sharing options right away once you’ve recorded your video.
How to Screen Record on a Mac Using QuickTime Player?
Another option for recording your Mac’s screen is to make use of the QuickTime player software. However, the QuickTime Player makes use of the same Screenshot utility tool that we discussed previously, with the difference being that you may control everything straight from the QuickTime Player. This may be beneficial for Macs running previous versions of macOS than macOS Mojave, such as Mountain Lion.
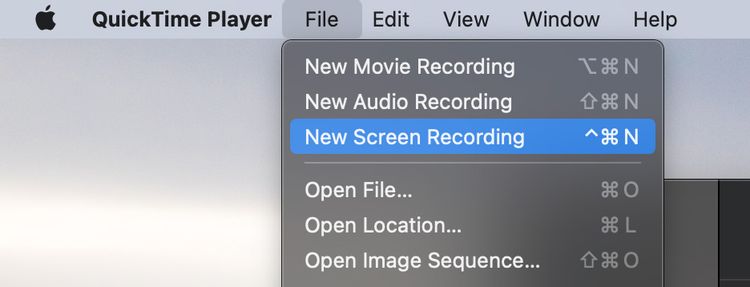
Using the QuickTime Player, start the app and then click File > New Screen Recording from the menu bar to start the recording.
This opens an overlay that allows you to choose from a number of different alternatives for recording your screen. Similar to the Screenshot application, you can choose to either record the entire screen or a selected portion of the screen to be recorded.
To begin recording, simply press the Record button on your keyboard after everything has been set up. To turn off screen recording on your Mac, choose the Stop symbol in the top-right corner of the macOS menu bar and click on it once.
The video that has been recorded will begin playing instantly. You have the option to make any necessary changes (using Trim or Rotate tools). Once you’re finished, simply choose File > Save or press Cmd + S on your keyboard to save the video to the location of your choosing.
Benefits of Screen Recording With QuickTime Player
1. Because QuickTime Player is already installed on your Mac, there are no further expenses or installations required.
2. Additional functionality, such as movie and audio recording, are available through QuickTime Player.
3. You can use Airplay or other sharing options right away once you’ve recorded your video.
4. QuickTime Player is available on Macs that are running older versions of the macOS operating system.
How to Record System Audio in Screen Recordings?
Both of the choices stated above are limited to the usage of a microphone for audio recording purposes alone. When you want to record a voice-over or a podcast, this is quite useful; but, when you want to capture the system audio, it is completely ineffective. The good news is that there is a simple workaround that entails installing a free audio driver on your Mac in order to be able to record system audio while screen recording on your Mac.
How to Screen Record on a Mac With Third-Party Apps?
There’s no reason to use a third-party tool to record your Mac screen unless you desire or require additional functions that aren’t provided by the two solutions listed above. However, in case you’re dissatisfied with the built-in options, we’ve listed some of our favorite third-party freeware software that you could find useful in the section below.
OBS Studio
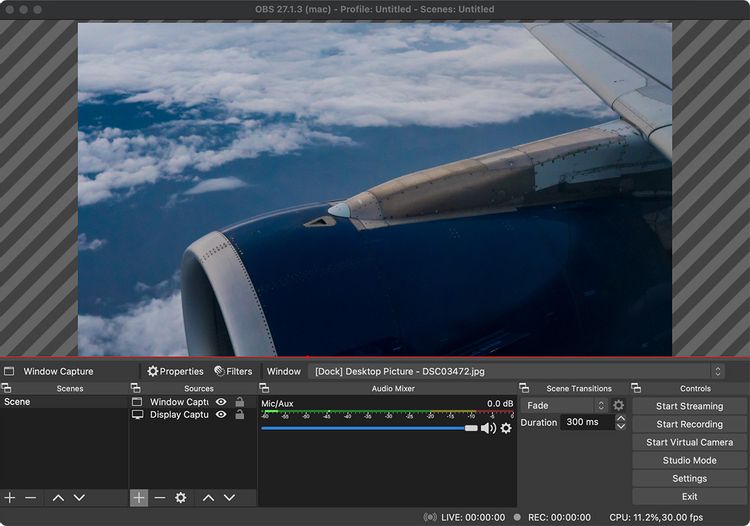
OBS Studio is widely regarded as the best freeware screen recording application available, with both casual and serious users agreeing on this point. Screen recording features are available for both novice and advanced users, allowing you to completely control every aspect of your screen recording. The app’s built-in features also allow you to stream straight to a variety of networks, including YouTube, Facebook, Twitch, and others.
It’s Just as Easy to Take Screenshots on a Mac
Previously, starting and stopping a screen recording on your Mac was a more involved process. However, as you can see, it is rather simple to accomplish these days. Hopefully, one of these solutions will be just what you’re looking for to capture the screen of your Mac.
Video

Vampire Crawlers Coin Farming Guide

Forza Horizon 6 Performance: Why 60 FPS Is Still the Console Standard

Yoshi and the Mysterious Book (2026) – Full Completion Guide, Rewards & Secret Ending

How to Get Free Pets in Adopt Me: A Guide for Players

Roblox Username Generator – Create a Cool & Unique Username in Seconds
How to Get Free Pets in Adopt Me: A Guide for Players
Yoshi and the Mysterious Book (2026) – Full Completion Guide, Rewards & Secret Ending
Forza Horizon 6 Performance: Why 60 FPS Is Still the Console Standard


