Guide
How to Recover Deleted Photos from Laptop Windows 11/10

One of the most prevalent causes of data loss is the deletion of a file by mistake. What’s more, you could have accidentally performed a permanent deletion by pressing Shift + Delete or emptying the Recycle bin without realizing One of the most prevalent causes of data loss is the deletion of a file by mistake. What’s more, you could have accidentally performed a permanent deletion by pressing Shift + Delete or emptying the Recycle bin without realizing. Losing images is a bummer, and recovering lost photos on Windows 10 is a difficult task.
Pay attention to the directions. Using three practical methods, we will show you how to recover deleted images on Windows 10 quickly and efficiently. These methods include employing the Recycle Bin, using professional data recovery software, and restoring deleted photos from a Windows files backup.
Read Also: How To Move Windows To Another Drive
1. How to Recover Deleted Photos on Windows 11/10 from Recycle Bin
When you delete a file in the conventional manner, the file is moved to the Recycle Bin. Files can be recovered from the Recycle Bin as long as they are not deleted from the system. See the instructions below on how to recover lost photos from the Recycle Bin. If you have erased all of the images from your computer’s hard drive, skip this approach and continue on to technique 2 to recover deleted photos using a photo recovery application.
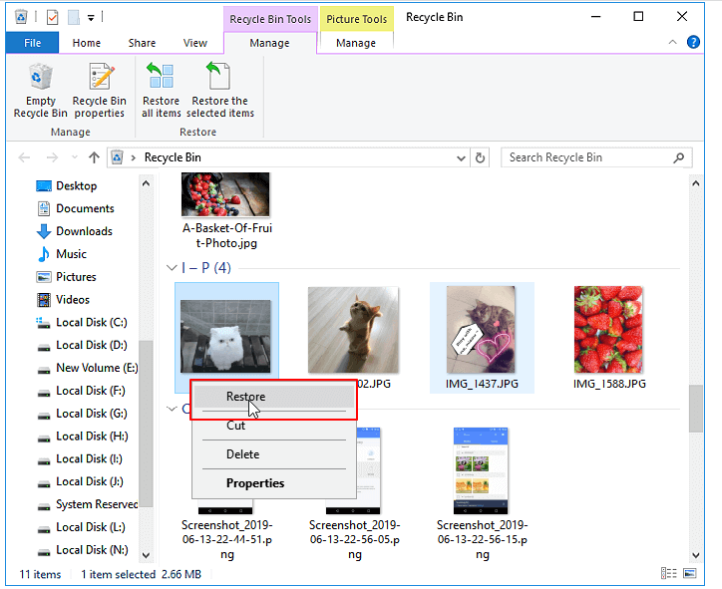
Step 1: On the Windows 10 desktop, double-click on the Recycle Bin icon to open it.
Step 2: Locate the deleted photographs and right-click on them, then select “Restore from Backup.”
Step 3: The deleted photographs will be restored to their original places after being recovered from the Recycle Bin.
Recycle Bin Disappeared, Where’s My Recycle Bin Windows 11/10?
If you have mistakenly deleted the Recycle Bin icon from your desktop or if the Recycle Bin symbol has simply gone, you may restore the Recycle Bin by following the steps below. It is possible to access files from the Recycle Bin to restore lost photographs on Windows 10 once it has been restored from the previous state.
Step 1: To open the Run dialogue box, click the Windows + R keys together, then type regedit and hit “Enter” to begin editing the registry.
Step 2: Navigate to “HKEY LOCAL MACHINE > SOFTWARE > Microsoft > Windows > CurrentVersion > Explorer > Desktop > NameSpace” in “HKEY LOCAL MACHINE > SOFTWARE > Microsoft > Windows > CurrentVersion > Explorer > Desktop > NameSpace.” Afterwards, right-click anywhere in the right pane and choose “New > Key” from the context menu.
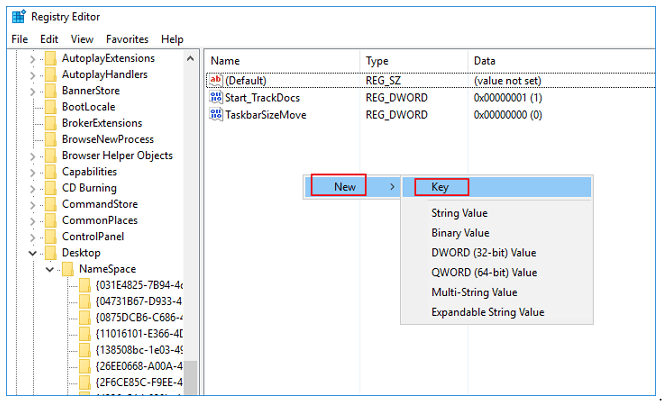
Step 3: Create a new item and rename it to “645FFO40-5081-101B-9F08-00AA002F954E” when you have finished making it. Then, as shown in the screenshot, enter “Recycle Bin” in the “value data” option as shown in the picture.
Step 4: Exit Registry Editor and log out of your computer. Please log in again. The Recycle Bin icon should then be returned to its original position on your desktop. In addition, you may restore deleted photographs from the Recycle bin if necessary.
2. How to Restore Deleted Photos from Laptop Using Windows Backup
If you have previously created a manual backup or activated the Windows backup feature, you may be able to recover lost images from backup files on Windows 10.
The methods for recovering deleted files from backups are as follows:
1. One method is to restore images from a manual backup by copying them from the backup and pasting them into the original storage device where the photos were lost.
2. Using software backups to restore images is another option; if you utilized backup software to back up your photos, you may use that programme to restore the backup image and get your lost photos back.
3. The third option is to restore from a Windows backup.
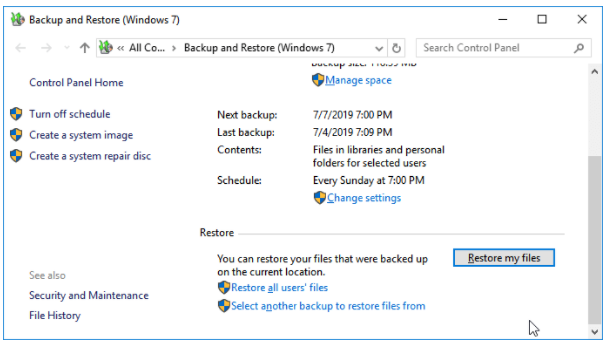
Step 1: Open the “Control Panel,” navigate to “System and Maintenance,” and then select “Backup and Restore (Windows 7).”
Step 2: Select “Restore my files” from the drop-down menu.
Step 3: Select the backup file that was previously made by clicking “Browse for files.”

Step 4: Select the place where the backup should be restored: “In the original location” or “In the following location.” Allow for the completion of the repairing procedure.
Video

Vampire Crawlers Coin Farming Guide

Forza Horizon 6 Performance: Why 60 FPS Is Still the Console Standard

Yoshi and the Mysterious Book (2026) – Full Completion Guide, Rewards & Secret Ending

How to Get Free Pets in Adopt Me: A Guide for Players

Roblox Username Generator – Create a Cool & Unique Username in Seconds
How to Get Free Pets in Adopt Me: A Guide for Players
Yoshi and the Mysterious Book (2026) – Full Completion Guide, Rewards & Secret Ending
Forza Horizon 6 Performance: Why 60 FPS Is Still the Console Standard


