Guide
How to Reinstall the Realtek HD Audio driver

With the majority of Windows 10 computers, Realtek audio is the default audio driver. It’s likely that the Realtek HD Audio Codec driver is responsible for every sound your computer emits, unless you’re utilizing a sound card or streaming audio over HDMI with the greatest graphics cards available today.
Unfortunately, there are roughly a hundred distinct causes that might cause your audio drivers to malfunction and become unusable. It is recommended that you check your device manager to see if you can obtain a new driver through Windows Update as soon as this happens.
To accomplish this on Windows 10, just right-click the Start Menu and select Device Manager from the drop-down menu. To update a device’s driver, go to the “Sound, video, and game controllers” section of the Control Panel and locate the device that needs to be updated, right-click it, and select “update driver.”
When it comes to finding and installing the necessary driver, Windows will almost always be able to do it without any further input from you, but there may be occasions when you will need to take matters into your own hands. Fortunately, this is why we wrote this instruction on how to manually reinstall the Realtek HD Audio Codec driver. We expect to be able to get you through it in a matter of minutes because it is a reasonably straightforward procedure on our end.
Read Also: How to Update Drivers in Windows
1. Uninstall your current audio drivers
This may sound paradoxical, but before you can reinstall your Realtek HD Audio Codec driver, you must first delete any and all traces of the audio drivers that are currently installed on your computer. To do so, open the Device Management by selecting it from the start menu or by putting “device manager” into the search box in the start menu.
To find Realtek High Definition Audio, go to the section labelled “Sound, video, and game controllers” and scroll down to the bottom of the page. As soon as you have done so, go ahead and right click on the device and select “Uninstall device.” It will prompt you with a dialogue box. Make sure the box labelled “Delete the driver software for this device” is checked, and then click the OK button.
Then, just follow the on-screen prompts until the device is successfully removed. Once you’ve completed this, go to the top of the device manager window and select “view,” then scroll down to “show hidden devices” and select that option. Just to be sure you don’t have any duplicate drivers, please do this. Remove any duplicates from your computer and restart it before proceeding to the next step.
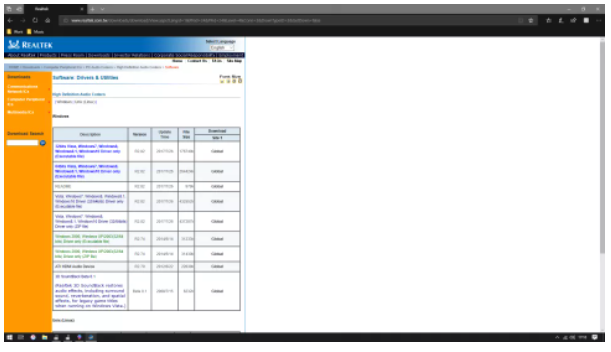
2. Download the Realtek HD Audio Codec driver
Then you’ll have to go ahead and download the real driver. Navigate to the Realtek website and look for the downloads area (opens in new tab). When you first boot up your computer, you’ll be prompted with a popup to ensure that you realize that some motherboards may not support these drivers. It’s highly probable that these drivers will function well for you, so go ahead and click “accept” to go to the real downloads page.
Your browser will display a lengthy list that, for some reason, only takes up about a quarter of the available space in your browser window. We understand that it appears strange. Simply locate your operating system and click on the “Global” link that corresponds to it to complete the process.

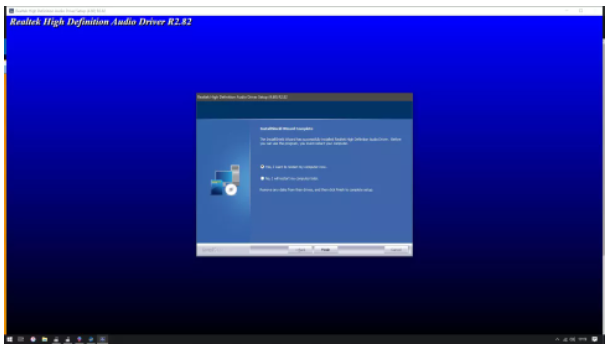
3. Install the driver
To use the programme, locate it in your downloads location and double-click it to begin the installation process. After you accept permission for the software to begin, it will display a large blue window on your screen. Just sit back and let the installer do his or her job. It will take a minute for the software to be installed, so go make yourself a sandwich while the process is taking place.
When the installer is finished, well, installing, it will prompt you to restart your computer – make sure you do so, or the driver will not be able to complete its installation.
4. Verify and finish
After restarting your computer, the driver should have been successfully installed. First, return to Device Manager and verify that “Realtek High Definition Audio” is listed under “Sound, video, and game controllers.” If it isn’t, restart your computer. If it’s there, that’s fantastic! If this is the case, the installation failed for whatever reason. Go ahead and look for the driver in your downloads folder and re-install it from scratch.
Following your confirmation that the driver is really present, you should proceed to play a YouTube video or your favourite song on Spotify to check that the driver is in proper working order. If it’s still not functioning, you can use our tutorial on how to troubleshoot audio difficulties in Windows 10 to help you figure out what’s causing the problem.
Congratulations! You have successfully re-installed your Realtek HD Audio Codec driver. Now that you have confirmed that everything is operating well, you may pat yourself on the back for your efforts.
Video

Vampire Crawlers Coin Farming Guide

Forza Horizon 6 Performance: Why 60 FPS Is Still the Console Standard

Yoshi and the Mysterious Book (2026) – Full Completion Guide, Rewards & Secret Ending

How to Get Free Pets in Adopt Me: A Guide for Players

Roblox Username Generator – Create a Cool & Unique Username in Seconds
How to Get Free Pets in Adopt Me: A Guide for Players
Yoshi and the Mysterious Book (2026) – Full Completion Guide, Rewards & Secret Ending
Vampire Crawlers Coin Farming Guide


