Apple
How to Remove Emergency Contacts on Your iPhone

The iPhone has long been the standard for modern-day electronics, whether it be for the purpose of monitoring your health or for the purpose of instantly notifying your emergency contacts in the event of a crisis. Using the SOS app on your iPhone, you may quickly and simply get in touch with both emergency services and the people you’ve designated to assist you in an emergency. You may accomplish this on your iPhone in one of two ways: either press and hold the Sleep/wake button in conjunction with the Volume buttons, or hit the Sleep/wake button three times in quick succession. Since you have turned off SOS, you have the option of deleting all of your saved emergency contacts as well. The following will show you how to accomplish it on your iPhone. This article will show you how to delete emergency contacts from your iPhone. So let’s get started:
Read Also: How to Disable or Turn Off Read Receipts on an iPhone
How to Remove Emergency Contacts on Your iPhone
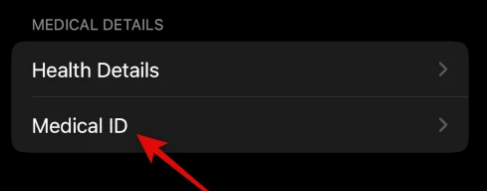
1. Launch the Settings app, then select the Health option.

2. Now, select the Medical ID option.
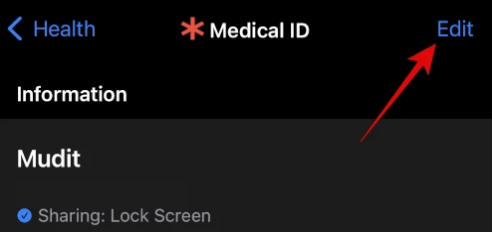
3. Select Edit in the menu that appears in the upper right corner of your screen.
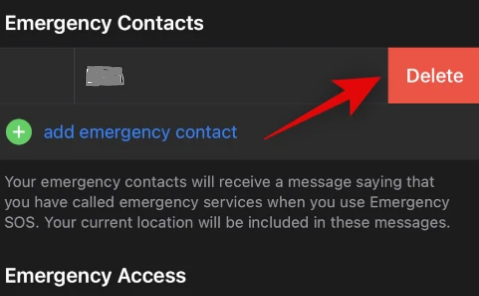
4. Scroll all the way down until you reach the section labelled Emergency Contacts, and then hit the delete icon that is located next to your emergency contact.
5. Tap Delete.
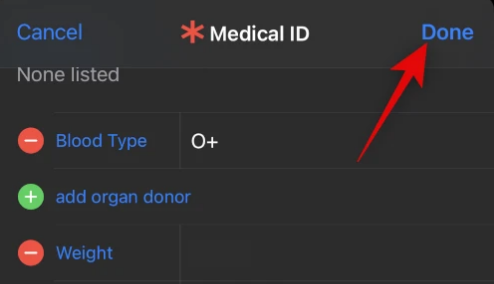
6. Follow the steps again to delete any additional emergency contacts that you might have added, and then press the Done button in the upper right corner of the screen when you are through.
7. And that wraps things up! You will now have deleted all of the emergency contacts that were stored on your iPhone.
FAQs
Why does iPhone go into emergency mode?
In most cases, the incorrect actions we take on our iPhones are the reason of the emergency SOS mode becoming permanently activated. You can enter SOS mode, for instance, by pressing the volume up and down buttons simultaneously with the power button. It’s possible that refreshing or rooting your iPhone will cause it to get stuck in emergency SOS mode.
Where are emergency contacts stored on iPhone?
Launch the Health app and select the Summary tab from the menu that appears. Simply tap your profile image, which is located in the top right corner. Tap the Medical ID option that’s located under your profile photo. After selecting Edit, scroll down until you see Emergency Contacts.
What happens when you put someone as an emergency contact?
An emergency contact is the first person that medical personnel will attempt to get in touch with in the event of an emergency; however, your emergency contact might not have the legal ability to act on your behalf unless you specifically empower them with that power.
Do emergency contacts ring on silent iPhone?
Even if your iPhone is set to silent or your notifications are turned off, you have the option to let vibrations and sounds from emergency contacts pass through. Open Contacts . Tap Edit after selecting a contact to edit. After selecting a ringtone or text tone, toggle the Emergency Bypass switch.
How many emergency contacts can you have iPhone?
There is no limit to the number of emergency contacts you can have on your account; however, we recommend that your emergency contacts have access to your home or place of business and are able to respond to the location if the authorities so desire.
What message do emergency contacts get?
Your iPhone will send a single text message to the contacts you’ve set up for urgent matters. After you have activated the SOS mode on your iPhone, the device will send your current position and your emergency contacts will be notified whenever your location changes for an extended length of time. Only iPhone 8 and later generations are compatible with this emergency SOS capability.


