Guide
How to Request a Read Receipt in Outlook
When you email someone, you have no way of knowing when that email will be read by the recipient. It is therefore difficult to establish if it was ever read at all if you do not receive a response to your message. You can find out when the recipient of your email has opened it with the “read receipt” option that is available in Outlook. A read receipt is a short automated reply that confirms for you that an email has been opened. This reply is sent to you whenever an email is opened.
You have the option of requesting it with a single email, or if you want to use it consistently, you may compel all outgoing emails to request a read receipt. This eliminates the need for you to do it manually each time, which is useful if you want to use it frequently. Although it’s convenient, it’s not quite foolproof. It is up to the recipient to decide whether or not to transmit a confirmation that the message has been read, and some email clients ignore read receipts entirely. Here are two different approaches you can take in order to successfully send an email that includes a read receipt.
Read Also: How to Send a GIF on Microsoft Outlook
How to Request a Read Receipt in Outlook
For a single email
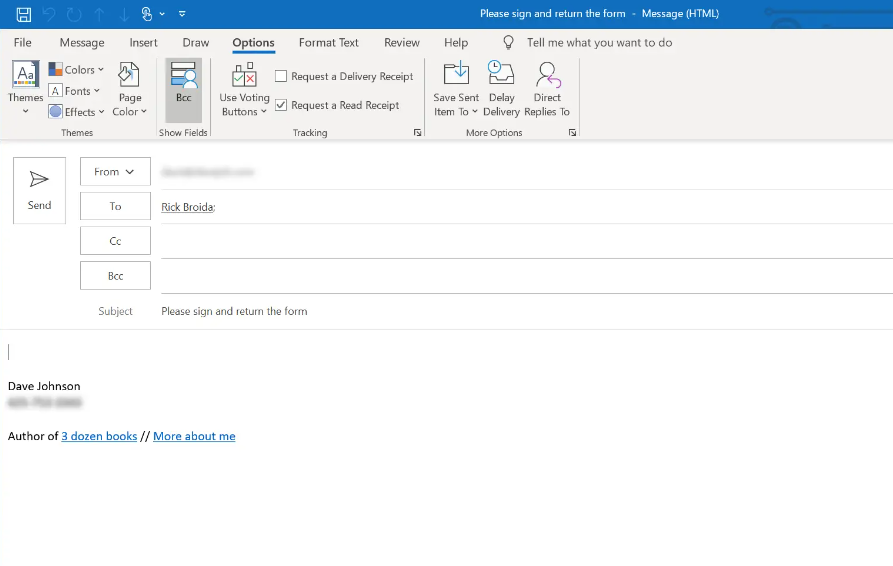
1. Start up Outlook, then from the program’s main menu, select the “New” option to get started writing a brand new email message.
2. Before you send the email, go to the menu that appears at the very top of the message window and select “Options.”
3. Before proceeding to the next step, you need to make sure that the box that is labelled “Request a Read Receipt” is checked. If it isn’t, you won’t be able to move on to the next step. In the event that it is not, you will not be able to go to the following step.
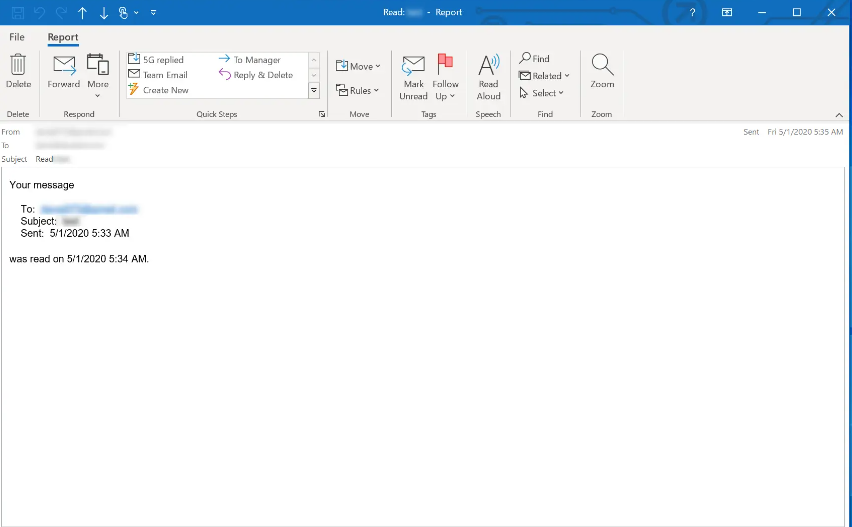
4. Check to see whether anyone is paying attention to what you have to say and make sure they are. You should check your email momentarily for a message from the system in answer to the message that you just sent. The message will be in reaction to the message that you just sent.
For every email you send
1. Within Outlook, go to the “File” option on the menu bar.
2. After that, go to the menu and select “Options.”
3. Within the Outlook Options dialogue box, go to the navigation pane on the left, and then click the “Mail” button.
4. Within the “Tracking” section, navigate to the subsection that is titled “For all messages sent, request:,” and then select the checkbox next to the option that reads “Read receipt indicating the receiver viewed the message.”
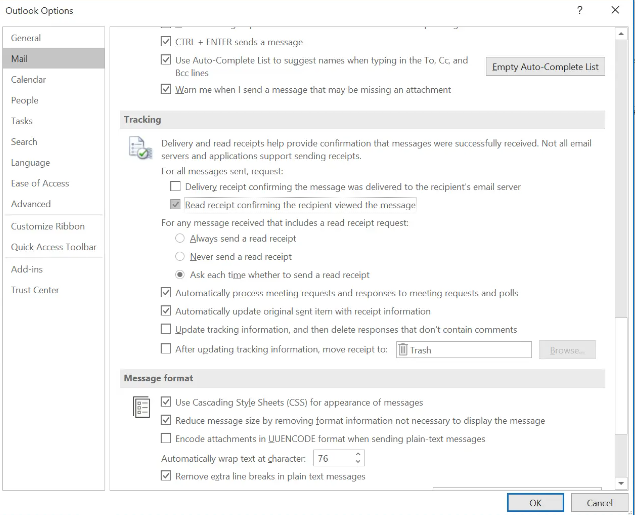
5. To keep the changes you’ve made, you must click the “OK” button. From this point forward, an automatic request for a read receipt will be included in each and every one of the outgoing messages.
FAQs
How exactly does one go about including a signature in Outlook?
Launch Outlook, go to the Options menu, and after that, select the option to View all of Outlook’s settings in order to generate a signature. In the window labelled Settings, select the drop-down menu and then select Mail > Compose and reply. In the space that has been allotted for your email signature, create your signature and format it.
How do you put an email on a future schedule in Outlook?
After you have finished composing your message, select Options from the menu bar of Outlook to begin scheduling an email. Choose the option to Delay Delivery, which may be found in the More Options drop-down menu. Select a time and date from the drop-down menus in the Properties tab, and after that, choose the checkbox next to “Do not deliver before.” After you have done so, navigate back to your inbox and then click the Send option.
How can I retrieve a previously sent email in Outlook?
When you need to retrieve a message that was previously sent, launch Outlook and navigate to the Sent Items folder in the program’s folder structure. Double-clicking the message will bring up the one you wish to remember and allow you to recover it. To recall a message, go to the tab labelled “Message,” click the down arrow next to the button labelled “Actions,” and then select “Recall This Message.”

Vampire Crawlers Coin Farming Guide

Forza Horizon 6 Performance: Why 60 FPS Is Still the Console Standard

Yoshi and the Mysterious Book (2026) – Full Completion Guide, Rewards & Secret Ending

How to Get Free Pets in Adopt Me: A Guide for Players

Roblox Username Generator – Create a Cool & Unique Username in Seconds
How to Get Free Pets in Adopt Me: A Guide for Players
Yoshi and the Mysterious Book (2026) – Full Completion Guide, Rewards & Secret Ending
Forza Horizon 6 Performance: Why 60 FPS Is Still the Console Standard


