Android
How to Root Android Phones
Android rooting is the best method to get greater control over your smartphone, opening the door to a world of previously unimaginable possibilities. However, it’s crucial to proceed with caution while rooting your device. If something goes wrong, you might lose your warranty, end up with a smashed smartphone or tablet, or even end up with your device completely ruined.
The first step is to recognize that rooting is not usually an easy procedure, and you may run into difficulties at various points along the journey. If you have determined that you must root your Android smartphone, go to the section below, but keep in mind that it is not for the faint of heart or those who are unfamiliar with technology.
Manufacturers and carriers will try to discourage you from rooting your device, and they aren’t simply being paranoid. If you don’t follow the directions carefully, the worst-case situation might result in irreversible harm to your equipment. However, many individuals believe that the possible advantages outweigh the risks. With a rooted phone, you can get rid of bloatware, increase the speed of your CPU, and modify the appearance of every piece of your phone’s software.
This article on how to root Android phones will take you step-by-step through the process of rooting your smartphone. While some phones may be rooted in minutes, others will necessitate a bit more investigation and time. However, one thing is certain: rooted your phone is one of the most effective ways to unlock the full power of your Android smartphone.
Read Also: How to Turn on Mobile Data on Android And IPhone
What is Rooting ?
Rooting an Android phone or tablet is similar to jail breaking an iPhone in that it allows you to have a better understanding of the phone’s sub-system. After rooted your Android smartphone, you will have access to the whole operating system, allowing you to change almost anything on your device and circumventing any limits that your manufacturer or carrier may have placed in place.
Rooting should only be attempted with extreme caution. Before you can install a custom ROM on your phone, you must first back up the software on your phone. This is referred to as “flashing” in rooting parlance (a modified version of Android).
How to prepare your Android device for Rooting

Framaroot, Firmware.mobi, Kingo Root, BaiduRoot, One-Click Root, SuperSU, and Root Master are some of the most popular rooting programmes available for Android devices. In the time it takes you to brush your teeth, these services can generally root your smartphone or tablet. Nevertheless, some of them are only compatible with smartphones running earlier versions of Android, so you may require some searching to locate one that works for your device. Firmware.mobi may be necessary if you want to root an even older device.
Rooting older versions of Android, such as Android 6.0 Marshmallow and Android 7.0 Nougat, was more challenging. If your device’s system files are hacked, legitimate rooting apps will not be able to run because of the verified boot service, which checks for cryptographic integrity. Thankfully, rooting programmes have kept up with the times, making it much easier to root newer Android versions.
If a one-click rooting programme won’t work on your phone, you’ll need to look into other options in Android forums. XDA Developers Forum is the ideal location to start looking for a solution for your specific phone or tablet.
Preparing for Rooting
Before you begin, make a complete backup of anything you value highly. Always make a copy of your phone’s existing ROM before you begin the process of installing a new one on it. Before you begin, make certain that your gadget is fully charged so that you can use it.
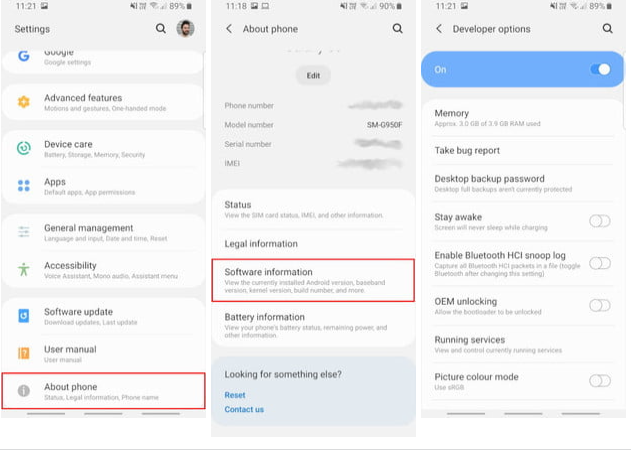
You’ll have to enable USB Debugging and OEM Unlocking before you can proceed further. Open your device’s settings to accomplish this. You can activate Developer Options if you don’t see it at the bottom of the Settings screen.
1.Find the Build Number by tapping on About Phone. If you’re not sure where to look, it’s generally available in the same place as other software information on your phone.
2.The Developer Options will show on the Settings main screen if you tap on the Build Number seven times. To activate this, you may need to enter your security passcode.
3.To access your new developer choices, press the Back button.
4.Then, select Developer Options from the menu that appears.
5.Make sure USB Debugging is turned on.
6.Make sure OEM Unlocking is turned on.
Video

Vampire Crawlers Coin Farming Guide

Forza Horizon 6 Performance: Why 60 FPS Is Still the Console Standard

Yoshi and the Mysterious Book (2026) – Full Completion Guide, Rewards & Secret Ending

How to Get Free Pets in Adopt Me: A Guide for Players

Roblox Username Generator – Create a Cool & Unique Username in Seconds
How to Get Free Pets in Adopt Me: A Guide for Players
Yoshi and the Mysterious Book (2026) – Full Completion Guide, Rewards & Secret Ending
Vampire Crawlers Coin Farming Guide


