Apple
How to Save an iMovie Project On Your Mac

You are able to work on many iMovie projects simultaneously on your Mac computer, and once you have completed one of them, saving the others is a simple process. You can create a new movie with Apple’s iMovie to assemble movies from a family trip or birthday party, or you can build a project from one of the pre-downloaded trailer templates. When you have finished working on a project, you have the option of saving it to your files, either in a designated folder or on your computer’s desktop.
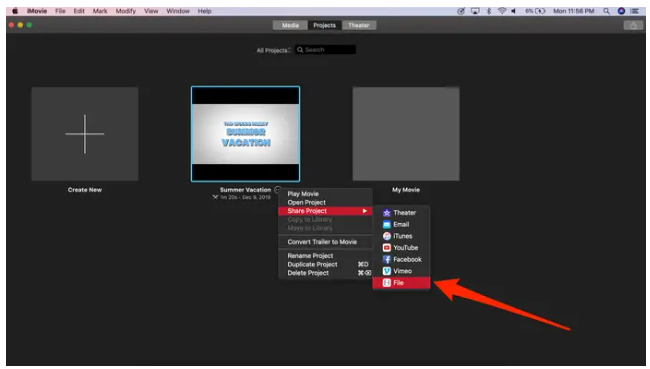
After clicking “Share Project” in the “Projects” tab, you have the option to save an iMovie project to your Mac by selecting the “Files” option from the drop-down menu that appears. In addition to this, you can choose the same choice from the drop-down menu.
Here’s how you can achieve both goals.
Read Also: How to Backup Your Mac Computer
How to save your iMovie on a Mac Computer
1. Open iMovie on your Mac.
2. Navigate to the “Projects” tab and select an active project to work on. You can also begin a new project by clicking the addition (+) button and picking a trailer template or beginning a new freeform movie. Both of these options are available when you start a new project.

3. If the project you want to save has already been finished, click the three dots to the right of its name, and then select “Share Project” from the list that appears in the pop-up window that appears.
4. At the very bottom of the list, select the “File” option. The other options provide you the ability to directly share the project via email or social media, but selecting “File” as the sharing destination will cause a copy to be saved on your Mac immediately. If you choose to share your project to “Theater,” it will only be saved within iMovie; you will not be able to access it from any other application or location on your computer.
5. Clicking this button will bring up a pop-up window where you can make various adjustments to the video you have saved. You also have the ability to alter the quality and resolution of the image, as well as add a description and tags. If you wish to watch your movie in the “Theater” page, make sure the box labelled “Add to Theater” is checked.

6. Click the “Next…” button.
7. After that, iMovie will ask you to select a file name and location for the movie. Enter a name for the file in the box labelled “Save As,” and select a destination for the file in the box labelled “Where,” either a specific folder or your desktop.
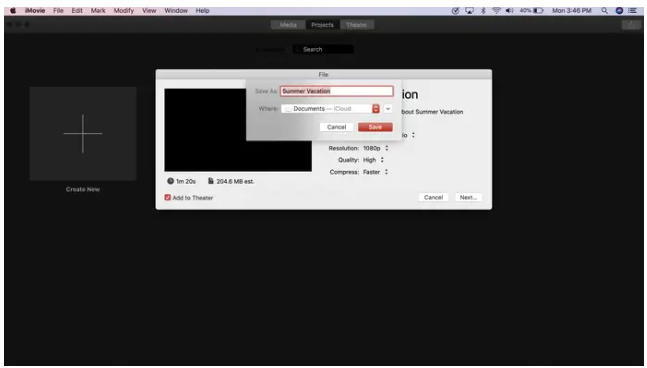
8. To finish off the process, click the “Save” button.
How to Save an iMovie project on Mac from the File menu
1. You can also access this pop-up from within the project that you are working on in iMovie. You can open an existing project or start a new one by clicking here.
2. When you have finished the project, go to the “File” tab that is located in the toolbar that is located at the very top of the app. This will be the first option to the right of the iMovie settings that are bolded in the menu bar.
3. From the menu that drops down, select the option to “Share.”
4. Select “File.” This will open a pop-up window on your Mac machine that allows you to save the project there.

Video

Vampire Crawlers Coin Farming Guide

Forza Horizon 6 Performance: Why 60 FPS Is Still the Console Standard

Yoshi and the Mysterious Book (2026) – Full Completion Guide, Rewards & Secret Ending

How to Get Free Pets in Adopt Me: A Guide for Players

Roblox Username Generator – Create a Cool & Unique Username in Seconds
How to Get Free Pets in Adopt Me: A Guide for Players
Yoshi and the Mysterious Book (2026) – Full Completion Guide, Rewards & Secret Ending
Forza Horizon 6 Performance: Why 60 FPS Is Still the Console Standard


