Guide
How To Screen Record on HP Laptops

Having the ability to screen record on your computer or laptop might be a very useful skill in today’s digital world. The desire to record your screen will almost certainly emerge whether you’re an IT expert who has to explain a technical notion, an online business who wants to record courses or workshops, or a streamer who wants to record classes or workshops.
If you are using an HP laptop, there are a variety of simple methods for recording your screen and sharing it with the rest of your audience. Did you know that all Windows laptops (including HP) that are powered by Windows 10 or higher contain a built-in screen recorder as standard equipment? Using it to produce video projects for personal, professional, or educational purposes is demonstrated here.
Read Also: How to Factory Reset an HP Laptop
How To Screen Record on HP Laptops
Method 1: Screen Record On HP Laptops With The Default Screen Recorder
HP laptops are equipped with a screen recorder that may be used to capture video. As a matter of fact, this is a function provided by Microsoft, and if you’re using Windows 10 or above, this capability should be available to you by default. In order to record a screen, you must first navigate to the Windows Game Bar and press Record.
Step 1: To reach the Windows Game Bar, press the Windows key + G at the same time.
Step 2: A pop-up window with the prompt should appear. Do you wish to access the Game Bar? Select the option by checking the box next to it: This is, in fact, a game.

Step 3: Hover your mouse cursor over the Xbox logo in the top bar. The camera symbol to the right of the Xbox icon is used to take still screenshots, while the white circle may be used to record live video feeds from the game.
Step 4: Make contact with the white circle. You’ll notice that it turns red when you click on it, which indicates that you’re now actively recording your screen.

Step 5: After you’ve completed recording, return to this circle and hit it again. It will become white, and the screen capture will come to an abrupt halt.
Step 6: The screen recording is automatically saved in the C/Users/Visuals/Captures directory. You may view your files from this location and change them to meet your requirements.
Troubleshooting
When attempting to use the native screen recordings, you may encounter certain difficulties. One of the most frequently encountered issues is that your HP laptop does not have Windows 10 (or a higher version) loaded on it. As a result, it will not be included with the Game Bar when it is first installed. That being the case, you may locate it for free in the app store, download and start using it to create your screen recordings right away!
Method 2: Screen Capture With Microsoft PowerPoint
HP laptops are pre-loaded with a slew of useful tools and software, one of which being the Microsoft PowerPoint presentation programme. Was it ever brought to your attention that the widely used PowerPoint programme may really be used to screen record? Follow the procedures mentioned below to record your screen using their built-in screen recorder.
Step 1: Create a new presentation with a blank template.
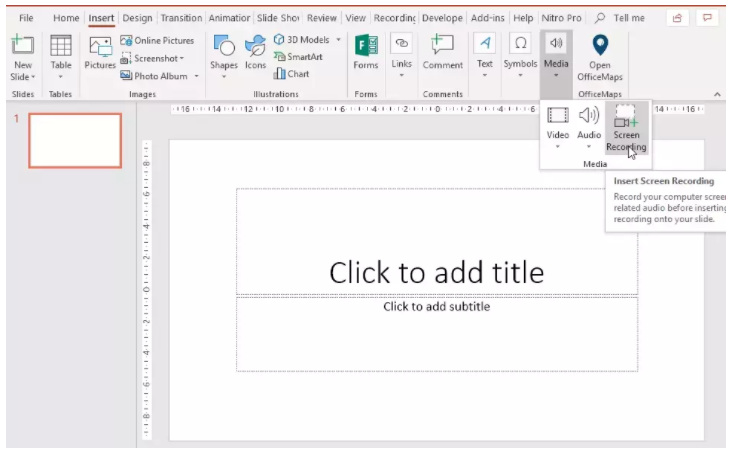
Step 2: In the top navigation bar, choose Insert > Screen Recording from the drop-down menu.
Step 3: A popup will appear, requesting that you pick the portion of your screen that you desire to record in step 3. Your choice should be dependent on the information you desire to record on the screen.
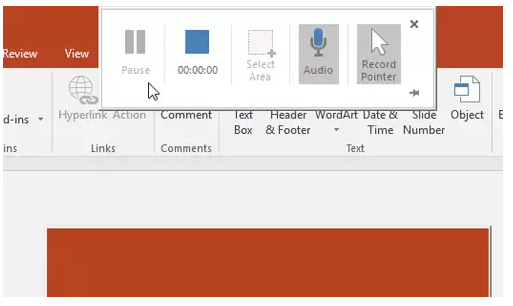
Step 4: You may select from a variety of custom controls (such as not recording audio). You can begin recording as soon as you have finished setting up your controls.
Step 5: To begin recording, click on the circular record icon in the upper right corner. Having pushed the record button will result in your inability to view the controls again.
Step 6: To stop or pause the recording, go to the top of the page with your cursor and click there. Your view of the control centre will be restored, and you will be able to make any necessary adjustments.
Step 7: The video will be integrated into PowerPoint once you have finished recording. You have the option of either saving the complete presentation as you would normally do or saving only the video file by selecting File > Save Media As and then specifying the name and save location of the screen recording!
Method 3: Use Third-Party Screen Recording Applications
Another useful alternative, if you want a more comprehensive set of tools, is to select from among the various free and paid software packages that are available to assist you in making screen recordings on your HP laptop. Some of the most often used are as follows:
- It is also known as Open Broadcaster Program (abbreviated OBS Studio). It is a free and open-source software for screen recording and live broadcasting, and it is available for all major operating systems including Windows, Mac OS X, and Linux.
- ShareX: ShareX is yet another free and open-source screen capturing programme for laptop computers from HP. Due to the fact that it is ad-free and has been in active development for more than a decade, it is jam-packed with sophisticated features that are ideal for more advanced users.
- Free Cam: Another great piece of software that is completely free to use is Free Cam. It is ideal for producing and distributing screencasts, and it does not include a watermark or a time limit on how long you may use it. Additionally, it has built-in video and sound editing facilities!!!
Video

Vampire Crawlers Coin Farming Guide

Forza Horizon 6 Performance: Why 60 FPS Is Still the Console Standard

Yoshi and the Mysterious Book (2026) – Full Completion Guide, Rewards & Secret Ending

How to Get Free Pets in Adopt Me: A Guide for Players

Roblox Username Generator – Create a Cool & Unique Username in Seconds
How to Get Free Pets in Adopt Me: A Guide for Players
Yoshi and the Mysterious Book (2026) – Full Completion Guide, Rewards & Secret Ending
Forza Horizon 6 Performance: Why 60 FPS Is Still the Console Standard


