Guide
How to Set Up a Nintendo Wi-Fi Hotspot with a VPN on Mac
A virtual private network (VPN) shields your online activity from prying eyes while you play, and it also enables you to fool websites into thinking you’re in a different nation, allowing you to access games hosted in other regions or circumvent geographical restrictions. It’s possible that learning that there are two ways to connect your Nintendo Switch to a virtual private network (VPN) will come as a bit of a surprise to you. Both of these methods are quite easy to use, but neither one requires installing a virtual private network (VPN) directly into the Nintendo Switch. This article will show how to set up a virtual private network (VPN) on a Nintendo Switch while using a Wi-Fi hotspot. So let’s get started:
Read Also: How to Enable Spotify Shuffle on Your PC and Mac
How to Set Up a Nintendo Wi-Fi Hotspot with a VPN on Mac
1. Sign up for a virtual private network (VPN) that works with Mac.
2. Install the virtual private network (VPN) software onto your Mac laptop or desktop computer, then log in to the VPN and connect to a VPN server.
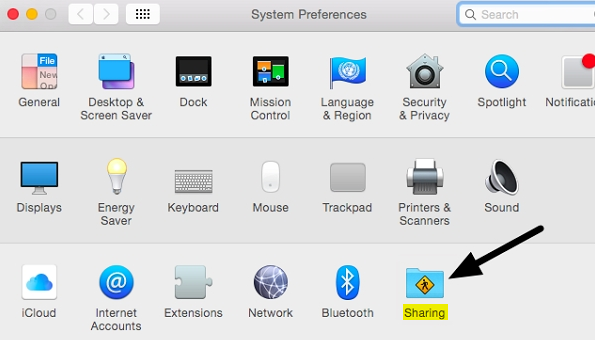
3. Launch the System Preferences window on your Mac, and select Sharing from the list of options.
4. Choose Internet Sharing from the list of available options. Now is the time to choose the Internet connection that you wish to make available to others through your hotspot. Choose Ethernet, and then check to see if a cable containing an ethernet plug is used to connect your Mac to the router (you cannot receive and emit a Wi-Fi signal on a Mac at the same time, so you will need to connect your Mac to your router to use this method).
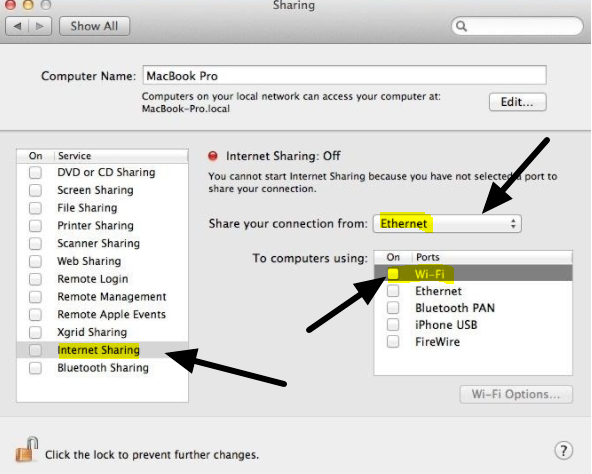
5. Now choose to share it with computers that are connected via: Wi-Fi (as illustrated in the image above).
6. Next, select Wi-Fi Options from the menu on the left, and then enter all of the required information, including a password, to prevent unauthorized users from joining to your personal wireless network.
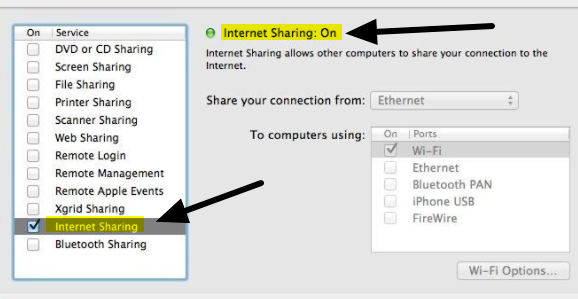
7. In the final step, activate the hotspot by checking the box labeled “Internet Sharing” on the left side of the screen.
8. You are now able to power on your Switch, navigate to the HOME Menu, and select Internet Settings to look for your personal hotspot and connect to it by entering the password that you created specifically for this purpose.
FAQs
Can you connect a Nintendo Switch to a VPN?
No, the Nintendo Switch does not arrive with a virtual private network (VPN) already installed. In addition, there is not a single program that you could possibly download onto it. But, you can benefit from an encrypted connection on your Nintendo Switch by installing a virtual private network (VPN) on the Wi-Fi router in your home.
Why won t my Nintendo Switch connect to VPN?
In a technical sense, a virtual private network (VPN) cannot be installed on a Nintendo Switch. This technology is not natively supported on the Nintendo Switch, and the console does not offer any virtual private network (VPN) applications. Despite this, you are still able to connect your Nintendo Switch to a virtual private network (VPN). The Virtual Private Network (VPN) can be installed on your router, and then the Switch can be connected to the network. This is one method for achieving this goal.
What DNS should I use for Nintendo Switch?
8.8.8.8
The primary DNS should be 8.8.8.8, so enter that, and then select OK.
What is a DNS error on Nintendo Switch?
This error code suggests that there may be a problem with the DNS that is currently being utilized. This problem could have been caused by an inaccurate DNS being typed into the console’s Internet settings, an issue with the Internet service provider (ISP), or an issue with the DNS service that you are attempting to utilize.
Why won t my Switch connect to WiFi?
Do a reset on the Nintendo Switch system. You can restart the console by pressing and holding the POWER Button for three seconds, then going to the “Power Settings” menu and selecting “Restart.” Make sure that the wireless security key option on your router is compatible with the Nintendo Switch.

Vampire Crawlers Coin Farming Guide

Forza Horizon 6 Performance: Why 60 FPS Is Still the Console Standard

Yoshi and the Mysterious Book (2026) – Full Completion Guide, Rewards & Secret Ending

How to Get Free Pets in Adopt Me: A Guide for Players

Roblox Username Generator – Create a Cool & Unique Username in Seconds
How to Get Free Pets in Adopt Me: A Guide for Players
Yoshi and the Mysterious Book (2026) – Full Completion Guide, Rewards & Secret Ending
Forza Horizon 6 Performance: Why 60 FPS Is Still the Console Standard


