Guide
How to Sort By Date in Microsoft Excel

You need to organize whatever it is that you’re having trouble remembering, whether it’s birthdays, your weekly or monthly budget, or anything else; this will help you avoid being confused. Excel’s built-in sorting functionality is your best bet for resolving the issue. But how can you organize things in Excel by date? If you have a list of dates in a column in Excel, for instance, you may sort the dates either from the most recent to the oldest or from the most recent to the oldest, is that correct? Don’t worry so much! This article will walk you through the process of sorting data in Microsoft Excel according to the date in a step-by-step format. So let’s get started:
Read Also: How to Turn Gridlines On and Off in Microsoft Excel
How to Sort By Date in Microsoft Excel
Without Mixing Data:
When sorting data in Excel, one approach to prevent the data in separate rows from becoming mixed up is to select all of the necessary columns before beginning the sorting process. When you have a huge table with numerous columns and you want to sort the data based on multiple criteria, this is extremely helpful because it allows you to organize the data in a more organized fashion. Learn how to arrange data in Excel according to date without causing any confusion by following the instructions below.
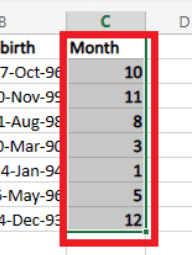
1. To begin, choose the cell that contains the data you need to sort.

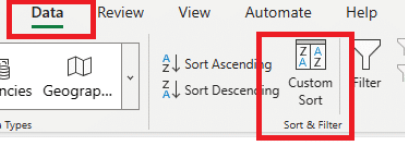
2. Choose the “Data” tab, then select the “Custom Sort” option.

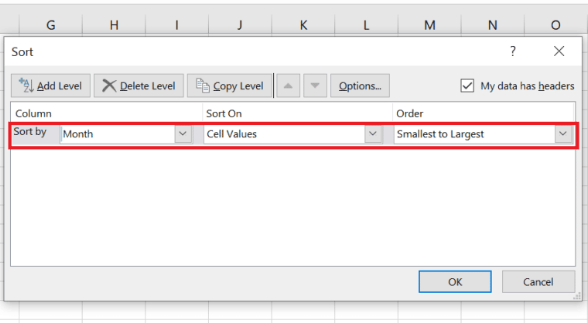
3. In the Sort dialogue box, pick the Column that will serve as the primary sorting criteria that you will be using.

4. In the Order area, choose the direction in which you want the data to be sorted, either “Smallest to Largest” or “Largest to Smallest,” depending on your preference.
5. Choose the “OK” button.
6. The last step, your data has been organised in the appropriate manner.

These instructions can also be helpful if you want to learn how to sort dates in Excel when there are several columns involved because the process is the same in both cases.
FAQs
Why can’t I sort by date in Excel?
Even if your cells are set to display either the month or the month and day, the default sort feature in Excel will always consider the year, hence it won’t work in this situation because it always takes the year into account. The addition of a helper column, followed by the extraction of the month number and subsequent sorting by that column, is the answer. Use the MONTH function to obtain a month starting from a given date.
How do you automatically date rows in Excel?
Take advantage of the Fill Handle.
Choose the cell that houses the first date to highlight it. Move the fill handle so that it covers all of the neighbouring cells that you intend to fill with consecutive dates. Keep your finger pressed down in the cell’s lower-right corner and slide it to the left to fill in the rest of the series. On a spreadsheet, the fill handles can be dragged up, down, or across the row.
How do I Auto date a spreadsheet?
Enter a date and time for the current day that can be kept up to date automatically. If you wish to enter today’s date in Excel in a way that ensures it will always be accurate, you should make use of one of the following Excel date functions: The =TODAY() function will insert the current date into a cell. Using the =NOW() function will insert the current date and time into a cell.
How do I Auto date a column in Excel?
Simply select the appropriate position for your date information by clicking on the column header. Click the arrow in the bottom right hand corner of the Number section, which is located in the Home tab of the Excel ribbon. Choose “Date” from the list of categories for formatting numbers, and then apply the date format of your choosing.
Can you automatically sort by date in Excel?
Excel does provide for the automatic organisation of a range of cells according to the date.


