Gaming
How to Update Your Xbox
Users of the Xbox One video game system are encouraged to maintain their controllers up to date with the latest software. Although it is not required, Microsoft often updates the firmware of the gaming device.
Additionally, these firmware updates offer a plethora of new functions to the controller, in addition to enhancements to its headset adapter capabilities. Microsoft has made it simple for Xbox One consumers to replace their controllers by offering them with three different alternatives to choose between. Allow me to demonstrate.
Read Also: How to Connect an Xbox One Controller to a PC
How to Update Your Xbox Controller Wirelessly
If you wish to wirelessly upgrade your Xbox One controller, you must have acquired the controller during or after June 2015. The bottom of your controller should have a round 3.5-mm port, which shows that your controller is capable of receiving wireless updates. If you are unsure when you purchased your controller, look for a round 3.5-mm port on the bottom of it.
It is essential that you connect your stereo headset adapter to your controller in order for your headset to receive the latest patches and enhancements.
1. Turn on your Xbox One controller by pressing the Xbox button on the controller. Select “System” and then “Settings” from the menu bar.
2. Select “Devices & streaming” from the drop-down menu, followed by “Accessories.” Select the controller that needs to be updated from the drop-down menu.
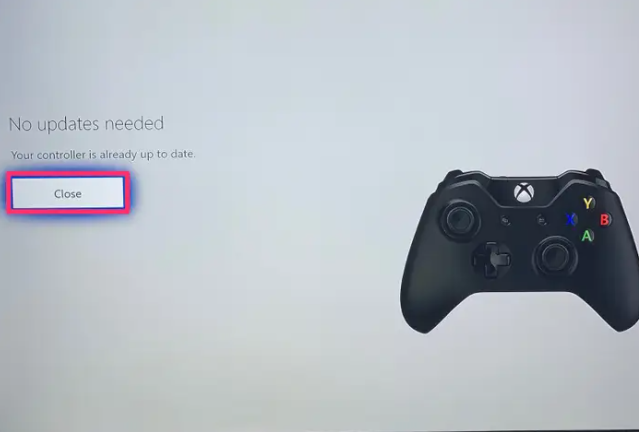
3. Select the “Firmware version” box from the “Device details” drop-down menu.
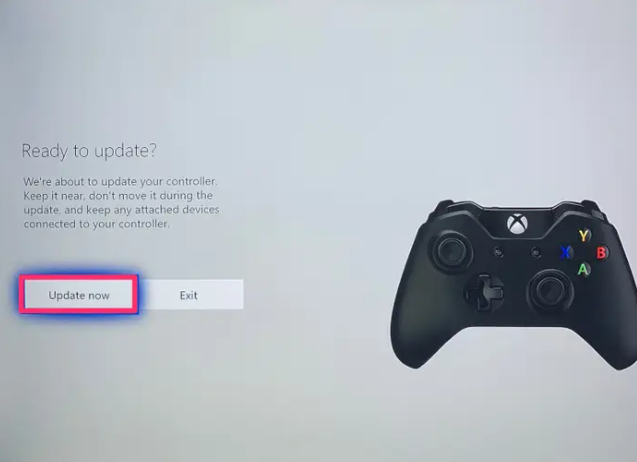
4. Once you choose “Update Now,” your Xbox One controller will begin to update automatically.
How to Update Your Xbox One controller using a USB
1. Install the Xbox One controller on your Xbox One by connecting it with a USB wire.
2. A window should open with instructions for automatically applying the update.
3. If the instructions don’t show automatically, hit the Xbox button on your controller to bring them up manually.
4. Select “System” and then “Settings” from the menu bar.
5. Select “Devices & streaming” from the drop-down menu, followed by “Accessories.” Select the controller that needs to be updated from the drop-down menu.
6. Select the “Firmware version” box from the “Device details” drop-down menu.
7. Press the “Continue” button.
How to Update Your Xbox One controller using a Windows 10 computer
1. Start the Xbox Accessories app on your Windows 10 PC after it has been turned on. If you do not already have it installed.
2. Connect your Xbox One controller to your computer through the USB cable. Use a USB cable or the Xbox Wireless Adapter for Windows to connect your controller to your computer if it is wireless.
3. If an update to the controller is necessary while the Xbox Accessories app is active, a notice stating “Update Required” should appear on the screen.
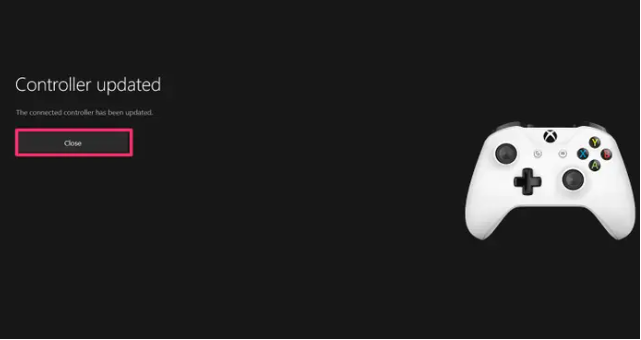
4. Once your controller has been modified, click on “Close.”
Video
FAQs
Is updating Xbox One controller important?
A dynamic latency input (DLI) feature has also been added to older Xbox One controllers as part of the new firmware update, which minimizes input latency on controllers linked to Xbox Series X / S consoles to make gaming more responsive. Microsoft is also making improvements to the audio output settings on all Xbox systems, in addition to the controller modifications.
Can you wirelessly update Xbox controller?
A USB cable or the Xbox Wireless Adapter for Windows may be used to connect your Xbox Wireless Controller to your computer. Note If you haven’t already, you’ll be prompted to upgrade to Windows 10 Anniversary Edition unless you already have. If an update is required when the controller is attached, you will see the message Update Required while the controller is connected. Install the latest version.

Vampire Crawlers Coin Farming Guide

Forza Horizon 6 Performance: Why 60 FPS Is Still the Console Standard

Yoshi and the Mysterious Book (2026) – Full Completion Guide, Rewards & Secret Ending

How to Get Free Pets in Adopt Me: A Guide for Players

Roblox Username Generator – Create a Cool & Unique Username in Seconds
How to Get Free Pets in Adopt Me: A Guide for Players

Grow a Garden Recipes in Roblox: Guide to Cook (Donuts, Sushi, Pie, Pizza & More!)
Roblox Username Generator – Create a Cool & Unique Username in Seconds
Yoshi and the Mysterious Book (2026) – Full Completion Guide, Rewards & Secret Ending


