Technology
Guide to Best Nvidia Control Panel Settings for Gaming 2021
Optimization of high-quality settings at good FPS is very essential for smooth AAA gaming. Many gamers believe that they only need the latest Intel/ AMD CPU, 16 GB or higher RAM, and an updated NVIDIA/ AMD graphics card.
But having all these things only is not enough for a seamless gaming experience. You should pay heed to the settings of your NVIDIA control panel to get more FPS rates and maximum performance.
In this blog, we will discuss every step of the best NVIDIA control panel settings for gaming along with its installation steps.
How to Download and Install Latest NVIDIA Drivers?
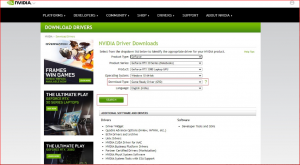
It’s very easy to install the latest NVIDIA drivers. The very first thing you should do is to visit the download page of Nvidia’s official website. Then add all your device configurations to identify your device compatibility with drivers.
Select “Game Ready Option” in the field of Download type for good gaming. If you use your PC for other purposes like video editing and graphic designing, the option of “Studio Driver” will also be suitable for you. After entering all these fields, tap the Search icon.
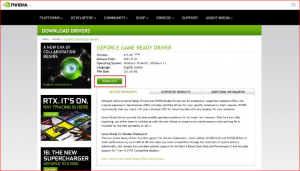
The “search” click will take you to the download page, from where you can easily download the latest Nvidia drivers by clicking the download button.
After downloading the Nvidia drivers on your PC, install them by following these steps.
- Right-click on the file of the Nvidia drivers and press the “run as administrator” icon.
- Select the installation option of Nvidia drivers alone.
- Press the “Agree and Continue” icon to move to the next tab.
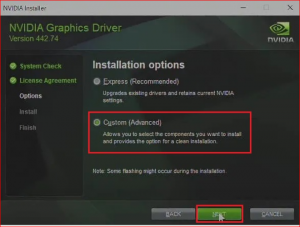
- There, select the “Custom (advanced)” option first and then click on the “Next” option.
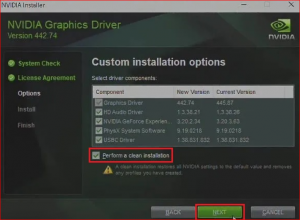
- Select the driver components you want to use.
- Then, select the checkbox of “perform a clean installation”. And press “Next” to start the installation.
- When the installation is done, restart your computer. Then, optimize the settings of the control panel for gaming.
Best Nvidia Control Panel Settings For Gaming
It’s very important to optimize Nvidia control settings to bring a fantastic change in your gaming. By changing the settings of the graphic card, you will maximize the performance of features.
When Nvidia gets downloaded to a computer, it starts working to pre-configured default settings. But you should configure your control panel settings yourself to optimize FPS (frame per second) rate. Here we will discuss the best Nvidia control panel 3D settings.
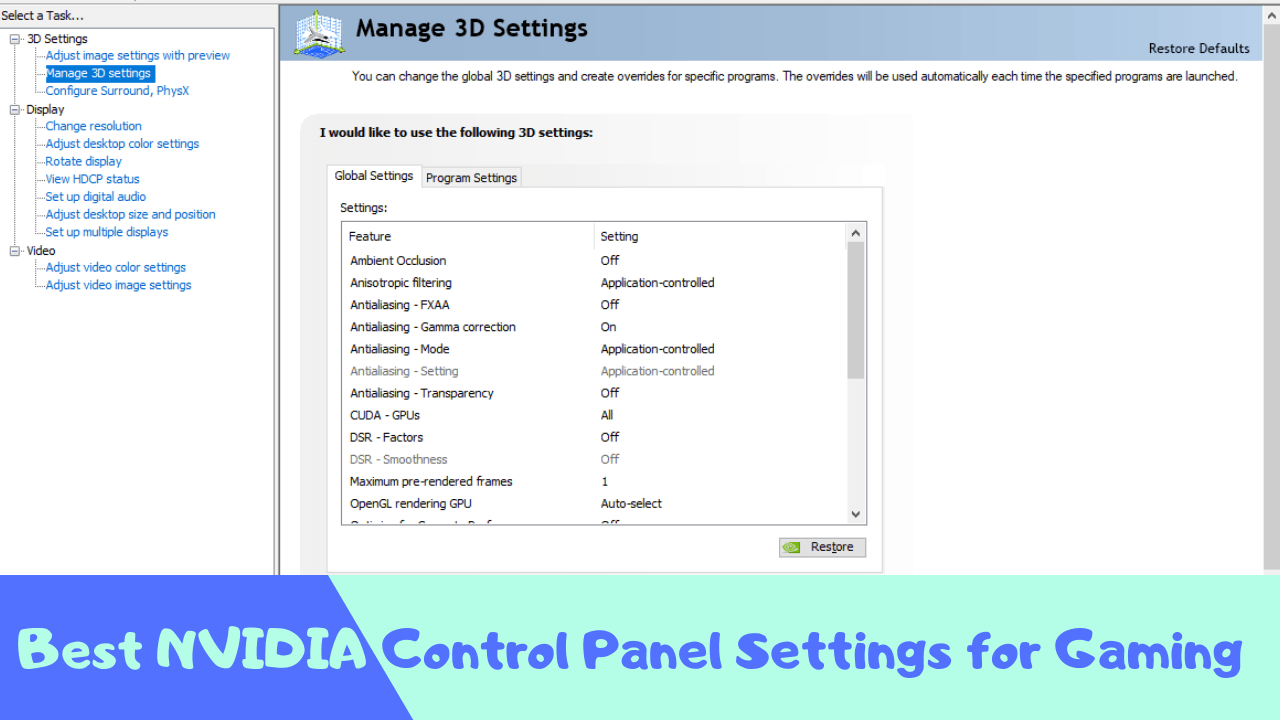
1- 3D Best Nvidia Control Panel Settings For Gaming
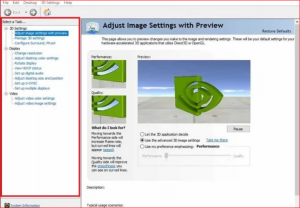
To configure the best Nvidia control panel settings, open the Nvidia control panel. In the control panel, click on the “Adjust Image Settings With Preview”.
After this, go for the option “Use the advanced 3D image setting” and click on the “apply”. Choose the tab “Manage 3D Settings” and start the configuration.
- Image Sharpening
The image-sharpening setting is used to have images of better visual quality and sharpness. It can be done by turning ON the Sharpening, maintaining a sharpening level of 0.5 and film grain to 0.17. Turn ON the scaling option to enable GPU and apply these settings.
- Anisotropic Filtering
Anisotropic filtering setting is very effective in the elimination of blurriness from images. All you need is to Turn OFF these settings to remove blurred textures.
- Ambient Occlusion
Turn ON the settings of ambient occlusion and amp up it up to level 16X. It brings improved in-depth perception of the game by adding soft shadows of the elements.
- Antialiasing Mode
This mode is effective in determining the application of antialiasing on 3D images. You need to select the APPLICATION CONTROLLED option for better gaming.
- Antialiasing FXAA
Turn OFF these settings to improve your game visuals holistically.
- Antialiasing Gamma Correction
Antialiasing Gamma correction setting is very important to improve the quality of 3D visuals by turning ON gamma correction.
- Antialiasing Transparency
Keep this setting option turned OFF to reduce the aliases of transparent textures with image edges.
- DSR Factors
Dynamic Super Resolution Factors play an important role in setting high-resolution images. But it also decreases the FPS rate. That’s why you need to turn it OFF.
- Low Latency Mode
Low Latency Mode lowers latency and controls the number of frames before their processing by GPU. Turn this setting ON to lower input lag and higher FPS.
- CUDA GPUs
Select the areas or applications where you want to use CUDA GPU cores. We recommend that you select ALL.
- Max Frame Rate
Turn this setting OFF to limit the number of FPS values in the game.
- Monitor Compatibility
Monitor compatibility is to be turned ON when you have to use an external monitor. Keep it OFF at its default option for laptops.
- Power Management Mode
Select the “PREFER MAXIMUM PERFORMANCE” option from the power management mode to improve graphics performance.
- OpenGL Rendering GPU
Set OpenGL Rendering GPU at GeForce GTX 1050 for better Nvidia card performance.
- Shader Cache
TURN ON the Shader Cache to lower the usage of the CPU by reducing full shaders to the computer disk cache.
- Texture Filtering – Anisotropic Sample Optimization
Turn this setting ON to control the number of anisotropic samples based on the pixel size.
- Texture Filtering – Negative LOD Bias
Select ALLOW the Negative LOD Bias settings in texture filtering to sharp stationary images.
- Texture Filtering – Quality
Switch Texture Filtering – Quality to the “high performance” icon to maximize texture filtering quality and balance.
- Texture Filtering – Trilinear Optimization
Turn this setting ON to enjoy bilinear filtration on textures.
- Triple Buffering
Keep this setting OFF.
- Threaded Optimization
Select the “Auto” icon in the threaded optimization to access multiple CPU cores.
- Vertical Sync
Turn the vertical sync OFF to control the refresh rate of the monitor using the GPU render rate interface.
- Virtual Reality Pre-Rendered Frames
Select 1 to limit the number of CPU frames before their processing.
2- Display Settings of Nvidia Control Panel For Gaming
After completing your 3D settings, adjust display settings in your control panel as follows:
- Resolution
Choose the highest screen resolution under the display setting. Go to the Refresh Rate section for the highest possible resolution. Then, move to “Use NVIDIA Color Settings” for the following settings
- Output color depth – 8 BPC
- Output color depth – RGB
- Output dynamic range – Full
- Desktop color depth – Highest (32 bit)
- Rotate Display
Press on the “Orientation to Landscape” option for better display and click the “apply” icon.
- Adjust Desktop Color Settings
Apply the following changes in the desktop color settings.
- Improve digital vibrancy by 80%.
- Keep colors vibrant and saturated.
- Click “apply”.
- Set Up Digital Audio
Keep the settings of digital audio the same as in default.
- Adjust Desktop Size and Position
Adjust the desktop size and position set by clicking “select a scaling mode”, then, “no scaling”, and “apply” in the end.
3- Video Settings in the Nvidia Control Panel
Also, adjust your video setting to have a clear view of visual content in games.
- Adjust Video Color Setting
Select “With the Nvidia Settings” from the video color adjustment. Move to the advanced tab to select the Dynamic Range to Full.
- Adjust Video Image Setting
Keep all the video image settings configuration as it is. Then, click on the “apply” to previous changes.
That’s all for the best Nvidia control panel settings for gaming. Hope that this blog will be helpful to you in the optimization of Nvidia drivers. Update your 3D, display, and video settings to experience the best gaming in terms of both visuals and performance.

Vampire Crawlers Coin Farming Guide

Forza Horizon 6 Performance: Why 60 FPS Is Still the Console Standard

Yoshi and the Mysterious Book (2026) – Full Completion Guide, Rewards & Secret Ending

How to Get Free Pets in Adopt Me: A Guide for Players

Roblox Username Generator – Create a Cool & Unique Username in Seconds
How to Get Free Pets in Adopt Me: A Guide for Players
Yoshi and the Mysterious Book (2026) – Full Completion Guide, Rewards & Secret Ending
Forza Horizon 6 Performance: Why 60 FPS Is Still the Console Standard


