Guide
How To Change Admin Name On Mac

When you initially receive your MacBook Pro, there are a number of procedures you must complete in order to get everything up and running.
In the event that you recently purchased your first MacBook, you may recall the procedure when you first turned on the computer and macOS guided you through a handful of steps to get things customized to your liking. One of these early setup stages is generating an Admin name for your Mac, which is essentially the name and folder for the person who will be using the device when it is purchased.
If you ever find yourself in the situation where you need to alter your Admin Name for whatever reason, the process is straightforward if you understand the processes involved. The name Admin is plainly a contraction of the word administrator, and it relates to the person who is in command of the computer.
Possessing knowledge of this name and account configuration grants you access to several essential functions on the Mac and the ability to perform significant modifications that would otherwise require a password.
What is an Admin Name?
After turning on your MacBook Pro, a login page appears, prompting you to enter your username and password in order to get access to the machine.

If you haven’t already done so, your user name and password that you created when you first got your computer are a portion of the Admin name known as the “full name.” An Admin name can also have a “account name” component to it, which refers to files and folders that are exclusive to the primary administrator.
It’s simple and uncomplicated to change your MacBook’s complete name, but it’s a little more complicated to change the account name connected with your admin name, which requires a few extra steps. Regardless of what you are attempting to improve, the stages outlined below will guide you through the process of achieving your goals and objectives.
How to Change Admin Name on Mac?
It’s a good idea to back up your MacBook Pro data to an external disc using Time Machine or to make copies in the cloud before you begin the process of changing your Admin name.
As you can see, this is not a significant modification to your Mac and should not result in the loss of any essential files. However, whenever you make a change to the backend of your operating system, it is wise to keep a backup of your machine.
Changing the “Full Name” of the administrator on a Mac
Changing the complete name of the administrator is a simple process that only requires a few steps. This procedure can be completed from the main account on your MacBook, as well as from any administrator accounts that have been set up on it.
Step 1: Click on the Apple menu icon in the upper left corner of the screen to open the Apple menu. Select System Preferences from the drop-down menu.
Step 2: Select Users & Groups from the drop-down menu.
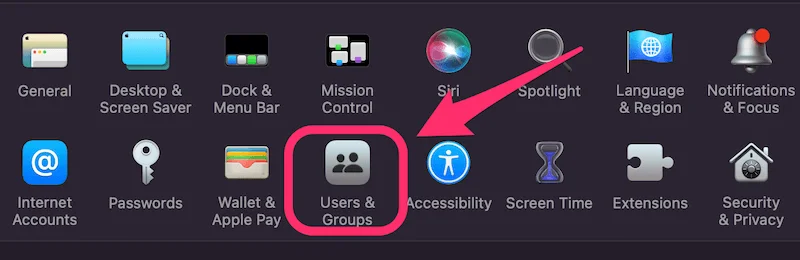
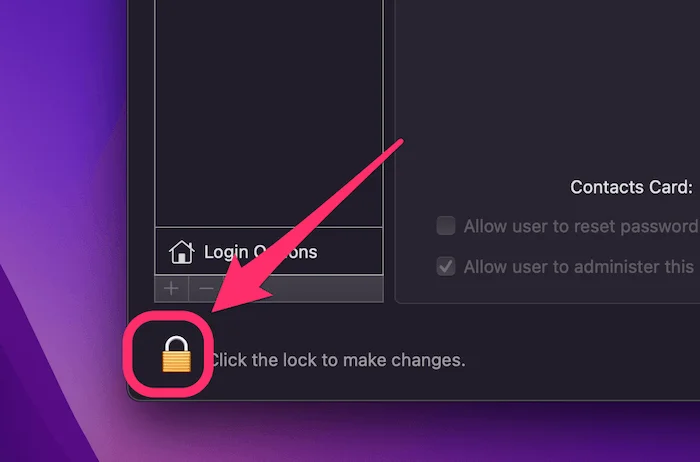
Step 3: In the lower left-hand corner of this dialogue box, click the Padlock icon to close it.
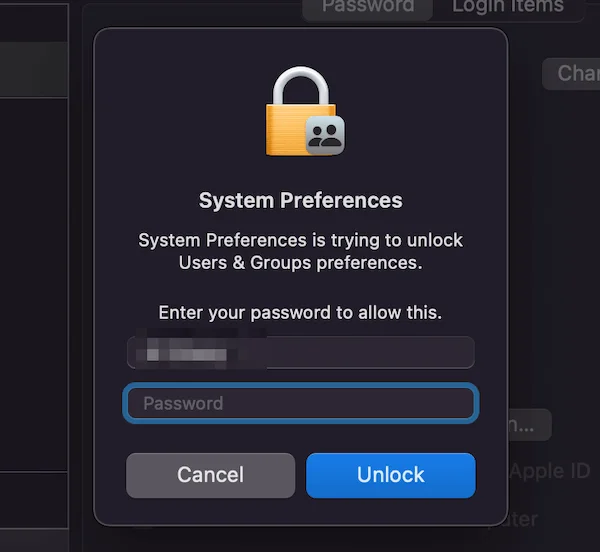
Step 4: Fill up the Username and Password fields with your information.
Step 5: While holding down the Control key, click on the Admin name field.

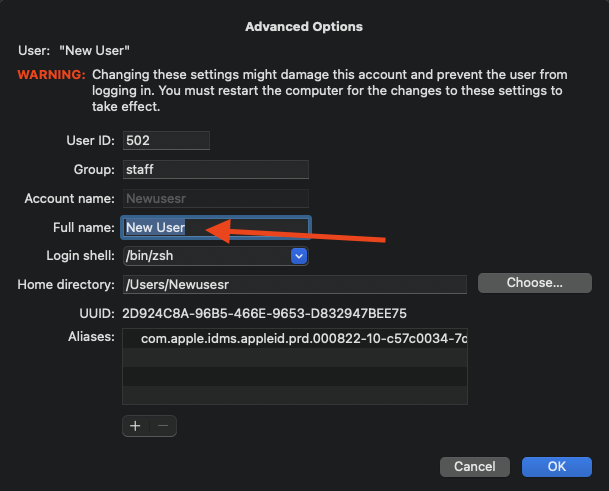
Step 6: Select Advanced Options from the drop-down menu.

Note: If you don’t see “Advanced Options,” go back to Step 3 and double-check that you’ve unlocked the security lock at the bottom of the screen.
Step 7: Changing the name in the Full Name field to whatever you choose is the seventh and last step.
Changing Admin “Account Name” on Mac
The procedure for changing the Admin Account Name is a little more difficult than the procedure for changing the entire name of the account.
It is necessary to do this job in practically all recent versions of macOS by logging into a separate administrator account than the one you wish to change in order to complete it.
To make the change, you will need to create a new Admin account on your computer if there are no other Admin accounts already set up. It appears to be hard, however it is simple if you follow these steps:
Step 1: Launch the Finder application. To begin, select Go from the menu bar at the top of your screen.
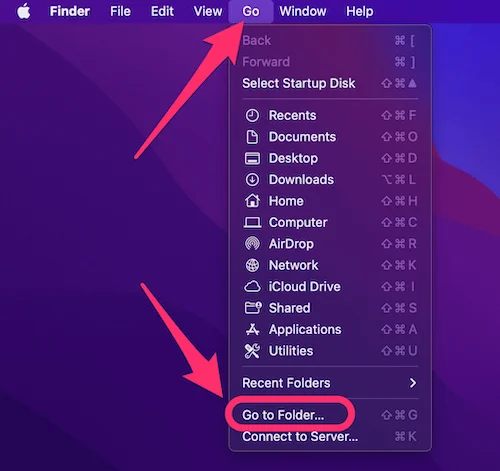
Step 2: Select Go to Folder from the drop-down menu, and you’ll see a popup that looks like this:
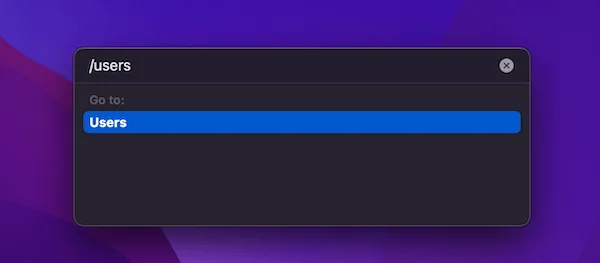
Step 3: Then, in this dialogue box, type /Users to locate the Users folder.
Fourth, locate the folder whose name you want to modify and make a note of it. Also make a note of what name you want to give to this folder. Change the name of the folder to reflect the new name.
Step 5: When requested, enter the existing Admin name and password to complete the process.
After that, you can follow the instructions in the preceding seven-step tutorial on how to modify the Admin Full Name on Mac.
1. Go to the Apple menu, which is located at the top left of your computer’s display screen. Select System Preferences, then Users & Groups from the drop-down menu.
2. To unlock this box, click on the Padlock icon in the lower left corner and input your existing username and password.
3. Control Select Advanced Options from the drop-down menu above your name field on the top left.
4. Change the value of “Account Name” to the new name that you assigned to the new folder in step 4 of this procedure.
5. Change the name of the “home directory” to reflect the new name as well. To proceed, click OK.
6. Restart your Mac to ensure that all of the modifications take effect.
Final Thoughts
As you can see, the procedure for changing the administrator’s name is a little complicated, but it is not overly difficult to complete.
If you have the time and resources, you can complete this task yourself, and by following the procedures outlined above, you can make the modifications permanent in a short period of time. Be sure to back up your computer and any essential files before making these changes so that you don’t risk losing them if something goes wrong during the process of making these changes.
Is this the first time you’ve changed the Admin name on your MacBook Pro? What motivated you to make the change?
Video:

Vampire Crawlers Coin Farming Guide

Forza Horizon 6 Performance: Why 60 FPS Is Still the Console Standard

Yoshi and the Mysterious Book (2026) – Full Completion Guide, Rewards & Secret Ending

How to Get Free Pets in Adopt Me: A Guide for Players

Roblox Username Generator – Create a Cool & Unique Username in Seconds
How to Get Free Pets in Adopt Me: A Guide for Players
Yoshi and the Mysterious Book (2026) – Full Completion Guide, Rewards & Secret Ending
Vampire Crawlers Coin Farming Guide


