Guide
How to Enable or Disable Fast Startup on Windows 11
Many of the excellent features from Windows 10 have been carried over into Windows 11, including Fast Startup. Fast Startup, as the name implies, allows your computer to boot up more quickly once it has been shut down.
Fast Startup is enabled by default on Windows 11 computers that are capable of using hibernation. This post will show you how to manually enable or disable Fast Startup in Windows 11 using the command prompt.
Read Also: How to Turn Off Game Mode on Windows 11
What Is Fast Startup on Windows 11
Generally speaking, Fast Startup is a feature included in Windows 11 that allows the system to boot up more quickly after being shut down or restarted. Please keep in mind that Fast Startup will not function during a restart. If you are experiencing a slow start-up on Windows 11, you can see if the Fast Startup function is enabled. If it is, you can disable it.
How to Enable/Disable Fast Startup on Windows 11 via Control Panel
Fast Startup is enabled by default, and it can be turned off at any time. However, if you have turned off Fast Startup on Windows 11, you can turn it back on by following the instructions outlined below.
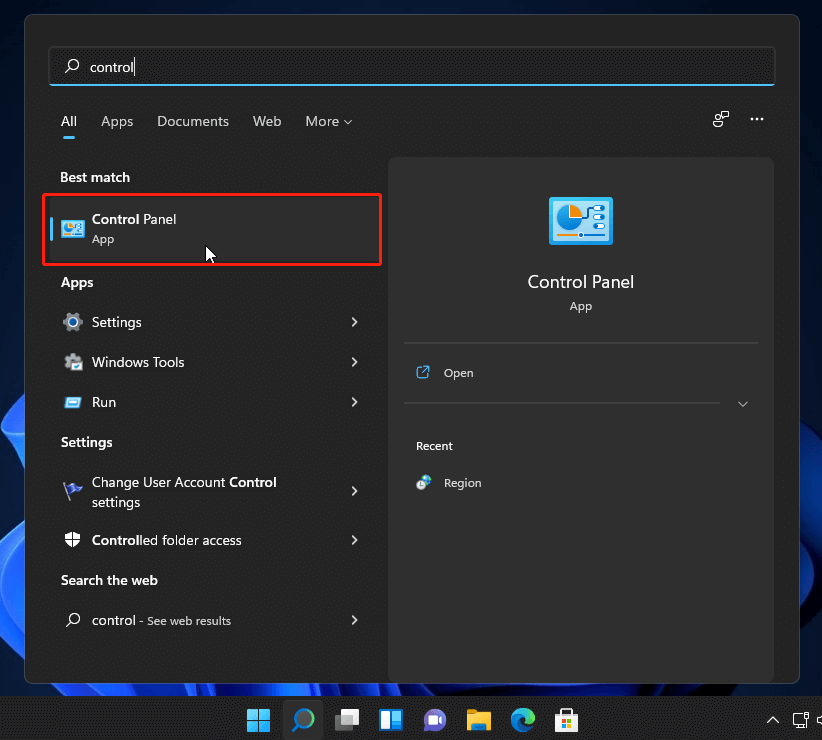
Step 1: On the taskbar, select the Search icon. Then look for and open the Control Panel by typing it in the search box.
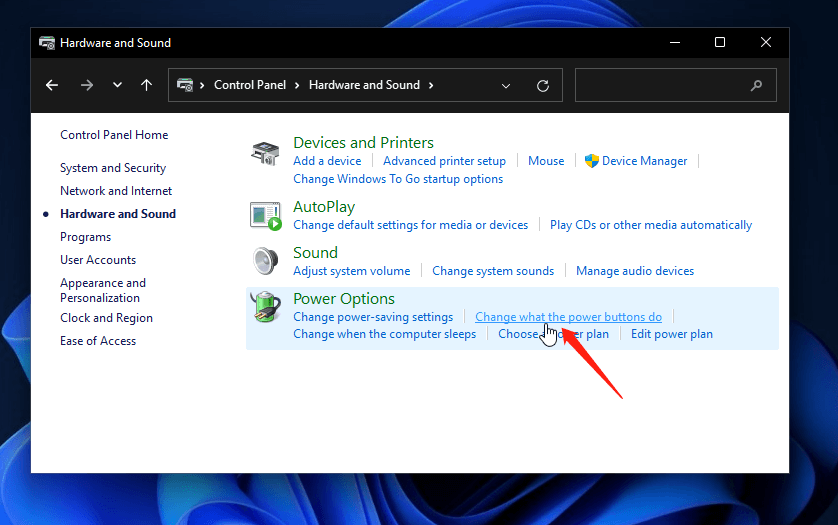
Step 2: The second step is to open the Control Panel interface by selecting View by Category from the upper right corner of the screen. Then, choose Hardware and Sound.
Step 3: In the Power Options section, select Change what the power buttons do from the drop-down menu.
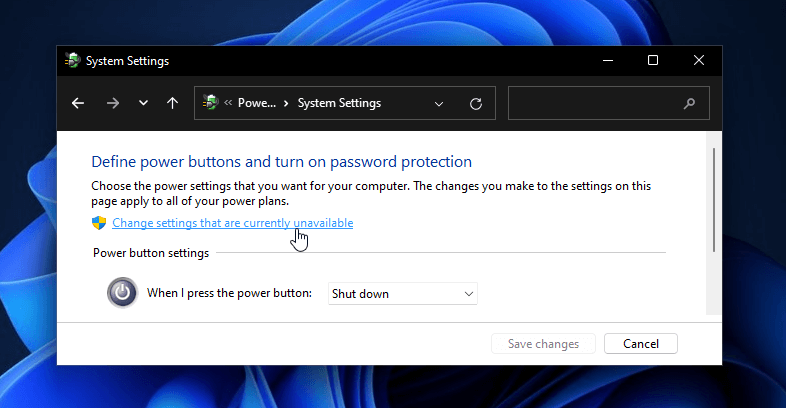
Step 4: On the following page, select Change settings that are presently inaccessible from the drop-down menu.
Step 5: You will be able to see the options for shutting down your computer. To enable Quick Startup on Windows 11, simply select the Turn on fast startup (recommended) option from the Start menu.
Step 6: To ensure that the modifications are retained, click Save Changes.
After making changes to the Fast Startup settings, you must restart your computer for the changes to take effect.
In order to disable Quick Startup, you must navigate to the same settings in Control Panel and uncheck the option Turn on fast startup (as seen in the screenshot above).
How to Enable/Disable Fast Startup on Windows 11 via Registry Editor
Another method of enabling or disabling Fast Startup on Windows 11 is to make changes to a specific registry key.
If you update or remove specific registry keys by mistake, please be aware that your computer may become jumbled, if not completely destroyed. Consequently, please remember to back up your registry entries before making any changes, and exercise extreme caution when working with the Registry Editor.
Let’s have a look at how to enable Fast Startup on Windows 11 by utilizing the Registry Editor.
Step 1: To open the Run window, press the Windows key + R together. Then type regedit into the search box and click OK to activate Registry Editor.
Step 2: When you are presented with the Registry Editor’s primary interface, navigate to the following location:
HKEY LOCAL MACHINE\SYSTEM\
CurrentControlSetControlSession ManagerPower is a control set that controls the session manager and the power.
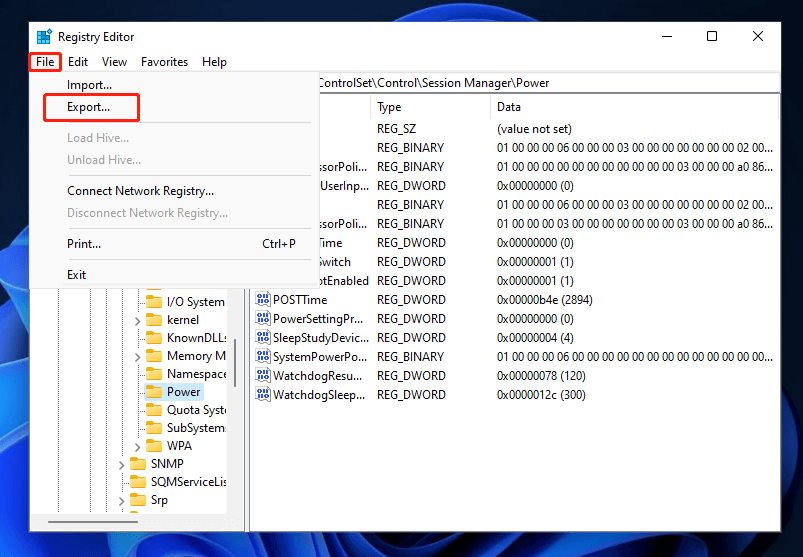
Step 3: Select File > Export from the menu bar. Then, in the pop-up window, specify a backup destination for the current registry entry and click Save to make a copy of it.
Step 4: In the right pane, double-click HiberbootEnabled to make changes to the setting. In the pop-up window that appears. For Windows 11, enter 1 in the Value data area to enable Fast Startup functionality.
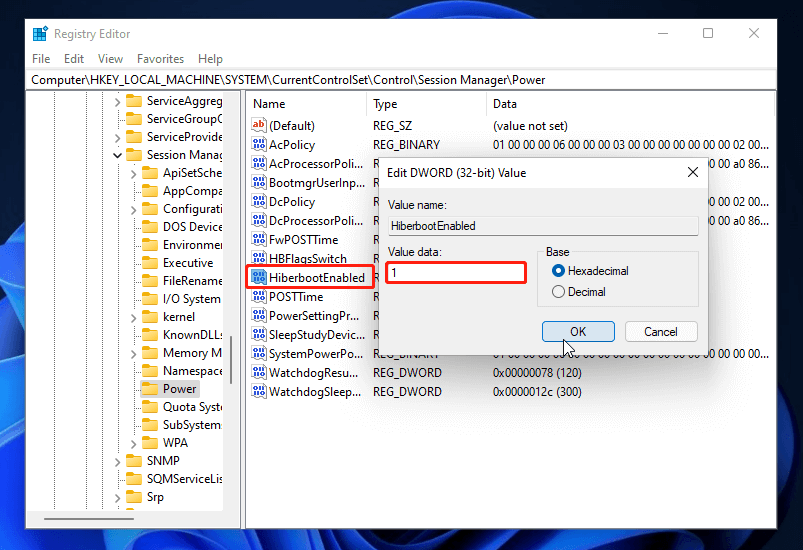
Step 5: To finalize the operation, click the OK button.
After making the necessary changes to the registry value data, you can exit Registry Editor and restart your computer.
The above procedure will show you how to toggle Fast Startup on and off in Windows 11.
Video


