Guide
How to Import Brushes in Photoshop

If you’ve become tired of the preset brushes that come with Adobe Photoshop, don’t worry: you can create your own by downloading and installing them. Adobe enables you to add new brushes to your computer that comprise forms, patterns, outlines, and other elements. Here’s how you go about it.
Read Also: How to Use the Pen Tool in Photoshop
How to Downloading New Brushes for Photoshop
To get started, you’ll need to obtain a sufficient collection of third-party Photoshop brushes before you can begin working. These are available in the ABR file format and may be purchased or downloaded for free from sites such as Brusheezy, among other places.
Keep in mind that you should only download and purchase brushes from reputable sites. In an attempt to take control of your computer, malicious actors will add malware-infected files.
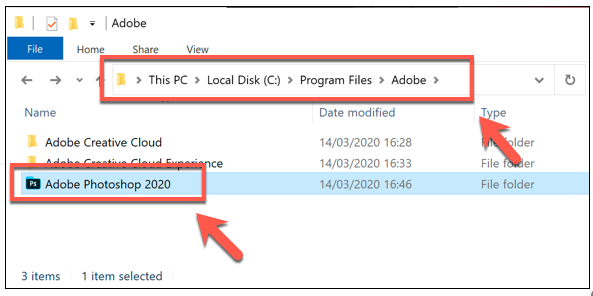
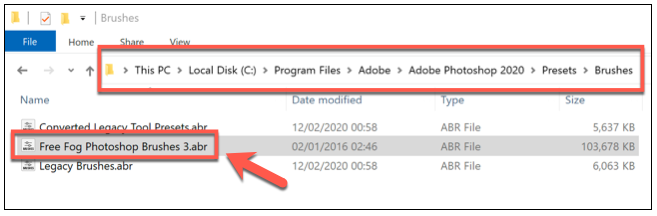
The brush file should be placed in the Preset > Brushes folder in your Photoshop installation directory once it has been downloaded. If you have any questions, please contact us.
If you’re using Windows, you’ll often find it under the C:Program FilesAdobe folder.
Depending on your operating system, certain brushes may already be present in the “Brushes” folder by default. To use a new ABR brush file, just copy or transfer it into this folder.
It is possible to save third-party brushes in an other folder and then load them manually, but it is far simpler to store these brushes in a controlled area where Photoshop can access them automatically.
Installing Brushes in Photoshop (From Photoshop 2020)
The method through which you install third-party brushes will differ based on your Photoshop version. In Photoshop versions 2020 and later, you’ll be able to add new brushes using the Brushes menu panel; however, you may need to first show the panel in order for it to work properly.
For this, open a new or existing image in Photoshop and then select Window > Brushes from the menu bar to bring up the Brushes panel.
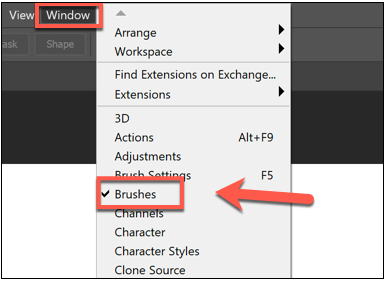
When you get to this stage, the Brushes menu panel should display; however, you may need to drag it around with your mouse to ensure that it is properly aligned with the other panels on the right.
To add additional brushes, go to the “Settings” menu item in the top-right corner of the panel and pick “Add Brush.” Select the “Import Brushes” option from the drop-down menu.
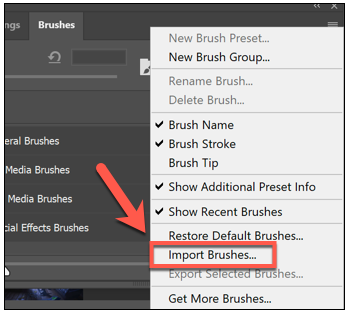
In the “Load” file selection box, pick the ABR file for the third-party brush that you downloaded earlier. Having picked your ABR file, click the “Load” button to begin the process of installing the brush into Photoshop.
If successful, the loaded brushes will now appear as a grouped folder in the Brushes panel for you to begin using.
Installing Brushes in Older Photoshop Versions (CC 2019 and Older)
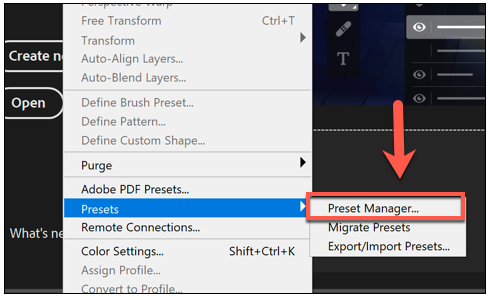
In previous versions of Photoshop (Photoshop CC 2019 and earlier), you’ll have to utilize the Preset Manager rather than the Brushes panel menu in order to load brushes.
To do so, start Adobe Photoshop on your computer and then select Edit > Presets > Preset Manager from the menu bar.
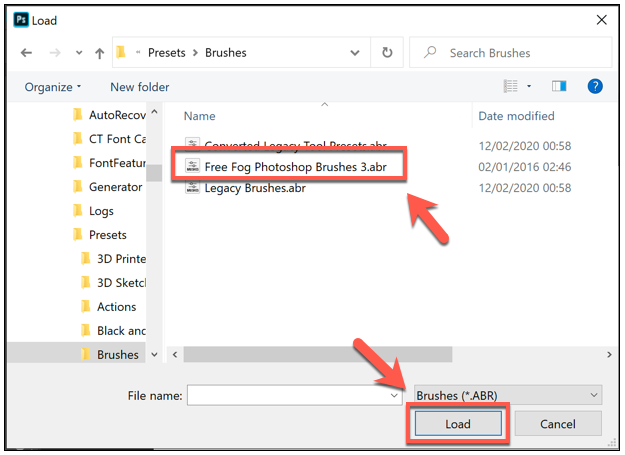
In the “Preset Manager” window, press the “Load” button.
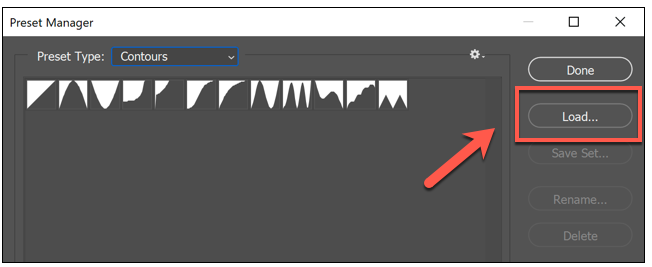
From here, use the “Load” file selection window to choose your brushes, and then click the “Load” button to import them into Photoshop.
If you are unable to choose them, you may need to pick “Brushes (*.ABR)” from the drop-down option beside the “File Name” field in order to do so.
Using an Imported Photoshop Brush
Once your Photoshop brushes have been successfully imported, you may begin working with them. It is necessary to have the Brushes panel visible in order to complete this task, so pick Window > Brushes to make it visible.
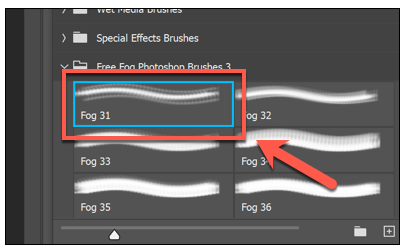
Brush Groups are created for you when you import new brushes; simply click on the “Brush Group” folder to get a list of all of the brushes that have been imported into your collection.

To begin working with any of these brushes, simply click on them with your mouse. In the Brushes panel, selected brushes will have a blue border around them to indicate that they have been selected.
Following the selection of your brush, you may begin sketching on your canvas in order to design and create new images.
In the same way that you do with any other Photoshop brush, you may further customise the parameters for your brush by utilizing the options bar located at the top of the Photoshop window.

This will allow you to adjust the size of the brush, the opacity, and other aspects of the brush based on the type of brush you are using and the options that are accessible.
Incorporating third-party Photoshop brushes into your workflow is just one approach to enhance the capabilities of your picture editing programme. You may go even farther by installing Photoshop plug-ins and extensions, which will allow you to access more functions and settings.
Video

Vampire Crawlers Coin Farming Guide

Forza Horizon 6 Performance: Why 60 FPS Is Still the Console Standard

Yoshi and the Mysterious Book (2026) – Full Completion Guide, Rewards & Secret Ending

How to Get Free Pets in Adopt Me: A Guide for Players

Roblox Username Generator – Create a Cool & Unique Username in Seconds
How to Get Free Pets in Adopt Me: A Guide for Players
Yoshi and the Mysterious Book (2026) – Full Completion Guide, Rewards & Secret Ending
Forza Horizon 6 Performance: Why 60 FPS Is Still the Console Standard


