Guide
How to Make a Discord server
Discord is a famous group-chatting application that, while primarily designed for gaming, has exploded in popularity since its inception in 2015. People from all walks of life have flocked to the platform in recent months to create group conversations based on politics, movies, writing, and every other topic under the sun, among other things.
Setting up your own Discord server is simple, whether you’re looking to start a new community or simply create a chat room for you and your pals. It will only take a minute to complete the process, regardless of whether you are using the app on a desktop, on a browser, or on a smartphone.
In addition, once you’ve set up your own server, you may invite your friends to join you, create separate channels for different topics, and assign roles to certain people – for example, you can designate some people to be chat moderators. We’ll stick to the fundamentals for now, but there are dozens of more detailed adjustments you can make to the server if you want to go very fancy.
Read Also: How to Connect Your Spotify Account to Discord
How to Make a Discord server
Discord servers are just large chatrooms, and after you’ve downloaded the Discord app onto your iOS or Android phone or your desktop computer, you can create them for absolutely no cost.
Discord is different from other programmes that allow you to run servers in that once you’ve created the server, you won’t have to worry about keeping your internet connection active because the firm will take care of that for you.
1. On a desktop computer, navigate to the sidebar on the left side of the programme; on a mobile device, you may need to swipe your finger to the right in order to find it.
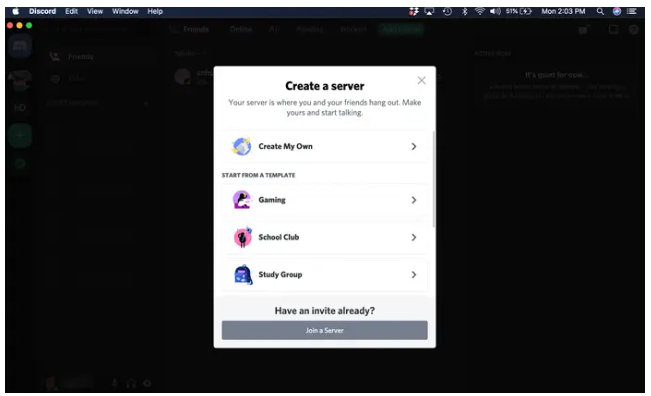
2. In the sidebar, underneath your other servers, click or tap on the green + sign, which is located at the very bottom.
3. Select one of the alternatives available to you here. Alternatively, you can select one of the available templates or hit “Create My Own” to start from scratch with no pre-existing channels or roles. Each template is very similar to the others, and they all include at least one channel that has already been configured.
In this tutorial, we’ll start with a blank “Create My Own” server and work our way up from there.
4. When planning an event on a mobile device, consider whether the event is for a club or a community, or if it is just for a small group of friends. If you are unsure about the answer or don’t care about the outcome, you can skip this question altogether.
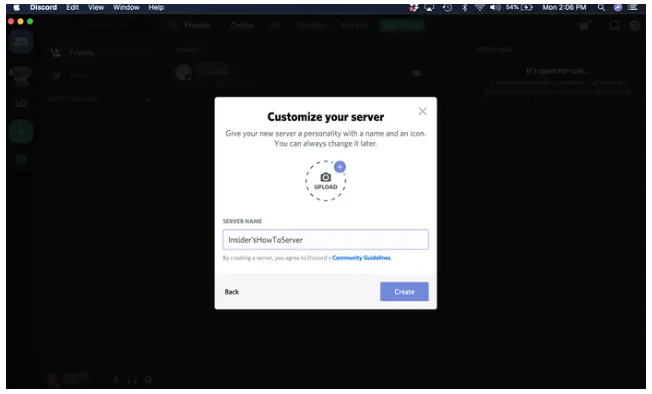
5. Give your server a name and a photograph to identify him or her. There is no requirement that they be unique, so you shouldn’t be afraid about your clever server design being replicated.
Please keep in mind that after you’ve formed your server, you are under no obligation to continue operating it permanently; servers can be deleted at any time, though you may need to consult with the other members first.
Video

Monopoly GO Daily Dice Links – Ultimate Guide to Free Rolls

Get Free Unlimited Simoleons in The Sims FreePlay

My Singing Monsters Free Diamonds, Coins, Gems & Food Guide

Brotato Best Builds: Top Strategies and Synergies for Every Playstyle in 2025

Poppo Live Free Coins and Diamonds – How to Get Them Without Paying

How to Get Mewtwo in Pokémon GO: A Complete Guide for 2025 Trainers

Supervive Tier List: Best Characters Ranked for 2025

Warframe Tier List 2025 – Best Warframes Ranked for Every Mission Type

Andrew Fillipponi Biography: The Voice Behind Pittsburgh Sports Radio

UK Online Casinos Accepting US Players With No Deposit Bonuses

-
Health3 years ago
Important! Tips for Developing Software for the Healthcare Sphere in 2022
-

 Apple3 years ago
How to Share a Google Docs File on an iPad
-

 Gaming6 years ago
Tales of Arise Trailer Preview by Microsoft E3 2019
-

 News3 years ago
Gigabyte Confirms X670 AMD Ryzen 7000 Zen 4 AM5 Motherboards for Computex