Guide
How to Remove Thermal Paste
Removing thermal paste may be a nerve-wracking experience for some. Consider the consequences of attempting to wipe thermal paste off CPU pins when your CPU is worth about $500 and accidentally harming one of the pins can cause your CPU to entirely fail.
However, you have already completed the first step correctly by doing a search for information before proceeding with the rest of the procedure. This article will instruct you on how to safely remove thermal paste from a CPU in the safest manner possible..
Read Also: Best Thermal Paste For CPU and GPU in 2021
Tools You Need to Clean Off Thermal Paste
To remove the thermal paste completely and without leaving behind any residue, you just need two items. Microfiber cloth and rubbing alcohol are included with this set. However, it doesn’t really matter what sort of cloth you bring, but it’s ideal to bring one that doesn’t leave any bits of fabric while removing the thermal paste.
The thermal paste may be removed by wiping it off with toilet paper or even old clothing, which could leave behind residue. Thermal paste reapplying might be a problem since the residue left behind by the toiler paper could impede heat transmission. A greater concentration of rubbing alcohol is what you’re looking for. When everything else fails, rubbing alcohol can be used as an alternative if you don’t have any other choices.
If you don’t use alcohol, you run the risk of damaging your computer’s CPU and other internal components. Because most cleansers are conductive and leave behind residue, this is why. Various equipment, such as a screwdriver for opening the PC case and removing the CPU cooler, may be required for other PC configurations.
How to Clean Thermal Paste Off a CPU
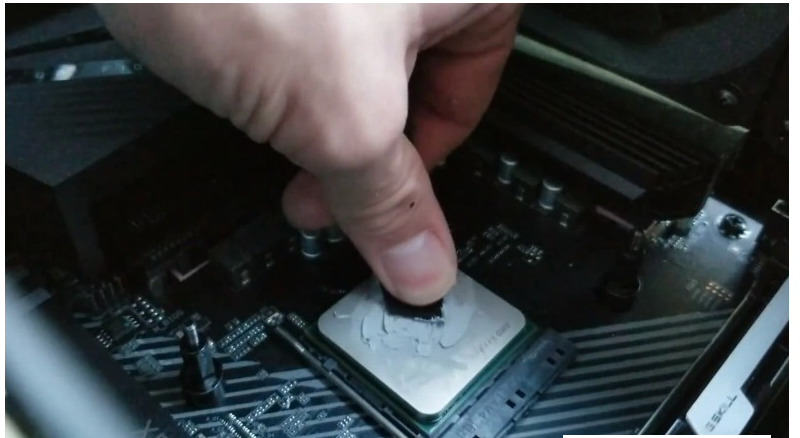
To remove the thermal paste from your computer case, you must first properly open the case and place the motherboard face up on a flat surface to make the process simpler. Locate your CPU cooler, and you will be able to determine where your CPU is located on your motherboard.
Some CPU coolers do not require the use of screwdrivers since the bolts may be turned with the palm of your hand. As soon as you have removed the CPU cooler/heat sink, you will need to thoroughly clean both the CPU cooler and the CPU. As soon as you remove the CPU cooler from its mounting bracket, attempt to twist it a bit before pushing it straight up. Keep your hands on the screwdriver at all times and do not simply pull it off after unscrewing it.
Grab your cloth and saturate it with rubbing alcohol before you begin. Remove the thermal paste from the heat sink and your CPU using a clean cloth. You may also experiment with a cotton swab that has been dipped in rubbing alcohol prior before using it. It is considerably more “accurate,” but you are only interested in cleaning out every gramme of thermal paste that is in there nonetheless. Always remember to thoroughly clean the area since you do not want any remaining residue from the previous thermal paste on the heat sink/CPU cooler or the CPU itself.
How to Clean Thermal Paste Off CPU Pins
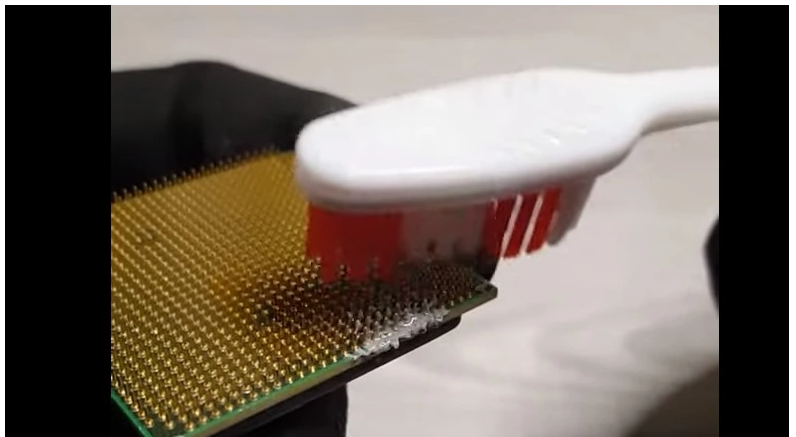
Due to the fact that the CPU pins are significantly more brittle, it is far more difficult to clean them. It is possible to do significant harm if you are not careful. The most effective method of removing thermal paste off CPU pins would be to use a toothbrush.
The brush for it is the perfect size, and you would also want the same amount of rubbing alcohol as you would for the last task. Remove the thermal paste off the CPU pins with the toothbrush dipped in rubbing alcohol and carefully wiping it off. During the scrubbing process, do not apply too much pressure to it and instead gently scrape the CPU pins.
The fact that it is slower when you scrape it gently is irrelevant because we do not want to harm the CPU pins throughout the process. This type of thermal paste pouring or flowing back to the CPU pins is quite uncommon. Application of excessive thermal paste is the primary source of this problem, which is also detrimental since excessive thermal paste can actually boost the temperature levels when used in excess.
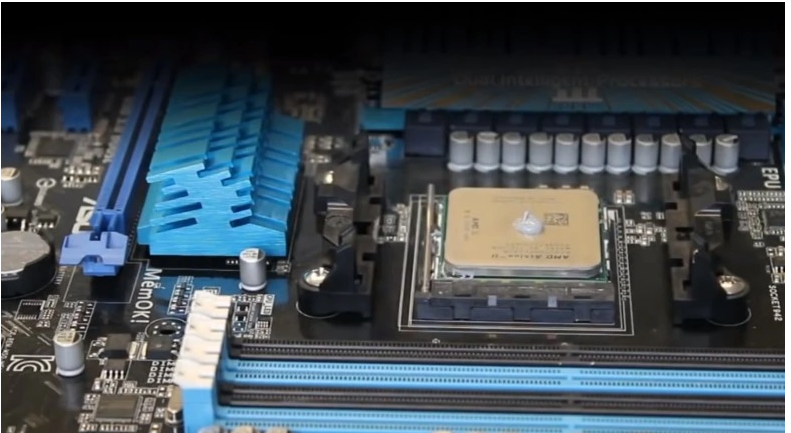
After cleaning the thermal paste off the CPU pins, make sure to apply the right amount of thermal paste. You do not need that much thermal paste, to begin with.
When Should You Reapply Thermal Paste?
If you’ve ever had your CPU overheat while playing a game, you may be wondering how often you should update your thermal paste. The majority of the time, folks don’t even know they have a problem until it’s too late. Thermal paste should be reapplied every two years as a rule of thumb. If you’re using the best thermal paste on your PC, it should last for at least 10 years. My last PC construction lasted eight years without any CPU temperature issues, based on my past experience. Thermal paste does not need to be reapplied.
As a result, monitoring the temperature of your CPU can help you determine when it’s time to reapply thermal paste. If you were able to play your regular game without any issues previously, you should be able to continue doing so.
After a few years, you would notice that your temperatures are suddenly rising to what you are usually accustomed to. This could mean that your thermal paste is starting to get dry. The problem here is that there are a ton of problems that can cause the same issue even before your thermal paste dries up. This would be an annoying issue to troubleshoot but higher CPU temperatures will have something to do with the PC’s airflow, the coolers, and your thermal paste.
Video
Conclusion
Before reapplying the new thermal paste, check sure there is no leftover residue from the previous one. The CPU pins must also be handled with care. It’s important to remember that CPU or processors are pricey, and wiping thermal paste from CPU pins is the most risky task.

Vampire Crawlers Coin Farming Guide

Forza Horizon 6 Performance: Why 60 FPS Is Still the Console Standard

Yoshi and the Mysterious Book (2026) – Full Completion Guide, Rewards & Secret Ending

How to Get Free Pets in Adopt Me: A Guide for Players

Roblox Username Generator – Create a Cool & Unique Username in Seconds
How to Get Free Pets in Adopt Me: A Guide for Players

Grow a Garden Recipes in Roblox: Guide to Cook (Donuts, Sushi, Pie, Pizza & More!)
Roblox Username Generator – Create a Cool & Unique Username in Seconds
Yoshi and the Mysterious Book (2026) – Full Completion Guide, Rewards & Secret Ending


