Guide
How to Save Streams on Twitch
You shouldn’t just let a fantastic Twitch stream end when you just finished it. Twitch provides a variety of options for streamers to store their work and even let viewers watch it long after it has stopped. You may learn how to save streams on Twitch in this article. Consequently, let’s begin:
Read Also: How to Re-Enable Your Twitch Account
How to Save Streams on Twitch
Using VODs and Highlights
Twitch streams can be saved in a few different ways after they’ve ended, but you have to activate them before the stream begins. Videos on demand (VODs) are merely recordings of the stream that also include all chat messages. Make your streams into Highlights if you want to keep them on your channel indefinitely. Though they never expire, these are identical to VODs.
And you may download any of your VODs or Highlights to your computer if you’d rather save your previous broadcasts somewhere other than your public Twitch channel. This is excellent if, for instance, you wish to upload your feeds to YouTube. Follow these steps to activate VODs, highlight any VOD, and save feeds to your computer.
Enable Twitch VODs
Before broadcasting any stream you want to save, you must turn this feature on.
1. If you haven’t already, visit the Twitch website and sign in to your streaming account.
2. From the drop-down menu, select Creator Dashboard by clicking your profile icon in the top-right area.
3. Select Settings from the left sidebar, then select Stream.
4. Select Store previous broadcasts under VOD Settings by scrolling down. If you want your VODs to be made public as soon as your stream ends, you can switch on Always Publish VODs; if not, you’ll have to publish them manually.

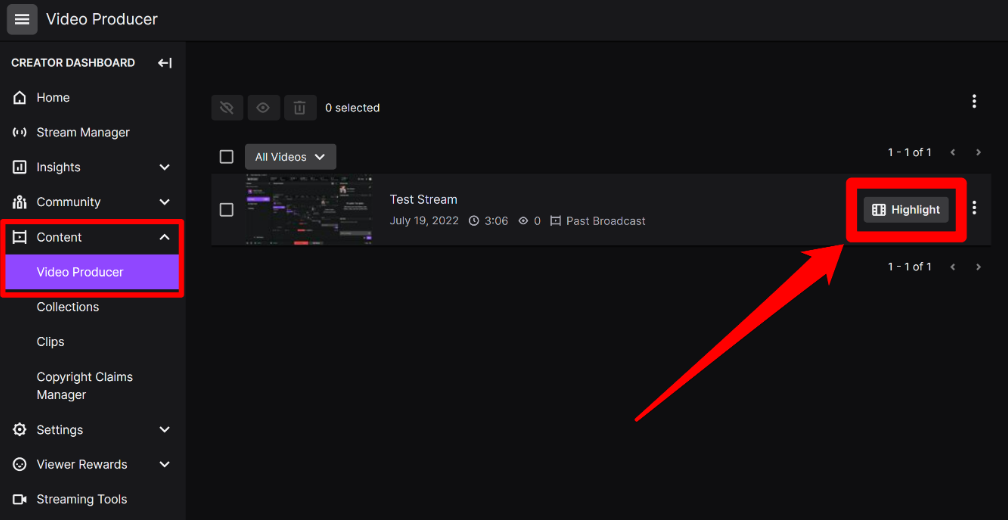
You may now find a recording of a stream once it has ended in the Content section of your Creator Dashboard. Simply select Video Producer from the sidebar’s Content section. You can also remove them from this page and unpublish them.
Turn Twitch VODs into permanent Highlights
Once you’ve saved a VOD, it will remain on your channel for 60 days (for Partners, Prime, and Turbo customers) or 14 days (for everyone else). But by making it a Highlight, you may save it indefinitely.
1. Go to your Creator Dashboard and select Video Producer from the left sidebar’s Content option.
2. Select Highlight on the right side of the stream you wish to save after finding it.
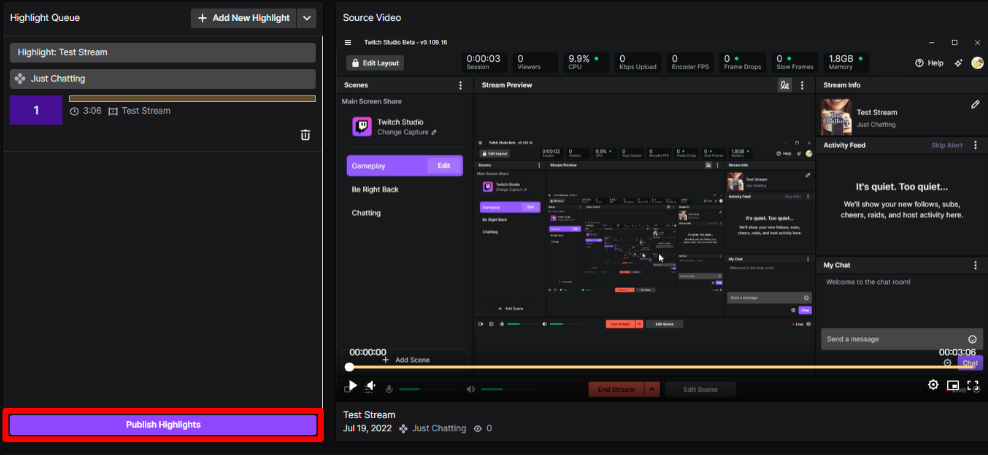
3. By doing this, an editing menu will open, allowing you to select precisely whatever segment of the VOD you want to preserve. Stretch the yellow bar at the bottom to fill the full timeline if you want to save the entire VOD as a Highlight. The Start and End settings can be used to define the bounds of the Highlight more accurately.
4. When it’s prepared, click Publish Highlights in the page’s center.
FAQs
Why does Twitch not save my streams?
Visit Twitch. Click on your profile and choose “Creator Dashboard.” Place your mouse over the hamburger icon next to “Home.” Select Stream under Settings. Turn “Store past broadcasts” on by toggling the switch.
Can you save other Twitch streams?
Every broadcast that is live-streamed on Twitch can be saved as a VOD (video on demand). Twitch VODs can be downloaded by viewers and streamers alike so they can access them when offline. You can learn how to download Twitch VODs on a variety of devices from this tutorial, which also includes frequently asked questions and relevant responses.
Does Twitch save streams forever?
Toggle the slider next to Store previous broadcasts under the VOD Settings section to either enable or disable archiving. Past broadcasts for the majority of Twitch Partners, Prime, and Twitch Turbo users will be stored for 60 days before being erased.
Why are streams deleted on Twitch?
Twitch often removes VODs for one of three reasons: either the VOD violates the Twitch Terms of Service, the streamer has been suspended from Twitch, or the previous broadcast has expired.

Roblox Username Generator – Create a Cool & Unique Username in Seconds

Grow a Garden Recipes in Roblox: Guide to Cook (Donuts, Sushi, Pie, Pizza & More!)

Job Opportunities in Dubai – 2026

Mr Bit at the SBC Awards Europe 2025: The Bulgarian Brand Setting New Standards in the European Gaming Industry

Dennis Rodman Net Worth 2026 – Everything You Need to Know

Bloxburg Neighborhood Codes 2026
Grow a Garden Recipes in Roblox: Guide to Cook (Donuts, Sushi, Pie, Pizza & More!)
Job Opportunities in Dubai – 2026
Dennis Rodman Net Worth 2026 – Everything You Need to Know


