Guide
How to Scan Documents in Windows 10
After becoming weary of tinkering with the built-in software of your scanner, use the straightforward scanning tool that comes packed with Windows 10. Unfortunately, the new Scan software, which is just titled Scan, does not operate with older scanners. However, if your scanner is relatively new, the Scan app is a welcome change from the convoluted scanner menus that can be found on older scanners.
Read Also: How to Split Your Screen in Windows 10
How to Scan Documents in Windows 10
If you want to scan something into your computer, follow these steps:
1. Open the Scan application from the Start menu. If you are unable to locate the Scan application on the Start menu, click the words All Apps in the bottom-left corner of the Start menu. The Start menu arranges all of its applications in alphabetical order.
As soon as you click the Scan app, the Scan app displays on your screen. Ensure that the USB cord connecting your computer and the scanner is properly connected and turned on if the programme complains that your scanner isn’t working properly. Additionally, a wireless connection can be used to connect the scanner to your computer. To accomplish this, go to the instructions that come with your scanner.
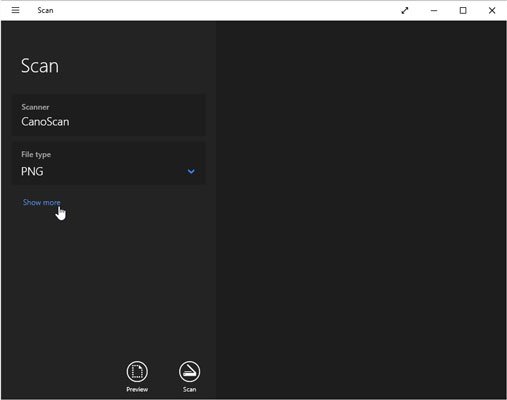
If your scanner is plugged in and switched on, the scan app displays the name of your scanner, as shown here, as well as the file type that will be used to save your files. (The PNG file format is extensively supported by a wide range of programmes.)
If the app doesn’t recognize your scanner, your scanner is too old. You’re stuck with your scanner’s bundled software — if it works — or, unfortunately, buying a new scanner.
2. (Optional) To change the settings, click the Show More link.
The app’s default settings work fine for most jobs. The Show More link offers these options for specific types of scans:
- Color mode: Choose Color for color items, such as photos and glossy magazine pages. Choose Grayscale for nearly everything else and choose Black and White only for line drawings or black-and-white clip art.
- Resolution (DPI): For most work, the default, 300, works fine. Higher resolution scans (larger numbers) bring more detail but consume more space, making them difficult to email. Lower resolution scans show less detail but create smaller file sizes. You may need to experiment to find the settings that meet your needs.
- Save File To: The Scan app creates a Scan folder in your PC’s Pictures folder, where it stores your newly scanned images. If desired, you can change the Scan folder’s name or even create a different folder for each scanning session.
Click the Preview button to make sure your scan appears correct.
3. Click the Preview icon, and the Scan app makes a first pass, letting you preview a scan made with your chosen settings.
If the preview does not appear to be correct, check to be that you have selected the appropriate Color Mode for your task, as described in the preceding step. It is possible that the preview is showing a blank white page because the scanner has not been unlocked as instructed in the scanner’s packed instruction instructions. Check the preview scan for the circle markings in each corner of the thing you’re scanning if it’s a smaller item that doesn’t fit the entire scanner bed. Drag each circle inward until it completely encircles the area you wish to duplicate.
4. To run a scan, press the Scan button. When the scan is complete, click the View button to see the results of your scan. The Scan app scans your photograph with the parameters you’ve selected in the previous steps and then saves the image in the Scan folder of your Pictures folder, which you can find in your Pictures folder.
If you want the buttons to operate or if you want more control over your scans, skip the Scan app and go straight to the desktop, where you may install the programme that came with your scanner. If you have a certain scanner model, Windows Update will immediately install the scanner’s bundled software as soon as you plug the scanner into your computer.)
Final option: take a picture of the paper with the camera built into your phone or tablet for quick and dirty scanning. The same is true for images, but it is an excellent method of keeping track of receipts and invoices as well.
Video

Vampire Crawlers Coin Farming Guide

Forza Horizon 6 Performance: Why 60 FPS Is Still the Console Standard

Yoshi and the Mysterious Book (2026) – Full Completion Guide, Rewards & Secret Ending

How to Get Free Pets in Adopt Me: A Guide for Players

Roblox Username Generator – Create a Cool & Unique Username in Seconds
How to Get Free Pets in Adopt Me: A Guide for Players

Grow a Garden Recipes in Roblox: Guide to Cook (Donuts, Sushi, Pie, Pizza & More!)
Roblox Username Generator – Create a Cool & Unique Username in Seconds
Yoshi and the Mysterious Book (2026) – Full Completion Guide, Rewards & Secret Ending


