Guide
How to Split Your Screen in Windows 10
The ability to run many apps at the same time and move between them has always made Windows an excellent platform for multitasking, and this hasn’t changed much over the years.
Microsoft improved the snapping mechanism in Windows 10 by making it more secure and by expanding its usefulness. Now that Windows 10 is out, you can divide your screen into numerous windows and get actual work done, thanks to improved support for higher-resolution screens and multiple monitors in the latest edition. Even Windows 11 follows suit, with features that prioritize efficiency, such as Snap Layouts.
Read Also: How to Install Windows 10 From USB Drive
Using Snap Assist in Windows 10
One of the most significant enhancements made by Windows 10 to split-screen multitasking is Snap Assist, which makes it simpler to pick an open application window when deciding which programmes to arrange on your screen in a split-screen configuration. Here’s how you can make advantage of it:
Step 1: Select the window that you want to snap to one half of the screen and drag it to the edge of the screen.
Step 2: The second step is to snap your chosen window while other windows or programmes are active. You’ll notice a number of alternatives that may be used to fill the second half of your window when you snap the window. The second window will immediately snap into position opposite the first window when you click on one of them. If you don’t do this and the selection grid vanishes, drag your second window to the border of the empty area until the selection grid emerges again.
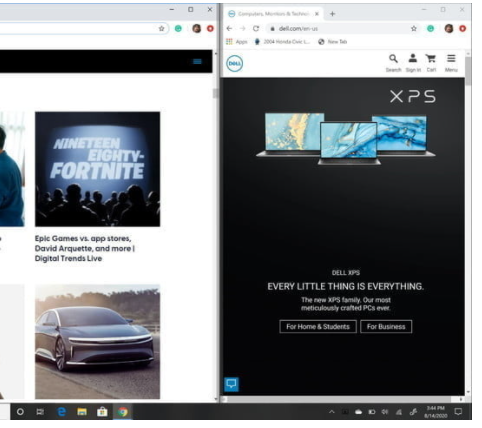
Step 3: Hover the cursor over the dividing line until it forms two arrows, and then click and drag the two windows to the desired size. Click and hold on the separator to move the two windows to their proper positions. There is, however, a limit to how tiny a window may be made to be.
Use the keyboard shortcut
Do you want a more efficient way to accomplish this on your keyboard? The ability to split windows quickly and easily is provided via a keyboard shortcut. If you have a window open, press and hold the Windows key, followed by either the Left or Right arrow keys to close it. This should cause the currently active window to be snapped to the left or right. To fill the second empty area, choose another window from the drop-down menu.
Simply pressing the Windows key and the Up arrow key simultaneously will bring a window back to its original size of 100 percent of the screen. To enlarge a quarter window instead of a half window that you mistakenly created, press and hold the Windows key while simultaneously pressing the Up or Down arrow keys.
Snapping more than two windows
Do you want a more efficient way to accomplish this on your keyboard? The ability to split windows quickly and easily is provided via a keyboard shortcut. If you have a window open, press and hold the Windows key, followed by either the Left or Right arrow keys to close it. This should cause the currently active window to be snapped to the left or right. To fill the second empty area, choose another window from the drop-down menu.
Step 1: Simply pressing the Windows key and the Up arrow key simultaneously will bring a window back to its original size of 100 percent of the screen. To enlarge a quarter window instead of a half window that you mistakenly created, press and hold the Windows key while simultaneously pressing the Up or Down arrow keys.

Step 2: The second step is to drag and drop your second window into any other accessible corner while keeping the initial active window in one of the corners. It is not necessary for you to choose a precise corner.

Step 3: Repeat Step 2 to fill in the remaining two corners, if necessary. The Windows 10 2020 update changed the four-window design and made all the snapped windows behave as if they were a single window, as shown below. This may not seem significant, but it comes in useful when you need to do anything else, such as open another programme or file while still working with your snapped windows – they will now remain together, waiting for you to return when you are through.
Turning off Snap Assist and adjusting settings
In the event that Snap Assist becomes an issue, it is simple to turn it off. Here’s how it’s done:
Step 1: Launch the Settings application. It’s represented by the gear symbol in the Start Menu.
Step 2: Select the Operating System
Step 3: Select Multitasking from the drop-down menu on the left.
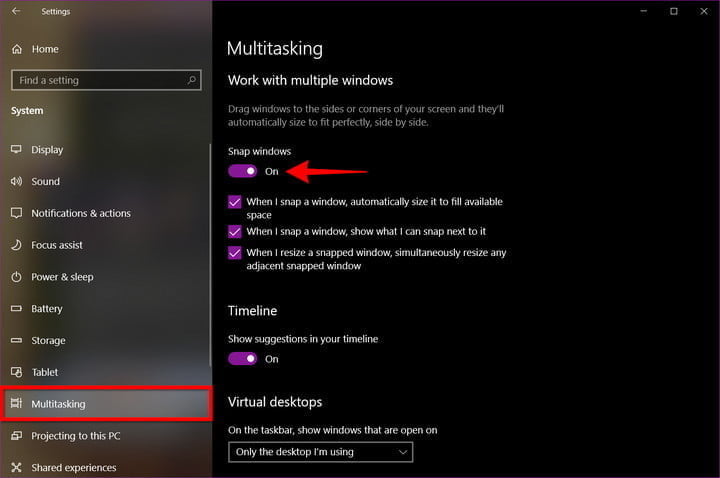
Step 4: To turn off this function, use the Toggle button that appears under Snap Windows in Step 3. If you’d prefer to stop individual Snap Assist functions rather than turning the functionality totally off, you may do so by disabling one of three Snap Assist options. Ignore Step 4 and uncheck the boxes next to each setting as needed to complete the process.
Video

Vampire Crawlers Coin Farming Guide

Forza Horizon 6 Performance: Why 60 FPS Is Still the Console Standard

Yoshi and the Mysterious Book (2026) – Full Completion Guide, Rewards & Secret Ending

How to Get Free Pets in Adopt Me: A Guide for Players

Roblox Username Generator – Create a Cool & Unique Username in Seconds
How to Get Free Pets in Adopt Me: A Guide for Players
Yoshi and the Mysterious Book (2026) – Full Completion Guide, Rewards & Secret Ending
Vampire Crawlers Coin Farming Guide


