Guide
How to Uninstall Windows 11
Windows 11 is scheduled to be released on October 5, and you may be interested in upgrading your PC to the new operating system once it becomes available. It is possible that you will want to install Windows 11 even while it is still in development via the Windows Insider programme to see what all the fuss is about.
You may uninstall Windows 11 from your computer in a variety of methods, if you don’t wind up loving it in the end for whatever reason. We’ve put together this article to show you how to uninstall Windows 11 from your computer.
Read Also: How to Turn Off Game Mode on Windows 11
How to Rollback to Windows 10 and keep your files
The quickest and most straightforward method of uninstalling Windows 11 is to revert to Windows 10. You will not lose any of your files if you use this procedure, however there is a catch to this strategy. You have only 10 days from the date of your initial Windows 11 upgrade to revert back to the previous version of Windows. If this is the case for you, please proceed to the next section; otherwise, skip to the following section.
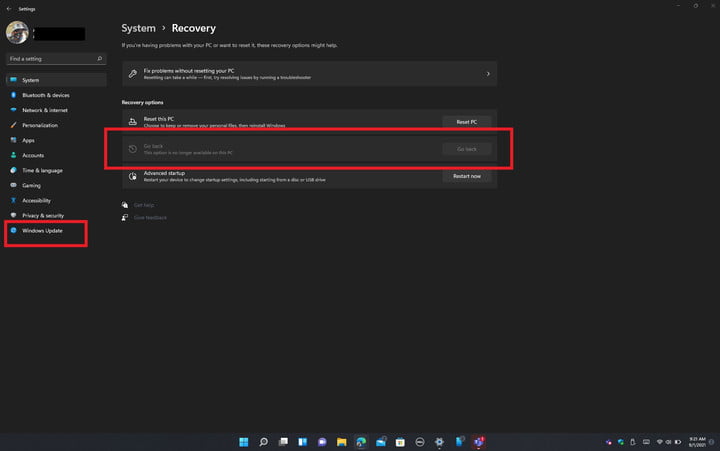
Step 1: Press the Windows Key+I to bring up the Windows 11 settings menu.
Step 2: On the left-hand sidebar, select Update Windows.
Step 3: In the middle of your screen, click on Advanced Options to reveal more options.
Step 4: Select Recovery from the drop-down menu, then select Go Back.
Step 5: Connect your laptop to a power source and follow the on-screen instructions.
You will be redirected to Windows 10 after a few restarts, and you will no longer be on Windows 11. This is the safest and most straightforward method of reverting to Windows 10, as it preserves everything in its original location. However, any programmes that you installed while using Windows 11 will no longer be available. You will not lose any of your files or documents.
How to Install Windows 10 via an ISO and delete your files

Another option for uninstalling Windows 11 and reinstalling Windows 10 is to use an ISO image file. If you’ve gone over the 10-day rollback limit, this is the only option to get back to Windows 10 on your computer. You will lose all of your files and applications if you choose this technique, and you will have to start again from the beginning.
We recommend that you save any of your files to an external storage device before proceeding. This is so that you can return to it later on after you have uninstalled Windows 11 from your computer. Once you’ve done that, go to the steps below.
Step 1: Go to the Microsoft website and download the Windows 10 Media Creation Tool. Install the software on your computer.
Step 2: Once the programme has been downloaded, run it on your Windows 11 system and confirm that you have read and agree to the Microsoft terms of service.
Step 3: Select the option to build installation media for another PC and then click Next, followed by another click of the Next button.
Step 4: Select ISO File from the drop-down menu and press Next.
Step 5: Select a location where you want to save the file (The desktop is a good place.)
Step 6: Give Windows 10 permission to download.
Step 7: Finish by clicking Finish, then navigate to the location where you saved the ISO.
Step 8: To launch the ISO file, double-click on it. Look for the Setup icon on your desktop and click it. Then follow the on-screen directions to downgrade to Windows 10 from Windows 10.
Again, if you use this technique, you will lose access to all of your files and applications. If your 10-day grace period has expired, there is presently no alternative method to uninstall Windows 11 and revert to Windows 10 other than by booting from an ISO file, which is not recommended. You’ll be forced to reinstall Windows 10 from scratch, and you’ll lose access to all of your data and programmes in the process.
Video

Roblox Username Generator – Create a Cool & Unique Username in Seconds

Grow a Garden Recipes in Roblox: Guide to Cook (Donuts, Sushi, Pie, Pizza & More!)

Job Opportunities in Dubai – 2026

Mr Bit at the SBC Awards Europe 2025: The Bulgarian Brand Setting New Standards in the European Gaming Industry

Dennis Rodman Net Worth 2026 – Everything You Need to Know

Bloxburg Neighborhood Codes 2026
Grow a Garden Recipes in Roblox: Guide to Cook (Donuts, Sushi, Pie, Pizza & More!)
Job Opportunities in Dubai – 2026
Dennis Rodman Net Worth 2026 – Everything You Need to Know


