Guide
How to Use the Photoshop Clone Stamp Tool

This article demonstrates how to use the Photoshop Clone Stamp Tool to replicate a portion of an image from one location within the same picture to another location within the same image. The steps outlined in this article are compatible with Windows and Mac versions of Photoshop CC 2022 to CC 2019.
Read Also: How To Cut Out An Image In Photoshop
How to Use the Clone Stamp Tool in Photoshop
The Clone Stamp tool in Photoshop copies the contents of one part of a picture onto another part of the same image. When they want to eliminate undesired parts from a shot, photographers and designers sometimes utilize a tool called the Clone Stamp. For instance, it can be used to cover flaws on people’s faces by copying from another region of the skin, or it can be used to eliminate trees from a mountain view by copying parts of the sky over them. Both of these examples are possible thanks to the capabilities of this technology.
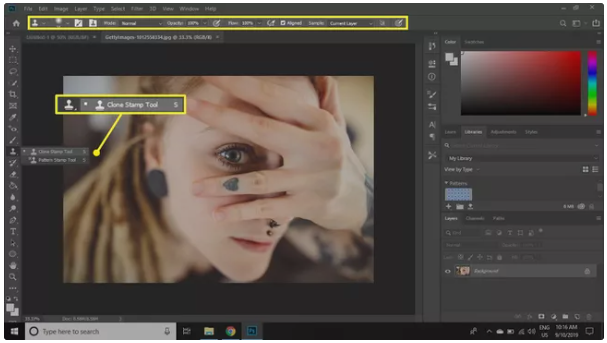
Launch Photoshop and open an image. To use the Clone Stamp tool, first click and hold the icon that looks like a rubber stamp in the toolbox. Then, in the fly out menu that appears, select Clone Stamp Tool. The tool options bar is located at the very top of the workspace, and it is where you will make adjustments to the brush’s size and shape, as well as its opacity, flow, and blending modes.
If you want to copy an exact region, make sure that the opacity, flow, and blending mode parameters are all at their defaults. You will discover that you need to make adjustments to these parameters as you make more frequent use of the tool. For instance, in order to get an even skin tone while retouching a person’s face, an opacity of twenty percent or less, at the very least, should be used. It’s possible that you’ll need to clone it more times, but the result will be more seamless.
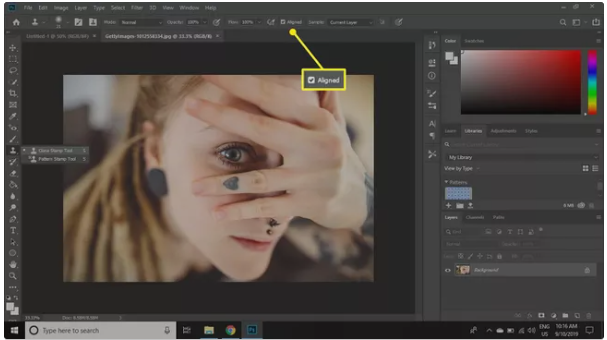
When you retouch an image and select the box in the tool options bar that is located next to the word Aligned, the target will follow the movement of your cursor. Because it uses several points for the target, this is frequently something that is desired. Unchecking the box labelled Aligned in the tool settings will prevent the target from moving while you use the tool.
How to Retouch Images With the Clone Stamp Tool
Move your mouse to the area you want to replicate, and with the Clone Stamp tool selected, press the Alt key plus the mouse click (on Windows) or the Option key plus the mouse click (on Mac) on the exact position you want to start copying from.
To remove the heart off the woman’s finger, for instance, press and hold the Alt key (on Windows) or the Option key (on a Mac) while clicking on a similarly coloured spot on another finger. After that, release the mouse button and drag the Clone Stamp Tool over the heart to create a painting using pixels from the region that was picked before. You will be able to monitor the progress of the adjustments in real time. You can change the size setting in the tool settings located at the very top of the screen if it is either too huge or too little.

FAQs
Why is clone stamp not working in Photoshop?
The fact that the incorrect layer was chosen is the primary cause of the Clone Stamp not functioning properly the vast majority of the time. Your edits can be concealed or the wrong object might be sampled if you have the wrong layer selected in the Layers Panel. For instance, I have two photos nestled inside of a shape, each of which is located on its own layer.
Which key is used in clone stamp tool?
Shortcuts on the Keyboard for the Clone Source Panel
Hold Alt (Mac: Option) To move the Clone Source, hold down the Shift key while pressing any of the arrow keys (left, right, up, or down). Hold Alt (Mac: Option) To rotate the Clone Source, press the or > shift key. Hold Alt (Mac: Option) To scale the Clone Source, press the or shift button.
Why I Cannot use clone stamp area not defined?
In the event that a pop-up message appears stating that you “could not use the Clone Stamp because the region to clone has not been defined,” the problem is either associated with layers or the selection. First, with the Clone Stamp tool chosen, press the Alt key and click (on a PC) or the Option key and click (on a Mac) on the pixels you wish to clone.
What is Vanishing Point in Photoshop?
The Vanishing Point filter in Photoshop is a tool that, when applied to a picture, allows for objects and adjustments to be scaled and positioned in accordance with the perspective of the image. You’ll locate Vanishing Point in the menu denoted by the word “Filter” (simply click Filter, then Vanishing Point).

Vampire Crawlers Coin Farming Guide

Forza Horizon 6 Performance: Why 60 FPS Is Still the Console Standard

Yoshi and the Mysterious Book (2026) – Full Completion Guide, Rewards & Secret Ending

How to Get Free Pets in Adopt Me: A Guide for Players

Roblox Username Generator – Create a Cool & Unique Username in Seconds
How to Get Free Pets in Adopt Me: A Guide for Players
Yoshi and the Mysterious Book (2026) – Full Completion Guide, Rewards & Secret Ending
Vampire Crawlers Coin Farming Guide


