Guide
How to Add Sub Badges on Twitch
Many content creators use Twitch because of the platform’s extensive customization options. It infuses an entertaining and engaging level of relatability into a channel, which is appreciated by its audience. One of the many things you should know to help your channel stand out from the competition on Twitch is how to add a subscriber badge. This is just one of the many things you should know. Continue reading to learn more about exactly what Twitch sub badges are and how you can add them to your profile!
Read Also: How to Delete a Message on Twitch
How to Add Sub Badges on Twitch
Sub badges have to be manually uploaded by the channel owner, despite the fact that they are extremely popular among subscribers. When you first unlock the feature, there will be no badges of any kind automatically affixed to your account.
Everything you need to know about sub badges can be found below, including how to locate the menu, where to upload your images, and even how to design your own sub badges!
1. Discover Your Own Personal Creator Dashboard
Through the “Creator Dashboard,” you will have access to all of the settings for your channel. Every owner of a Twitch channel has access to a dashboard where they can make changes to all of the settings associated with their channel, including the sub badges.
To gain access to the creator dashboard, please proceed as follows:
- Head on over to Twitch.tv.
- You can access your Twitch account by logging in.
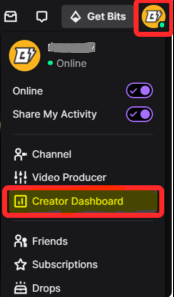
- To edit your profile, go to the top right corner of your screen and click on your photo.
- The drop-down option that displays should be navigated to the creator dashboard.
If you click this, you will be sent to a whole new page where you will be able to access all of the settings for your creator dashboard.
2. Find the Settings for the Affiliates or Partners
It has already been mentioned that in order to view the sub badge settings, you need to be a Twitch affiliate or partner. If you don’t meet the requirements for either of these two account categories, you’ll need to add a few more subscribers to your channel.
When you have met the requirements and registered for one of these titles, you will find a menu labelled affiliate or partner settings located on the left-hand side of your creator dashboard. This menu may be accessed by clicking the settings tab.
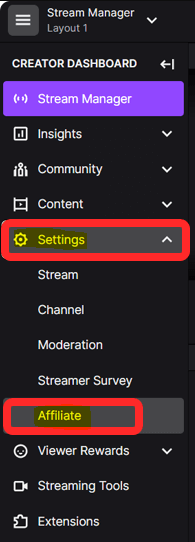
The preceding illustration provides an illustration of how it appears to affiliate members. The only change that will be made for partners is that the word “affiliate” will be substituted with the word “partner.”
3. Get familiar with the Sub Badges Page
On the tab for the sub badges, you can upload and update each of your own badges individually. The page is broken up into a number of distinct sections, each of which has a distinct function.
You can find the line of currently available badges at the very top of the page. In this section, the badges that you have previously uploaded are displayed, as well as any empty slots that are currently available for new designs.
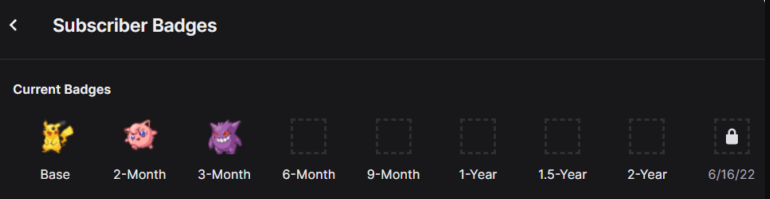
A duration of subscription has been allotted to each slot. This indicates how long a viewer must be subscribed for in order to obtain access to that particular emote. In the preceding illustration, once the audience member has subscribed to the channel, they will be able to obtain the yellow Pikachu badge. After a period of two months, they will be able to unlock the pink Jigglypuff, and after a period of three months, they will be able to unlock the purple Gengar.
Affiliates on Twitch begin with a year’s worth of badge slots available, which are then subdivided into the following time periods:
- Base
- Two months.
- Three months
- Half a year
- Nine months.
- 1 year
Twitch will add one additional slot to your collection of available badges every six months. In the previous illustration, the channel has been operational for a year after obtaining affiliate status, and as a result, it has two vacant slots that it can fill.
4. Add And Manage Sub Badges
You can upload new badges and make changes to existing ones in the second section of this page.
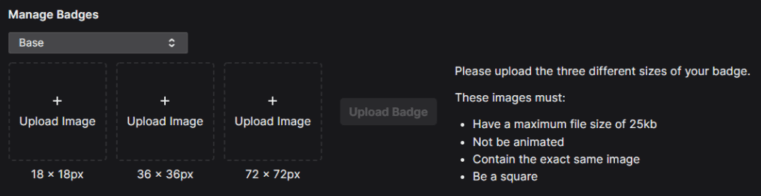
You will see right away that there are three boxes where you can upload three different pictures. It is recommended that each image be a different size of the same icon. These are utilized in a variety of different capacities across Twitch.
The dimensions of the badges are 18 by 18 pixels, 36 by 36 pixels, and 72 by 72 pixels respectively. They are not allowed to be animated and can be no larger than 25 kilobytes in size. If you try to submit an image that does not conform to these guidelines, Twitch will reject your attempt and prompt you to either resize or change the image.
If you already have a badge created but need to adjust its dimensions, one of the free image editors that we recommend using is GIMP. Pixlr is another option.
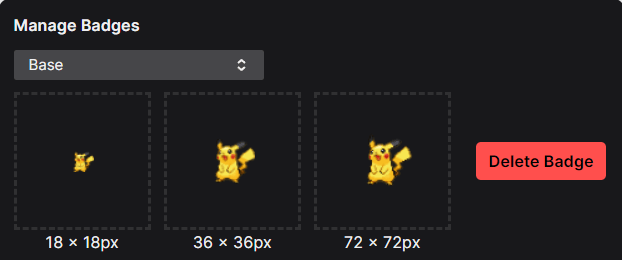
In the example that was just presented, we submitted three different sized icons that were all based on the same image. They were approved, and there is now no reason not to use them as the foundation for the badge selection. However, what about the additional badges that are available for longer subscriptions?
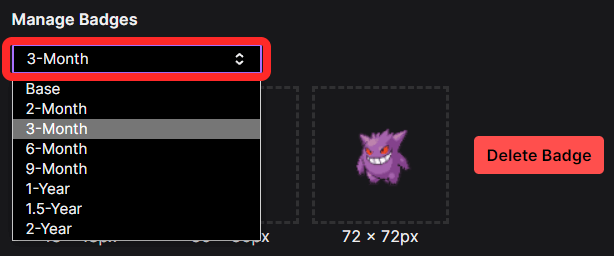
You can view a list of the different subscription lengths that are offered by selecting the drop-down menu that is located where it says basic. When you select one of them using your mouse, three additional empty image boxes will appear, each of which allows you to upload a picture that represents the length of your membership. Once all three sizes of the badge have been uploaded, it will be displayed in the current badges line at the very top of the sub badges settings page.

Vampire Crawlers Coin Farming Guide

Forza Horizon 6 Performance: Why 60 FPS Is Still the Console Standard

Yoshi and the Mysterious Book (2026) – Full Completion Guide, Rewards & Secret Ending

How to Get Free Pets in Adopt Me: A Guide for Players

Roblox Username Generator – Create a Cool & Unique Username in Seconds
How to Get Free Pets in Adopt Me: A Guide for Players
Yoshi and the Mysterious Book (2026) – Full Completion Guide, Rewards & Secret Ending
Vampire Crawlers Coin Farming Guide


