Guide
How to Draw with Mouse in Google Docs
Word processing has never been easier than with Google Docs, a web-based word processor that has quickly become one of the company’s most popular products. This makes it simple for numerous users to collaborate remotely on projects while also providing a variety of ways for them to communicate with one another and exchange ideas. Because so many students use Google Docs, the company decided to incorporate a user-friendly drawing tool right into the platform itself. Utilizing this application, one can generate individualized drawings, infographics, graphs, and charts, amongst other visual representations. This tutorial will walk you through the steps of drawing in Google Docs using your mouse:
Read Also: How to Enable Google Docs Dark Mode on Mobile App
How to Draw with Mouse in Google Docs
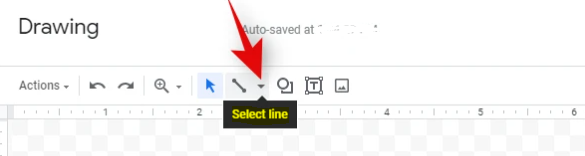
Using the line tool, you can write on your canvas and draw straight, curved, and skewed lines. The procedure is as follows. Insert a drawing into a document in the same manner that you would ordinarily. Now, instead of picking the line tool, you should hover over it, and when an arrow appears below it, click on it.
Pick one of these alternatives that works best for your drawing requirements.
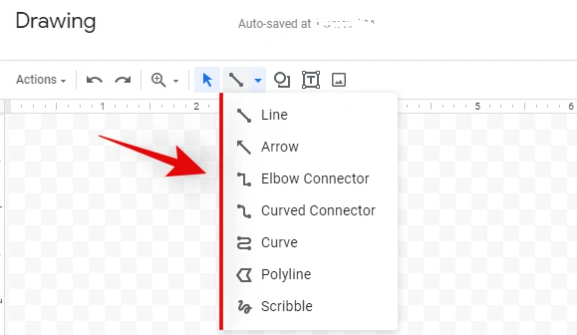
- Line: You will find that this makes it easier to create straight lines. Clicking from point A to point B in succession to create a line.
- Arrow: By selecting this option, you can more easily draw arrows in straight lines.
- Elbow Connector: By selecting this option, you will be able to design arrows with a curved line that connects at two right angles.
- Curved Connector: Another variety of arrows, this one characterised by the use of a curving line bent in two places rather than right angles to indicate direction.
- Curve: This feature allows you to draw curved lines on the screen according to your own specifications, as the name suggests. You can start sketching a line on the canvas by clicking once and then clicking again to add a point to your curve. Now, click once more to add a second curve, and then drag your cursor over the screen to create your curve. Adding many curves can be accomplished with a single click, and the sketching process can be terminated with two clicks.
- Polyline: Drawing polygons with polyline is the most effective method on the canvas. It is controlled exactly the same way as the curved line, except rather than introducing curves with every click, it introduces right angles.
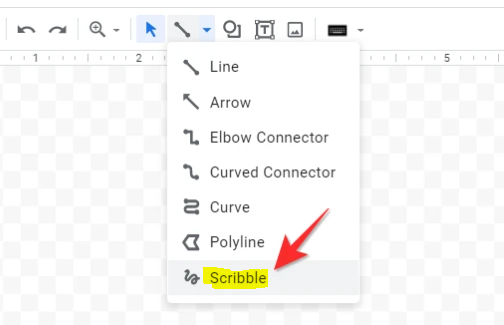
- Scribble: This tool enables you to freely sketch using your mouse, as its name suggests, so long as you have it. To draw, choose the scribble option and keep your left mouse button depressed.
Choose the Scribble option.
You can now sketch by making use of your mouse. Unfortunately, you cannot use a stylus or pen because Google Docs does not yet support those tools.
However, once you have drawn something, a new set of icons will show on the screen, and you may use those icons to modify the colour of what you have drawn, as well as its size, line type, arrow type, and other attributes. Make use of these five buttons to give your drawing some personal flair.

Alternative method for drawing using a pen or stylus in Google Docs
Drawings can be added to Google Docs using a feature called Google Drawings. Since Google Docs does not allow pen or graphic tablet inputs by default for drawings, it is not possible to draw freehand in Google Docs using either of those tools. The only other choice you have is to utilize the Scribble tool, which only accepts input from the mouse but provides you with sufficient leeway to create the majority of basic forms using freehand. You will need to purchase either an iPad Pro or a Surface tablet if you want to take advantage of the input provided by a stylus.
To draw freehand on the screen using touch inputs, you can use the scribble tool, which is available for usage on any touchscreen desktop device that supports touch input. This workaround does not provide correct results, but it is a significant improvement over the conventional mouse input supported by Google Docs.
It is important to keep in mind that if you are working on an iPad Pro, you will need to use the desktop browser version of Google Docs in order for this workaround to be successful. This is because the mobile app does not allow you to include Drawings in your document.
FAQs
Can I write with my mouse in Google Docs?
The handwriting input method enables you to directly jot down text using a trackpad or mouse. More than fifty different languages can be written by hand. The first thing you need to do if you want to use handwriting input is to enable the Input Tools.
Can I handwrite in Google Docs?
Launch any text field or application that allows you to type, such as Google Docs or Gmail. Enter your text into the box. The scratch pad for handwriting should display. In the event that you do not see Handwrite: hit the Right arrow at the top of the virtual keyboard, and then hit Handwrite when it appears.
What app can I use to draw on Google Docs?
You shouldn’t utilise the drawing tool in Google Docs if you wish to illustrate a more complex picture and include it in your document, because this will prevent you from doing so. Instead, launch a third-party application such as Microsoft Paint. In the event that you require additional functionality, excellent options include Corel, Krita, and Clip Studio Paint amongst others.
What is Google’s writing app called?
The online document editor known as Google Docs. Google’s online office space. An integrated suite of apps that are native to the cloud, are safe, and are designed for collaboration and productivity, driven by Google AI.

Vampire Crawlers Coin Farming Guide

Forza Horizon 6 Performance: Why 60 FPS Is Still the Console Standard

Yoshi and the Mysterious Book (2026) – Full Completion Guide, Rewards & Secret Ending

How to Get Free Pets in Adopt Me: A Guide for Players

Roblox Username Generator – Create a Cool & Unique Username in Seconds
How to Get Free Pets in Adopt Me: A Guide for Players

Grow a Garden Recipes in Roblox: Guide to Cook (Donuts, Sushi, Pie, Pizza & More!)
Roblox Username Generator – Create a Cool & Unique Username in Seconds
Yoshi and the Mysterious Book (2026) – Full Completion Guide, Rewards & Secret Ending


