Apple
How to Format an External Hard Drive for Mac

The vast majority of external hard drives are intended to function with Windows-based PCs alone. As a result, if you’re trying to connect an external hard drive to a Mac, you may need to format the drive first before it can be used. Here’s how you can go about it:
Read Also: How to Scan a Hard Drive Using ‘Error Checking’
How to Format a Hard Drive for Mac
1. Connect an external hard drive to your Mac and you’re good to go. Some external hard drives need that they be hooked into an electrical outlet in order to function.
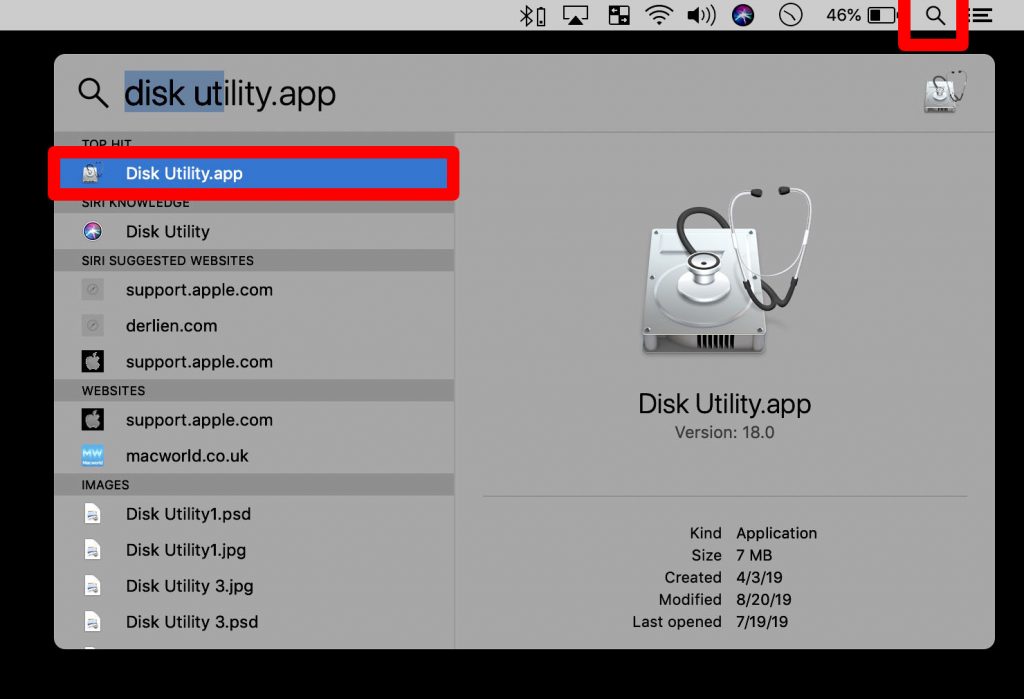
2. Disk Utility may be found by searching for it in Spotlight Search and selecting the first result. This will launch the Disk Utility application, which will allow you to see all of the internal and external discs that are currently linked to your Mac.
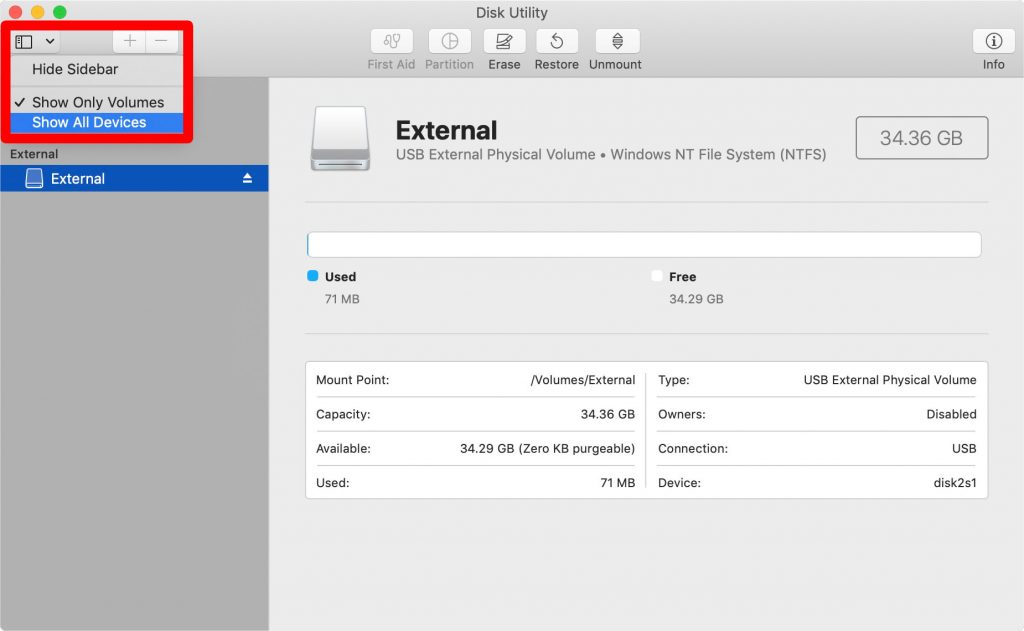
3. Then, in the top-left corner of the window, select Show All Devices from the View drop-down menu.
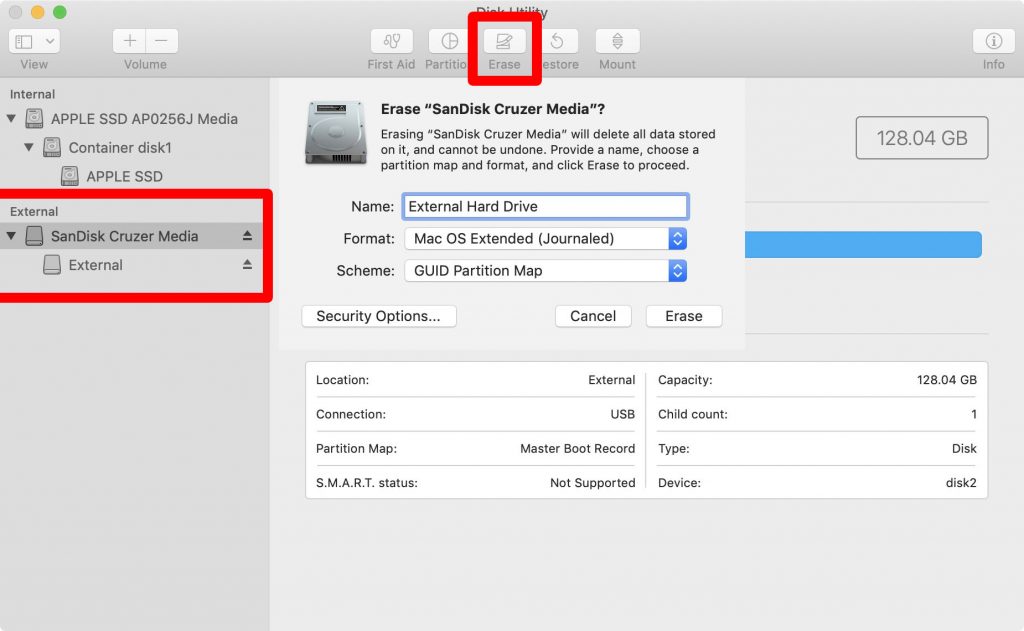
4. Select the external hard disc that you wish to format from the drop-down menu. External Hard Drives may be found on the left-hand side of the screen, in the “External” section. Selecting the disc will get the best results (the highest option in the external tree).
5. Erase may be found on the top menu. An informational pop-up box will appear, alerting you that deleting the disc would lose all data saved on it and that it will be impossible to recover your data.
6. Choose a name for your drive, as well as its format and colour scheme. You may give your partition whatever name you wish, but in most circumstances, you should use GUID Partition Map as the Scheme name instead. However, you have the option of selecting one of the following formats:
- Because it is compatible with all Macs, Mac OS Extended (Journaled) is the best choice for the vast majority of Mac users.
- It is only available on newer Macs running macOS 10.13 or later that support APFS (Apple File System).
exFAT is a file system that works on both PCs and Macs. - It is also possible to transfer files between Mac and PC using MS-DOS (FAT), however you can only transfer files that are less than 4GB in size.
7. When you’re through completing the configuration details, click Erase to close the window. This will completely erase the contents of the whole drive.
If you see an error message that indicates, “The erase procedure has failed,” follow the steps below. Don’t get too worked up over it; just click done to proceed.” This is a problem created by Time Machine, which is now operating on your external hard disc.
You will need to switch off Time Machine before continuing. If you click System Preferences and uncheck the item next to “Back up automatically,” you will be able to accomplish this. Then select Options from the drop-down option next to “Show Time Machine in menu bar.” This will open a new window for you. When you click Cancel, the Time Machine will be turned off.
Video
FAQs
Can any external hard drive be formatted for Mac?
Yes, connecting an external hard drive or USB flash key to a Mac will generally read and work fine as is because the Mac can easily read and write to a variety of filesystem formats, including Windows MSDOS, FAT, FAT32, ExFat, and NTFS formats. However, unless you intend to use the drive to transfer files between a Windows and a Mac machine, formatting it to be NTFS is recommended.
What is the best format for a Mac external hard drive?
If you need to format a disc, the ideal format to utilize is APFS or Mac OS Extended (Journaled) for the greatest overall performance. If your Mac is running macOS Mojave or later, the APFS file system should be used. Remember that if you format a disc, all of the data on the volume is erased, so make a backup if you wish to save the information.

Vampire Crawlers Coin Farming Guide

Forza Horizon 6 Performance: Why 60 FPS Is Still the Console Standard

Yoshi and the Mysterious Book (2026) – Full Completion Guide, Rewards & Secret Ending

How to Get Free Pets in Adopt Me: A Guide for Players

Roblox Username Generator – Create a Cool & Unique Username in Seconds
How to Get Free Pets in Adopt Me: A Guide for Players

Grow a Garden Recipes in Roblox: Guide to Cook (Donuts, Sushi, Pie, Pizza & More!)
Roblox Username Generator – Create a Cool & Unique Username in Seconds
Yoshi and the Mysterious Book (2026) – Full Completion Guide, Rewards & Secret Ending


