Guide
How to Insert a Check Box in Microsoft Word

We live in a world where checklists and checkboxes are commonplace, so it stands to reason that you would wish to incorporate checkboxes in the papers you prepare from time to time.
The checkboxes you can create in Microsoft Word are divided into two categories. The first category is decorative checkboxes, which can be checked off in real life with a pen or pencil; the second category is functional checkboxes, which users can check off with a mouse click if they’re viewing the document on a computer.
Read Also: How to Double Space in Microsoft Word
How to Insert a Checkbox in Word for Printed Documents
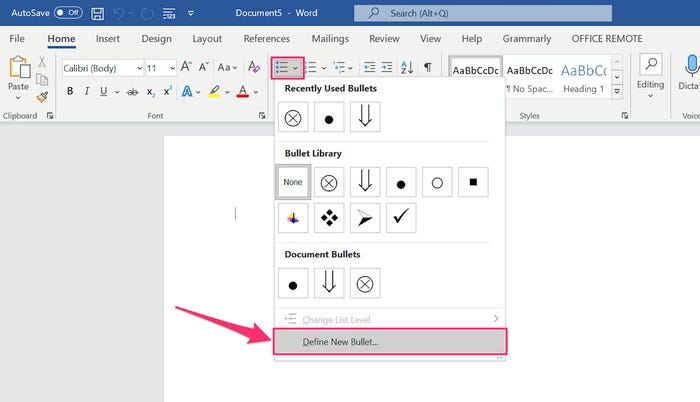
1. Start by placing the cursor where you want the checkbox to appear in your Microsoft Word document.
2. Ensure that the “Home” tab is selected on the ribbon at the top of the screen, and then click the down-arrow next to the Bullets button.
3. In the drop-down option that appears, select “Define New Bullet.”
4. Select the “Symbol” option.
5. Choose a symbol that resembles a checkbox from within the Symbol dialogue box. There are a variety of alternatives to consider, but the following is an excellent starting point: When prompted, select “Wingdings 2” from the “Font” drop-down menu, and then enter “163” in the “Character code” field. If this is an option you prefer, select “OK.”
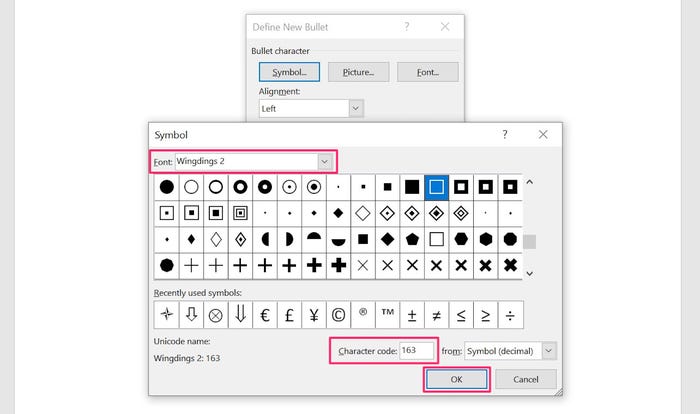
6. Click “OK” once more to shut the other window that was previously opened.
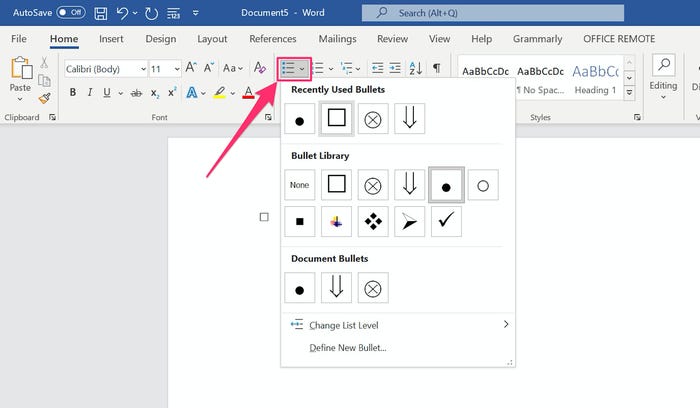
7. Adding the checkbox to your document will complete the process.
To add additional checkboxes, simply click on the Bullet button, and they will be added immediately (to get your usual bullet back, click the down-arrow next to the Bullet button and choose the symbol you prefer). In the future, you will be able to pick either the standard bullet or the checkbox from the drop-down menu, rather than having to do it from the “Define New Bullet” dialogue box.
How to Insert a Checkbox in Word for Electronic Documents
When creating electronic documents, you’ll need to activate the Developer ribbon in the Options menu if you want the checkbox to be “clickable.” After that, you’ll only have to do it once, and you’ll be able to add a working checkbox whenever you want.
1. Select the “File” tab in the top-right corner of Word’s ribbon, and then click “Options.”

2. In the Word “Options” dialogue box, select “Customize Ribbon” from the navigation pane on the left side of the screen.
3. Select “Main Tabs” from the drop-down menu on the right and then select “Developer” from the drop-down list in the “Customize the Ribbon” section on the right.
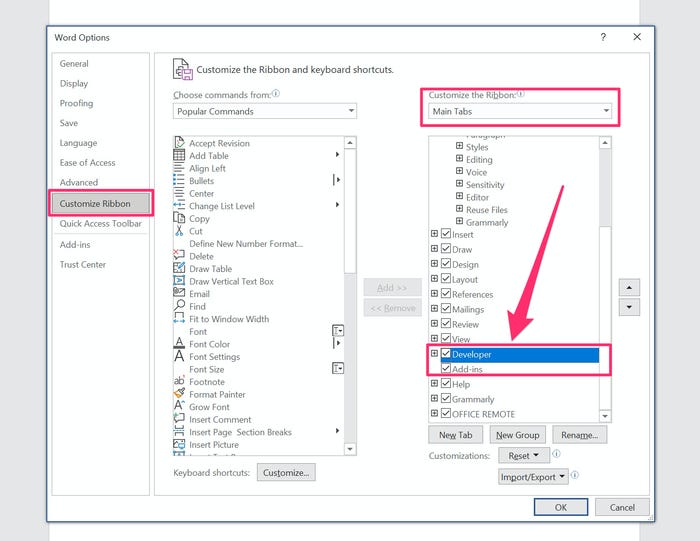
4. To close Word Options, click the “OK” button.
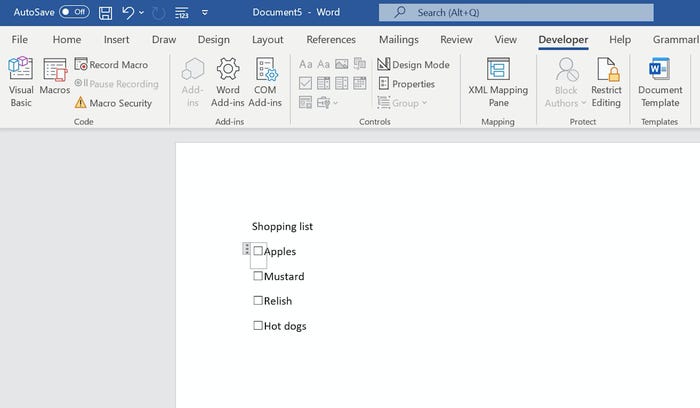
5. In the ribbon, select the new “Developer” tab from the drop-down menu.
6. Select the checkbox icon in the “Controls” area of the window. It should appear in the document, as you expect. Clicking on it will make it seem checked or unchecked, depending on your preference.
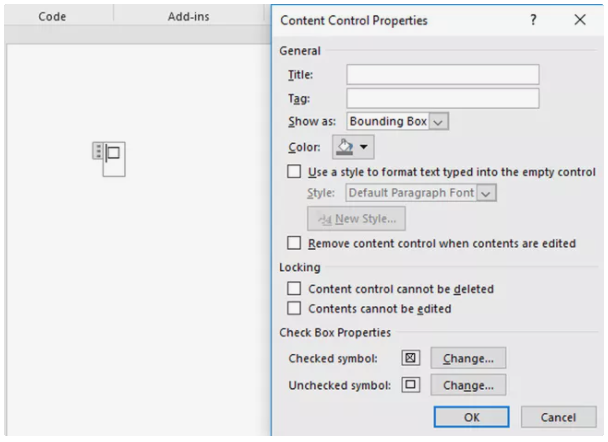
How to Change the Check Box Symbol
When someone clicks on the check box, an X appears in the check box by default. This symbol, as well as several other characteristics of the new check box, may be customized. Select it and then Properties from the drop-down menu. You may customise the appearance of both checked and unchecked symbols, as well as the behaviour of the check box itself when it is used within an electronic document, through this menu.
Video

Vampire Crawlers Coin Farming Guide

Forza Horizon 6 Performance: Why 60 FPS Is Still the Console Standard

Yoshi and the Mysterious Book (2026) – Full Completion Guide, Rewards & Secret Ending

How to Get Free Pets in Adopt Me: A Guide for Players

Roblox Username Generator – Create a Cool & Unique Username in Seconds
How to Get Free Pets in Adopt Me: A Guide for Players
Yoshi and the Mysterious Book (2026) – Full Completion Guide, Rewards & Secret Ending
Forza Horizon 6 Performance: Why 60 FPS Is Still the Console Standard


