Guide
How to Compress Files to a ZIP Archive in Windows

“Zipping” is the process of combining numerous files into a single file-like folder with the.zip file extension on the Windows operating system. It opens like a folder, but it behaves more like a file in that it is a single object rather than a folder. It also has the capability of compressing files in order to conserve disc space. On this tutorial, you will learn how to generate a ZIP file in Windows 10, 8, and 7.
Read Also: How to Transfer Files from SSD to HDD in Windows
How to Compress Files to a ZIP Archive in Windows
File Explorer, which is included with Windows, makes it simple to compress files. Here’s how it’s done:
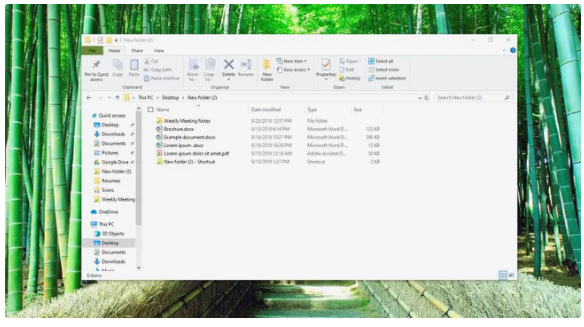
1. Navigate to the location of the files or folders that you want to combine into a ZIP file by using File Explorer (Windows). These files can be found everywhere on your computer, including on external and internal hard drives, and can be accessed by anybody.
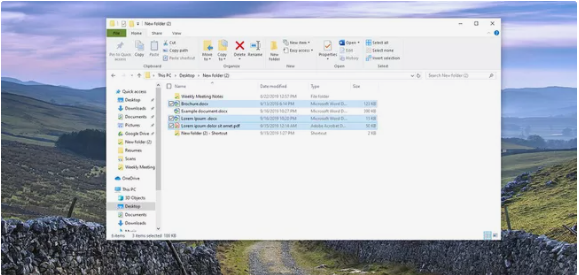
2. Choosy the files you wish to compress and click on them. The keyboard shortcut Ctrl+A may be used to select all of the files in a folder so that they can be zipped together in a single place.
To choose several things that are not all in the same place, press and hold the left mouse button while dragging it over all of the objects you wish to select. The products you’ve selected will be surrounded by a light-blue box, as shown above.
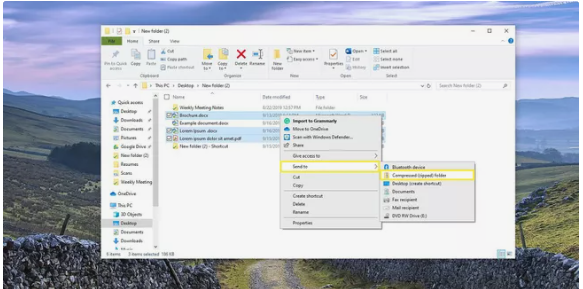
3. Once you’ve picked your files, right-click on one of them to bring up an options menu for that file. Select Send to > Compressed (zipped) folder from the drop-down menu.
If you’re delivering all of the files in a certain folder, another alternative is to just choose the full folder from the drop-down menu. For example, if the folder structure is Documents > Email items > Stuff to send, you may navigate to the Email items folder and right-click Stuff to send to create a ZIP file from the folder structure.
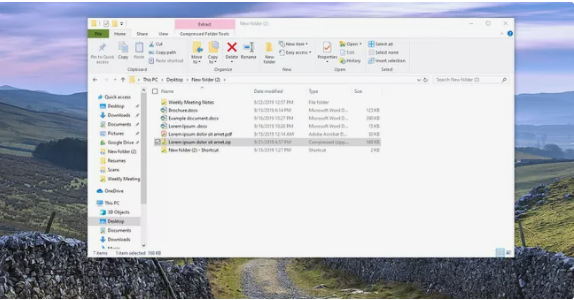
4. Once you have zipped the files, a new folder will appear next to the original collection with a large zipper on it, showing that it has been successfully compressed. It will automatically utilize the name of the last file you zipped as the name of the new file.
You have the option of keeping the name as is or changing it to something else. Rename the ZIP file by selecting it with the right-click menu.
Once completed, the file is ready to be sent to a third party, copied to another hard drive, or stored in your preferred cloud storage service account. One of the most effective applications of zipping files is to compress large images for transmission through email or upload to a website, among other things.
Video
FAQs
What is the fastest way to zip large files?
Right-click the file and select Send to, followed by Compressed (zipped) folder from the drop-down menu. After being compressed into a ZIP file, the size of most files will decrease by anywhere from 10 to 75 percent, depending on how much accessible space there is inside the file contents for the compression algorithm to work its magic.
Why is my ZIP file not compressing?
Again, if you make Zip files and then discover that some of the files cannot be extensively compressed, it is likely that the files already contain compressed data or that they are protected by encryption. If you want to send a file or a collection of files that do not compress properly, you could: Email photographs that have been zipped and resized.

Roblox Username Generator – Create a Cool & Unique Username in Seconds

Grow a Garden Recipes in Roblox: Guide to Cook (Donuts, Sushi, Pie, Pizza & More!)

Job Opportunities in Dubai – 2026

Mr Bit at the SBC Awards Europe 2025: The Bulgarian Brand Setting New Standards in the European Gaming Industry

Dennis Rodman Net Worth 2026 – Everything You Need to Know

Bloxburg Neighborhood Codes 2026
Grow a Garden Recipes in Roblox: Guide to Cook (Donuts, Sushi, Pie, Pizza & More!)
Job Opportunities in Dubai – 2026
Dennis Rodman Net Worth 2026 – Everything You Need to Know


